
Considering using WP Rocket to speed up your WordPress site?
When it comes to WordPress performance plugins, WP Rocket is one of the best-known options. And that’s for a good reason – it’s a really great tool for speeding up your site.
We ran a test for this review and we found that it cut our site’s fully loaded times by 44-61%, which is pretty impressive and important when you consider that page load times affect everything from SEO to bounce rates, conversion rates, user experience, and more.
But is it the right plugin for your site and your unique situation? Well, that’s one of the questions that we’re going to answer in our WP Rocket review.
Here’s everything that we’re going to cover:
- A quick overview of WP Rocket’s features just to set the stage.
- Our own performance tests to see a before/after with WP Rocket.
- A step-by-step tutorial to configure the best WP Rocket settings.
- Our thoughts on whether WP Rocket is worth the money.
Let’s get started!
WP Rocket Review: What Does It Do?
We don’t want to spend too long here because you can find all of this on the WP Rocket site, but the quick version is that WP Rocket is a full-service WordPress performance plugin.
It aims to offer pretty much everything you need to create a quick-loading WordPress site in one simple package.
The “core” feature is page caching. But WP Rocket is a lot more than just another page caching plugin. It also handles:
- Browser caching.
- Gzip compression.
- Code optimization (HTML, CSS, and JavaScript) – you get a lot of different options here including minification, combination, and more.
- Media optimization – speed up your images and videos.
- Database cleaning.
- CDN integration.
- Various minor performance tweaks – e.g. adjusting the Heartbeat API and disabling embeds.
It’s also highly configurable and you’ll get lots of advanced options to control exactly how your caching functions, including a flexible cache preload option.
WP Rocket also includes some unique features that you won’t find in other WordPress performance plugins, which I think is one area where it differentiates itself.
One of the most interesting features is its new Remove Unused CSS option, which lets you scan your site and remove unnecessary CSS on a page-by-page basis. In my testing, I’ve regularly seen reductions of ~80-250 KB in page size (depending on your theme/plugins) just from this feature alone.
It also includes other features to automatically inline critical CSS and delay loading JavaScript.
Overall, the WP Rocket team is always pushing things forward with new and unique features to speed up your site, which is one of the best things about the plugin.
WP Rocket Review: Testing the Performance
Now, let’s run some performance tests to see just how much WP Rocket can speed up a WordPress site. After all, this is the most meaningful question in our WP Rocket review.
To assess this, I set up a realistic WordPress site powered by the Astra theme (our review) and one of its Elementor demo sites. This is a full website, just like the website you might be installing WP Rocket on.
My website is hosted on a droplet from DigitalOcean, which is pretty speedy hosting just by itself. If you’re hosting on cheap shared hosting, you’ll probably see even better improvements than this test.
To collect the data, I’ll use WebPageTest to run tests in two scenarios:
- Desktop – Chrome browser with a throttled FIOS connection speed (a decent but not fast connection).
- Mobile – a simulated Moto G4 device with a throttled 4G connection to simulate someone browsing while not connected to WIFI.
I’ll configure WebPageTest to run nine separate tests and take the median value. Then, I’ll test before WP Rocket and after installing/configuring WP Rocket using the recommended settings from our tutorial below.
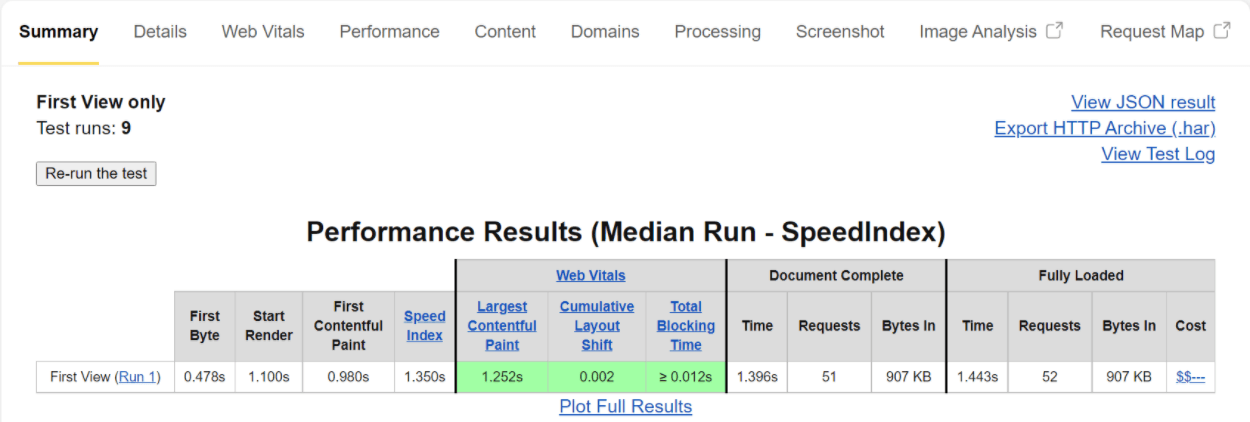
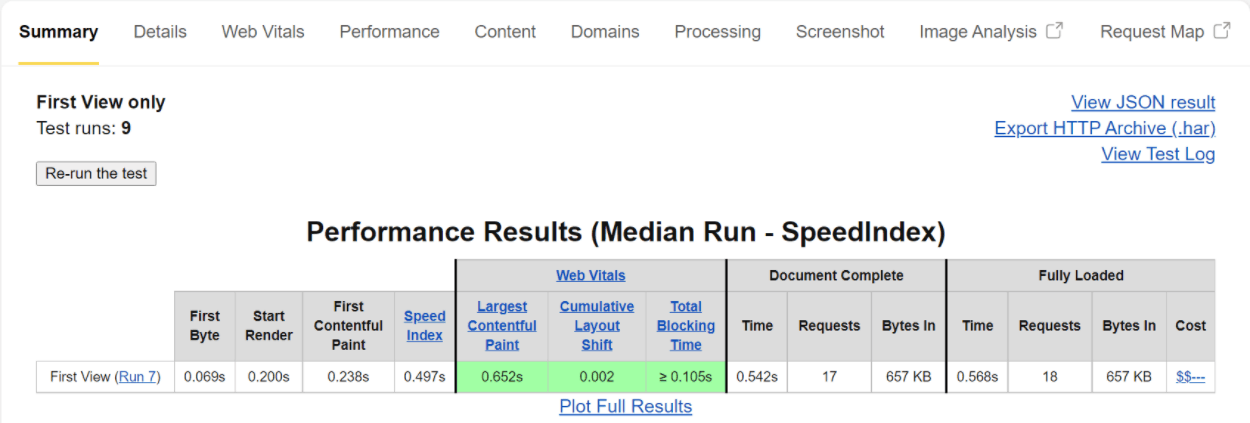
Desktop Test
| LCP | Fully Loaded | Size | HTTP Requests | |
| NO WP Rocket | 1.252 s | 1.443 s | 907 KB | 52 |
| 🚀 With WP Rocket | 0.652 s | 0.568 s | 657 KB | 18 |
| ⬇️ Decrease | ⬇️ 48% | ⬇️ 61% | ⬇️ 250 KB | ⬇️ 34 |
LCP = Largest Contentful Paint, one of Google’s new Core Web Vitals metrics
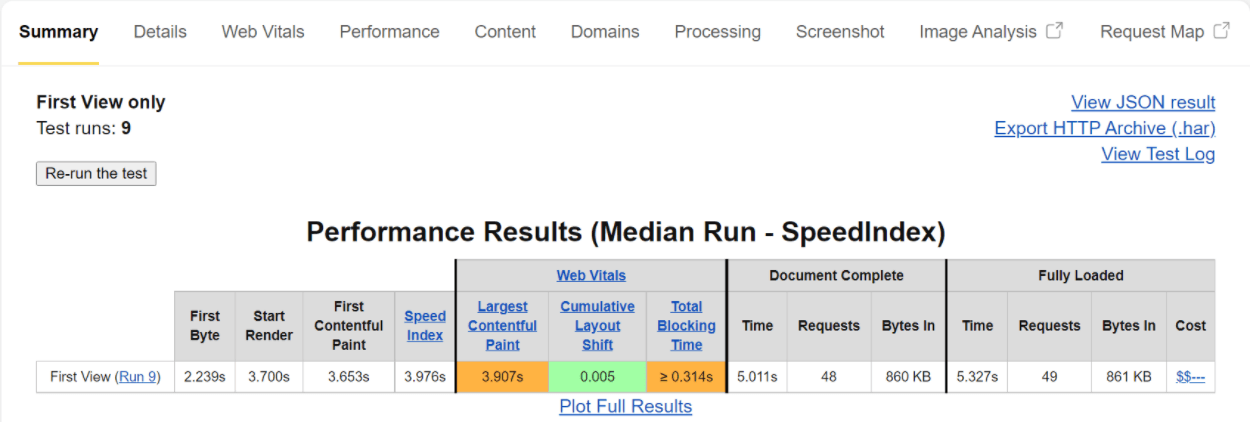
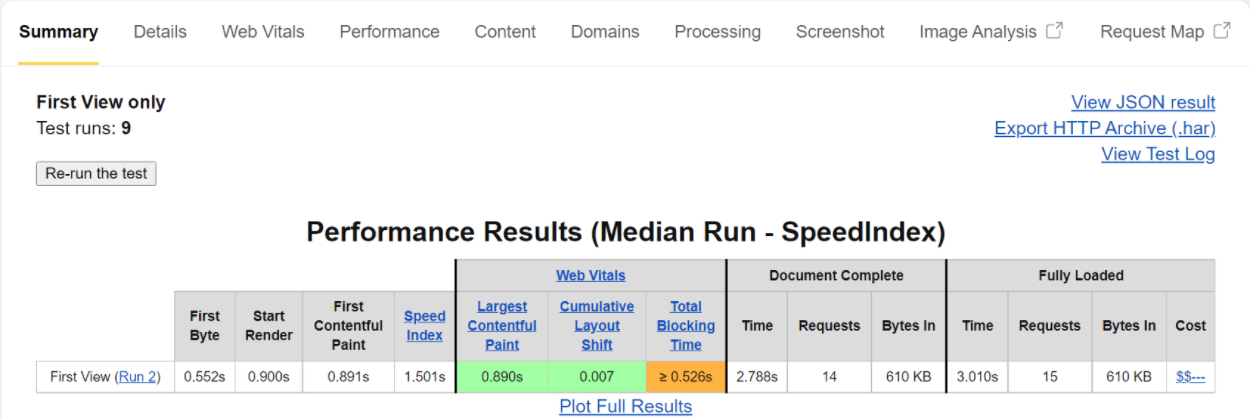
Mobile Test
| LCP | Fully Loaded | Size | HTTP Requests | |
| NO WP Rocket | 3.907 s | 5.327 s | 861 KB | 49 |
| 🚀 With WP Rocket | 0.890 s | 3.010 s | 610 KB | 15 |
| ⬇️ Decrease | ⬇️ 77% | ⬇️ 44% | ⬇️ 251 KB | ⬇️ 34 |
WP Rocket Review: Performance Conclusions
The numbers pretty much speak for themselves in the example above:
- Desktop LCP decreased by 48%.
- Desktop fully loaded time decreased by 61%.
- Mobile LCP decreased by 77%.
- Mobile fully loaded time decreased by 44%.
Beyond the huge improvement to page load times, you can see a big reduction in the size of the page, a lot of which comes from the new remove unused CSS and delay JavaScript loading features. Most other WordPress performance plugins won’t be able to achieve such a big reduction in page size because they don’t have these features.
Basically, WP Rocket can make your site load a lot faster. So now, let’s talk about the other stuff, like how you can configure WP Rocket for optimal results and whether WP Rocket offers good value from a pricing perspective.
Best WP Rocket Settings: How to Configure WP Rocket
Now that I’ve shown you the performance data from our WP Rocket review, let’s take a deeper look at the features and go over the optimal WP Rocket settings to achieve the benefits from above.
This section will accomplish two things:
- You’ll learn how WP Rocket works and all the different features it offers.
- If you do decide to purchase WP Rocket, you can follow this tutorial to configure it on your site.
WP Rocket Automatically Activates Core Features
First off, as soon as you activate WP Rocket, it will automatically activate some core features. These include:
- Page caching
- Browser caching
- GZIP compression
- Cross-origin support for web fonts
- Auto-detection to work with popular plugins (like WooCommerce)
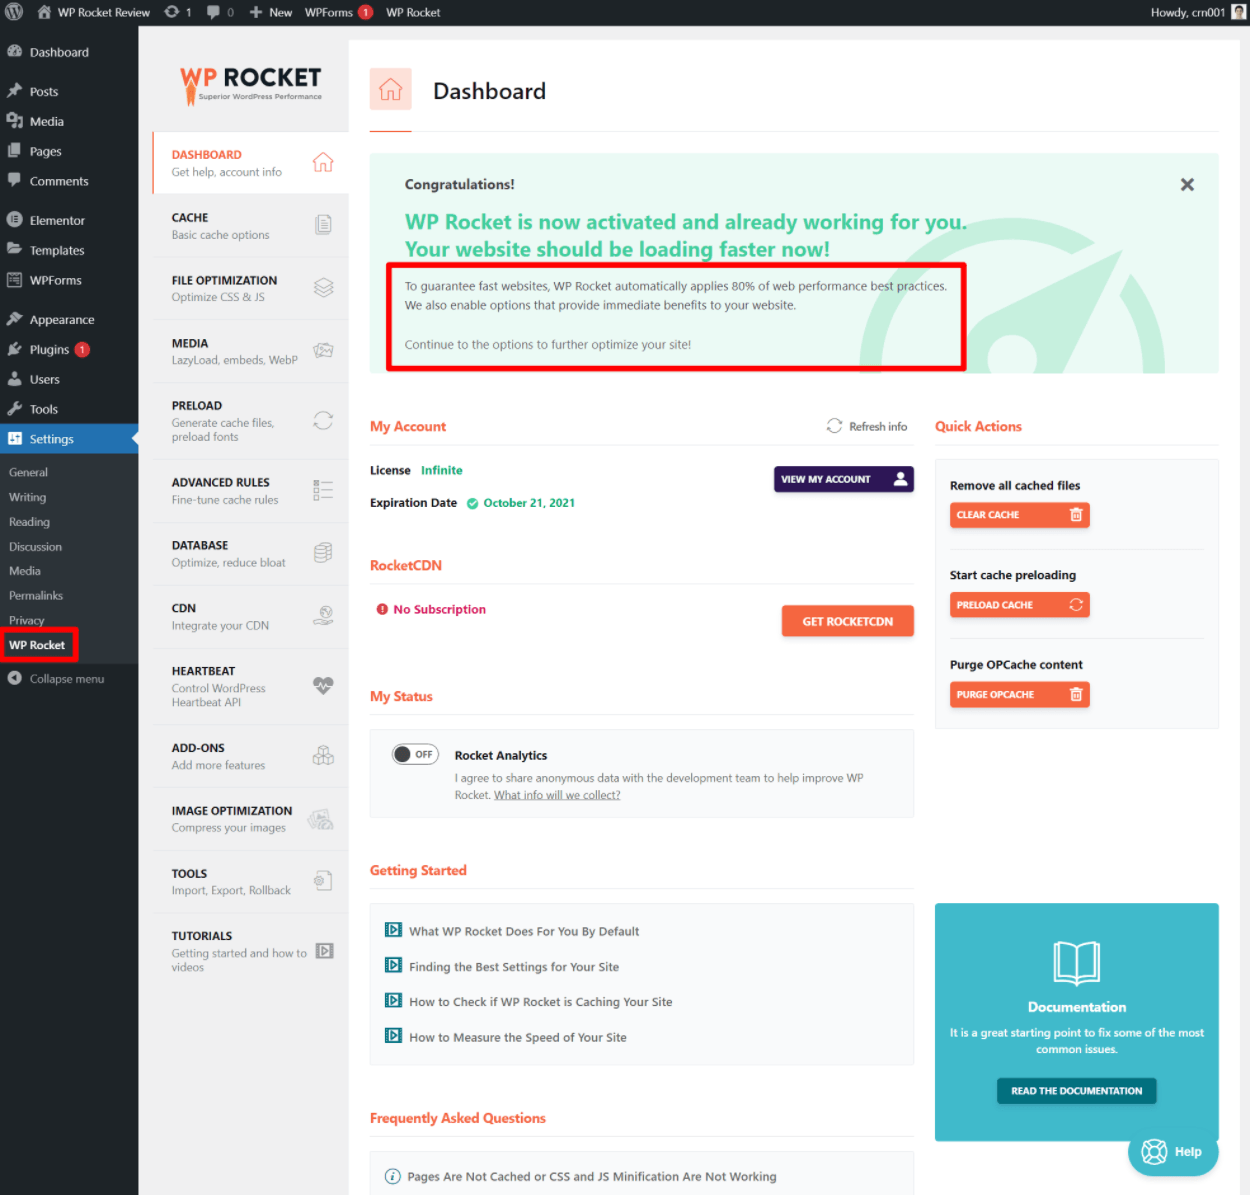
However, to get the most from WP Rocket, you’ll want to further configure its settings, which you can access by going to Settings → WP Rocket.
Let’s go through each tab in the WP Rocket settings…
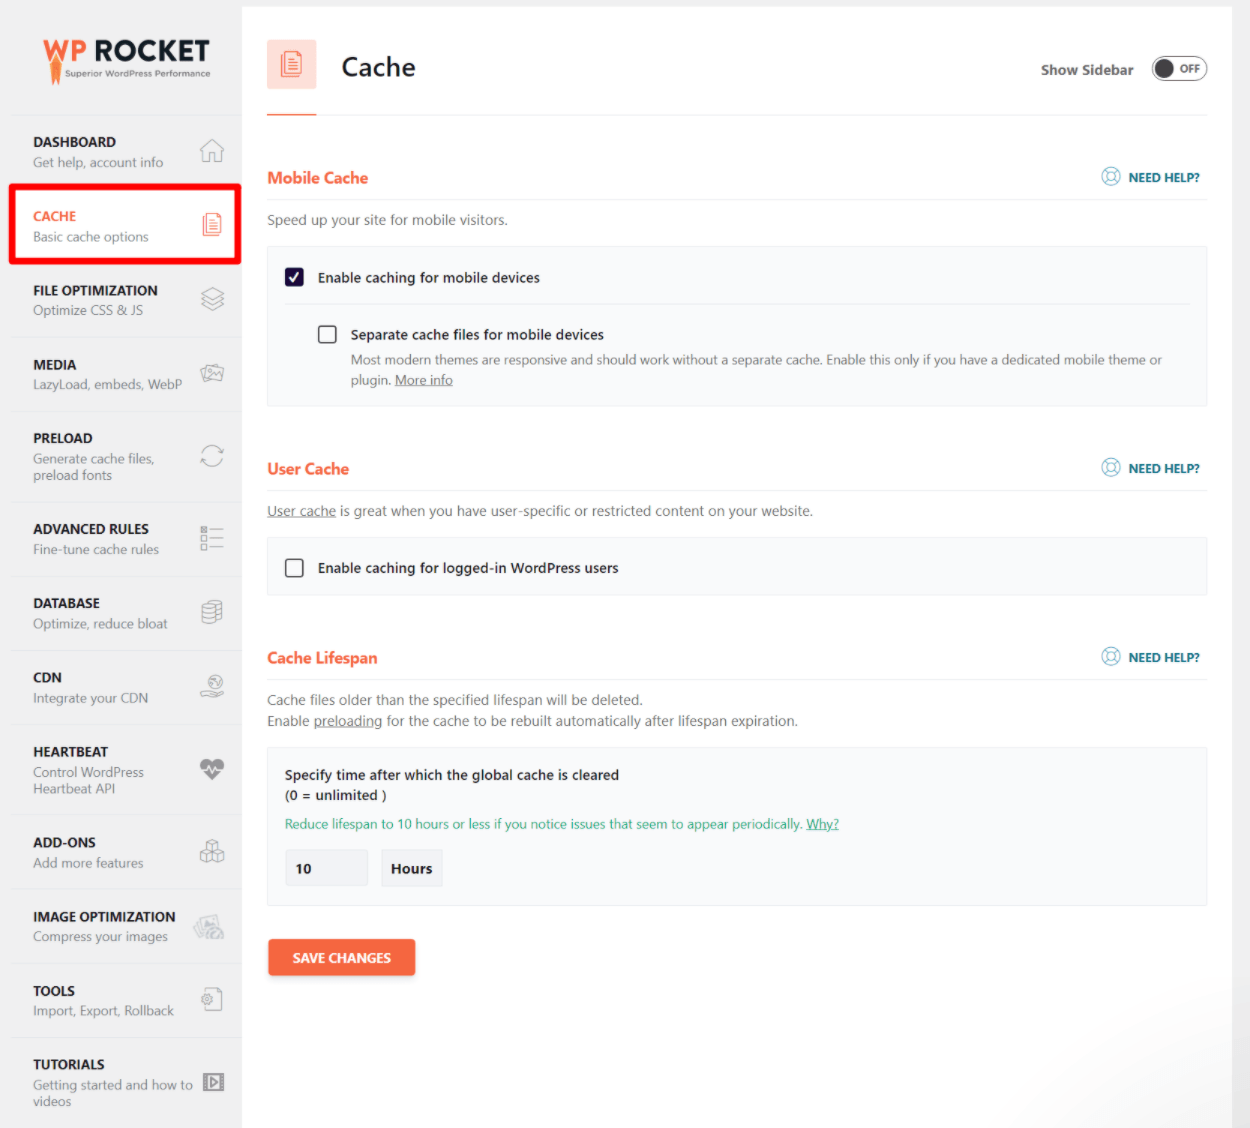
Cache
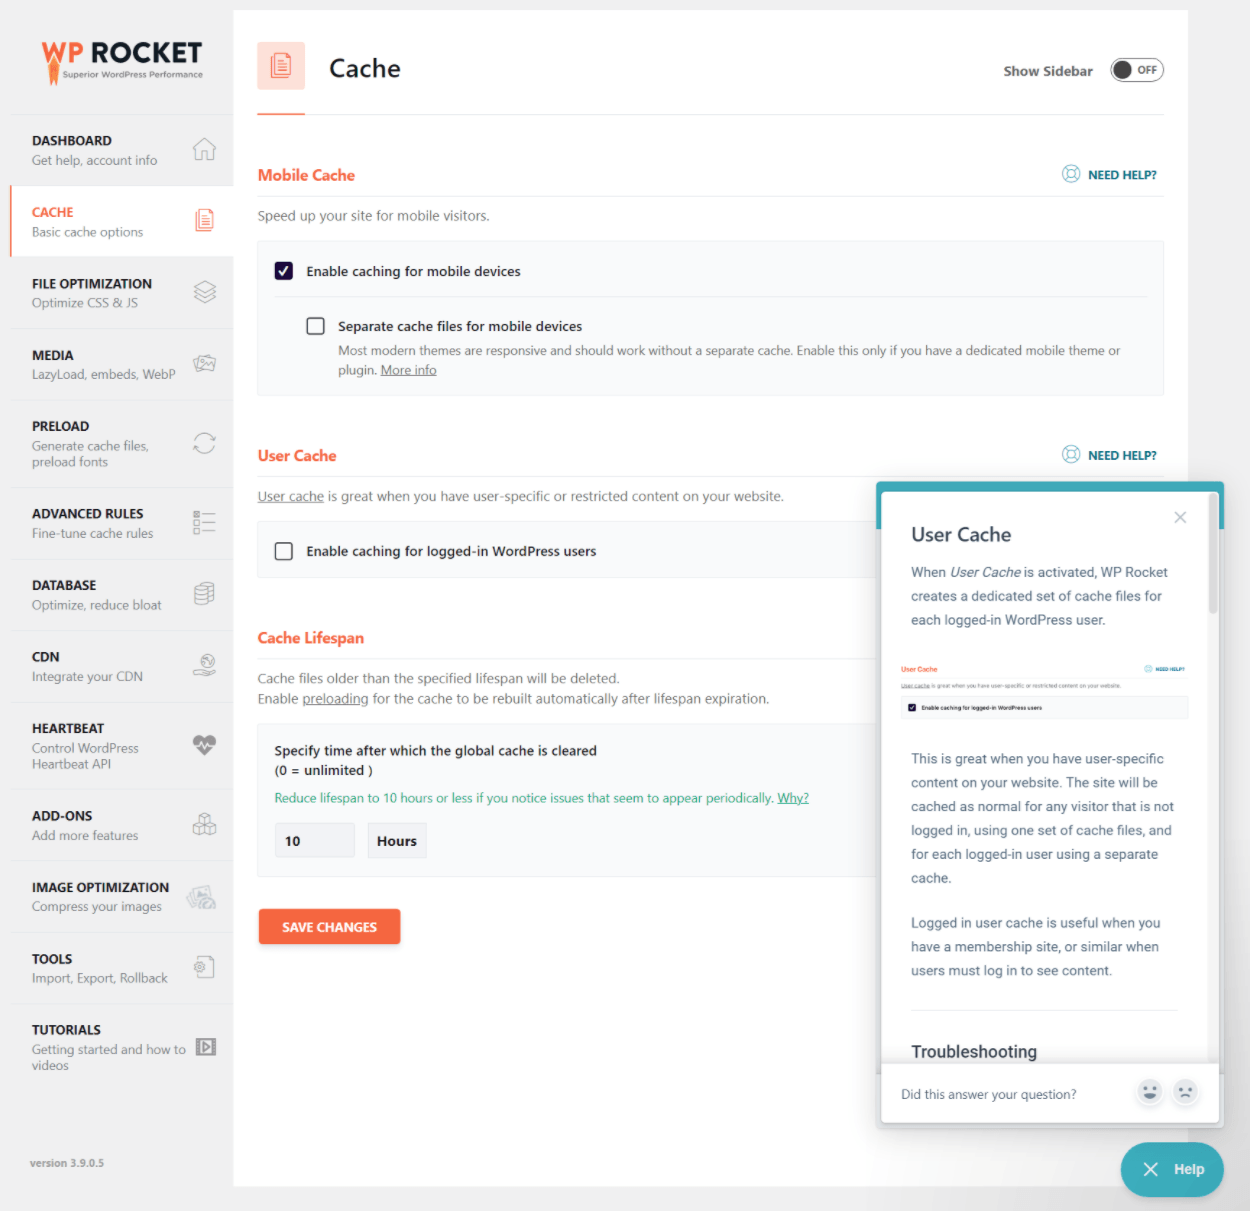
The Cache tab gives you more control over how page caching functions. On most sites, you can leave these as the defaults.
If your site offers separate features to mobile users (like a special toolbar loaded via JavaScript), you might want to enable separate caching for mobile devices. Otherwise, you can leave it disabled. You do want to enable caching for mobile devices, though.
The User cache is useful if you have user-specific or restricted content on your site, like a membership site or online course. With this feature activated, WP Rocket will create a separate cache for each user, which means that users will still always see the proper content. If you don’t allow user registration, you should leave this disabled.
Finally, you can adjust the cache lifespan. If you don’t change your site very often, you can make it longer (or even unlimited). Otherwise, the default is a good choice.
I will point out one specific thing I love about WP Rocket here. This applies to all sections, but I just want to highlight it early on.
If you’re ever confused about what a certain setting does, you can click the Need Help? link to open up an “instant answers” interface without leaving your dashboard.
For example, let’s say you’re confused about user caching. If you click Need Help, you’ll see some articles related to it:
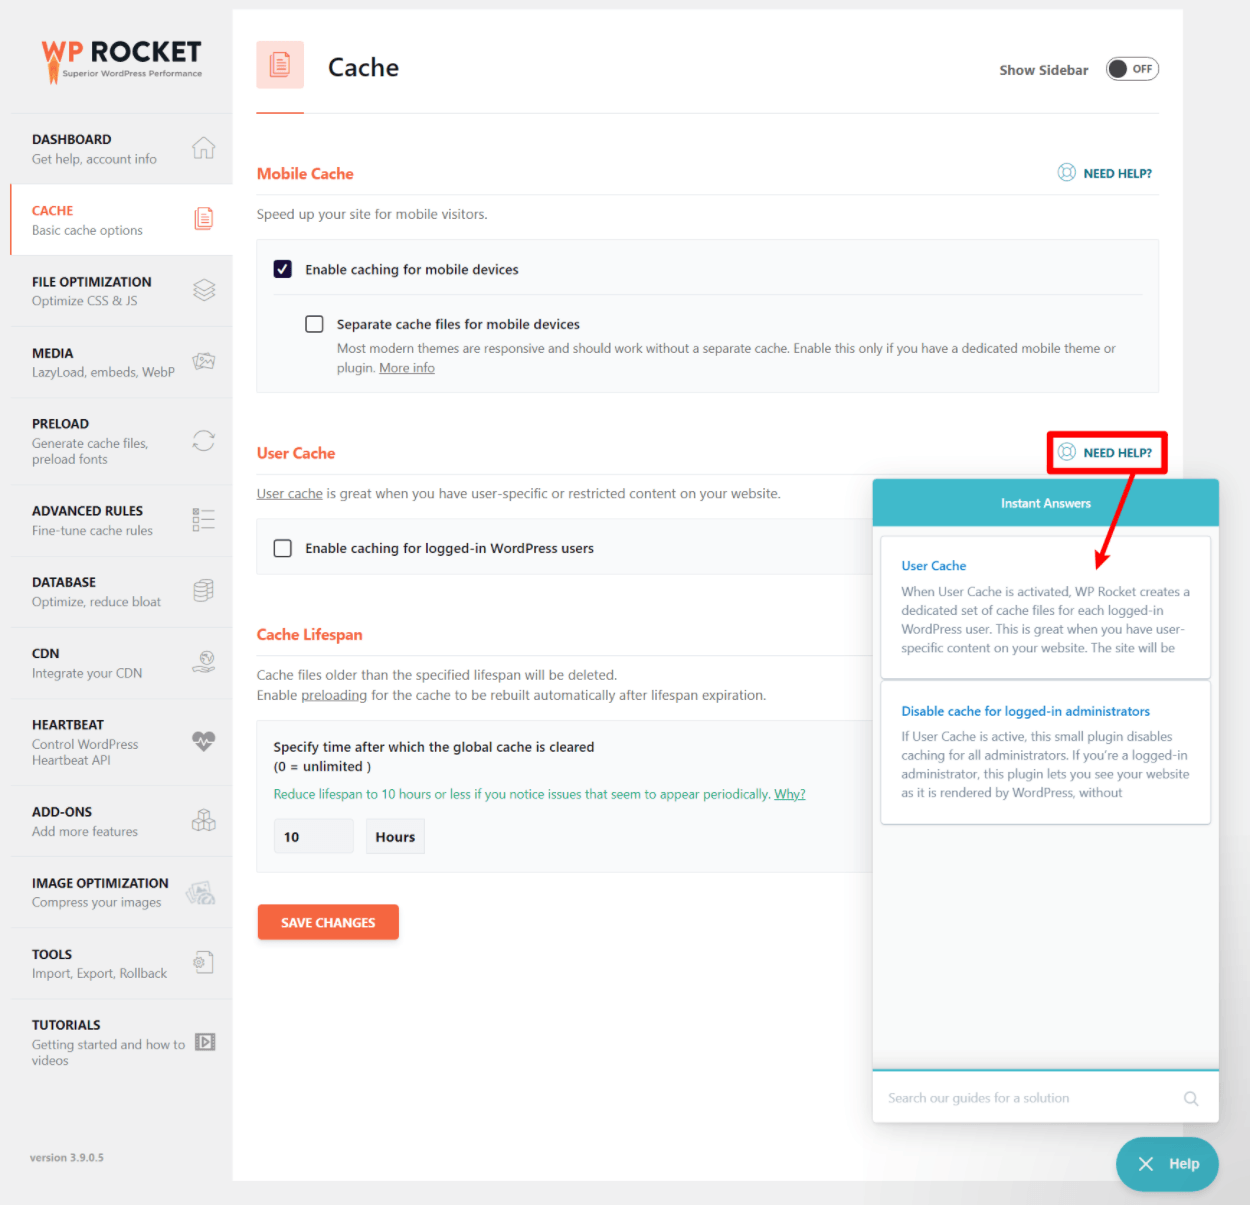
If you select the user cache article, you can see the full text without leaving your dashboard:
I think these user-friendly touches are one of the best parts of WP Rocket – they make it super easy to understand each setting and configure your site.
File Optimization
The File Optimization tab includes a bunch of features to optimize your site’s CSS and JavaScript code.
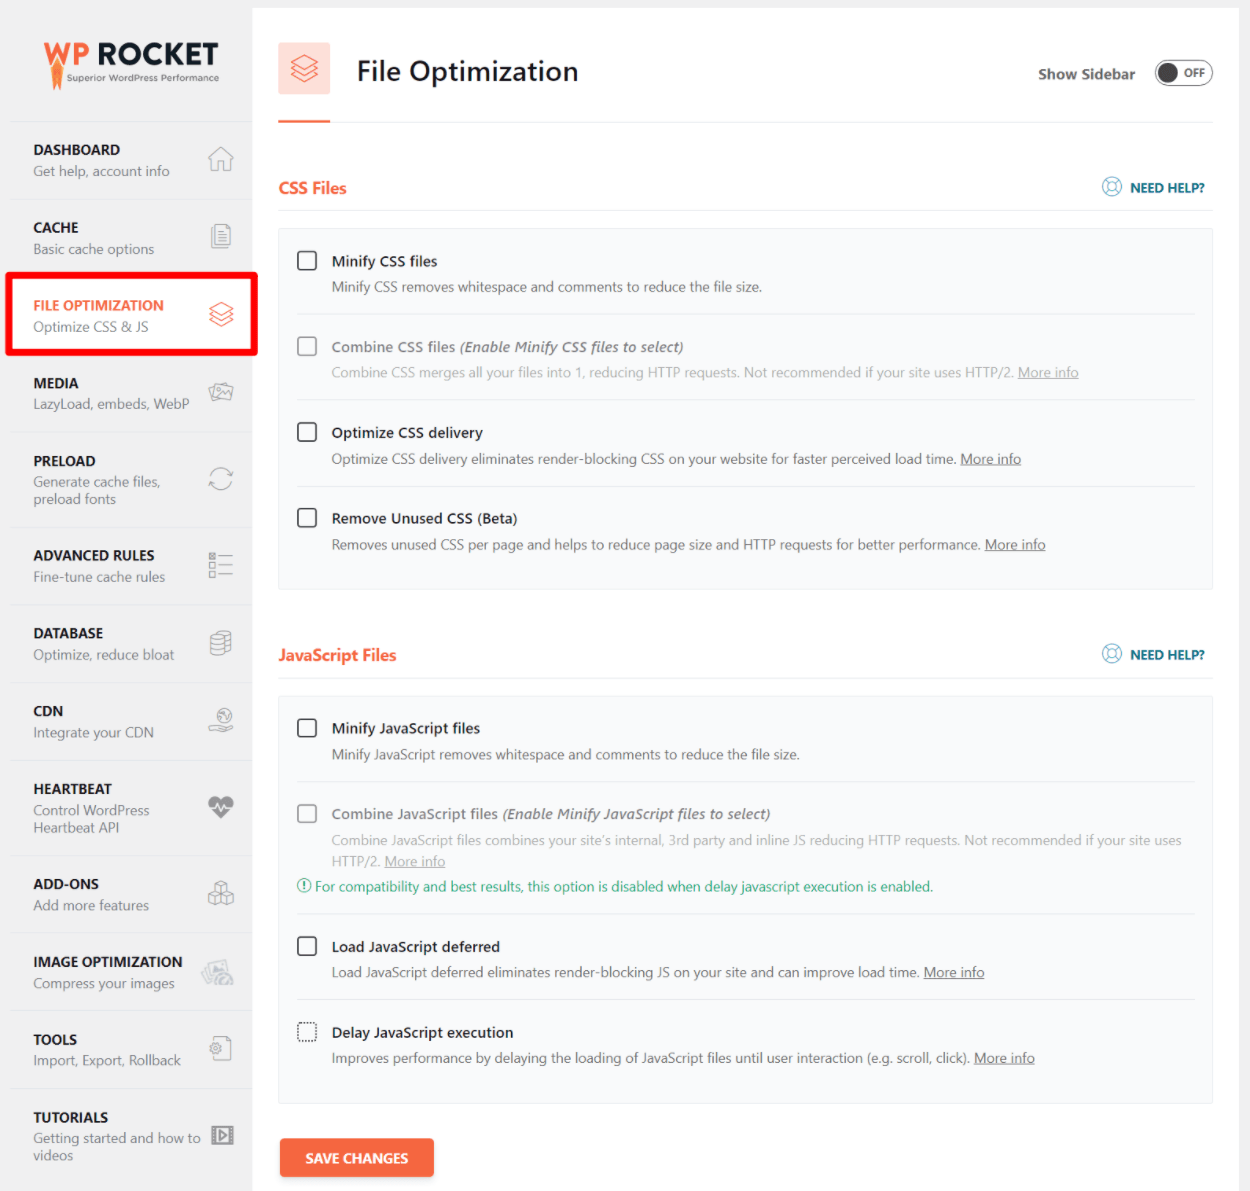
You get two core options:
- Minify – removes unnecessary characters/white space to shrink the size of files.
- Combine – combines separate files into one to reduce HTTP requests.
And then you get some unique options that most other performance plugins don’t offer:
- Optimize CSS Delivery – WP Rocket will scan your pages to generate inline critical CSS to avoid render-blocking CSS issues.
- Remove Unused CSS – WP Rocket will scan each page on your site to remove unused CSS. I’ve tested this with a few themes and you can usually remove 100+ KB from the size of a page – really awesome!
- Delay JavaScript execution – delays loading JavaScript files until a user interacts with the page.
Here’s how I recommend configuring this:
Enable all of the options in the CSS section:
- Minify CSS files
- Combine CSS files
- Optimize CSS delivery
- Remove unused CSS
And enable these options in the JavaScript section:
- Minify JavaScript files
- Load JavaScript deferred
- Delay JavaScript execution
However, of all the WP Rocket settings, these settings have the most chance to mess up something on your site, which WP Rocket will warn you about when you activate them.
For that reason, I recommend testing your site right after you enable them. If something looks off, you can just come back and disable the features to find the one that’s causing problems.
Typically, the issue will come from combining CSS files or optimizing CSS delivery, so I would check there first.
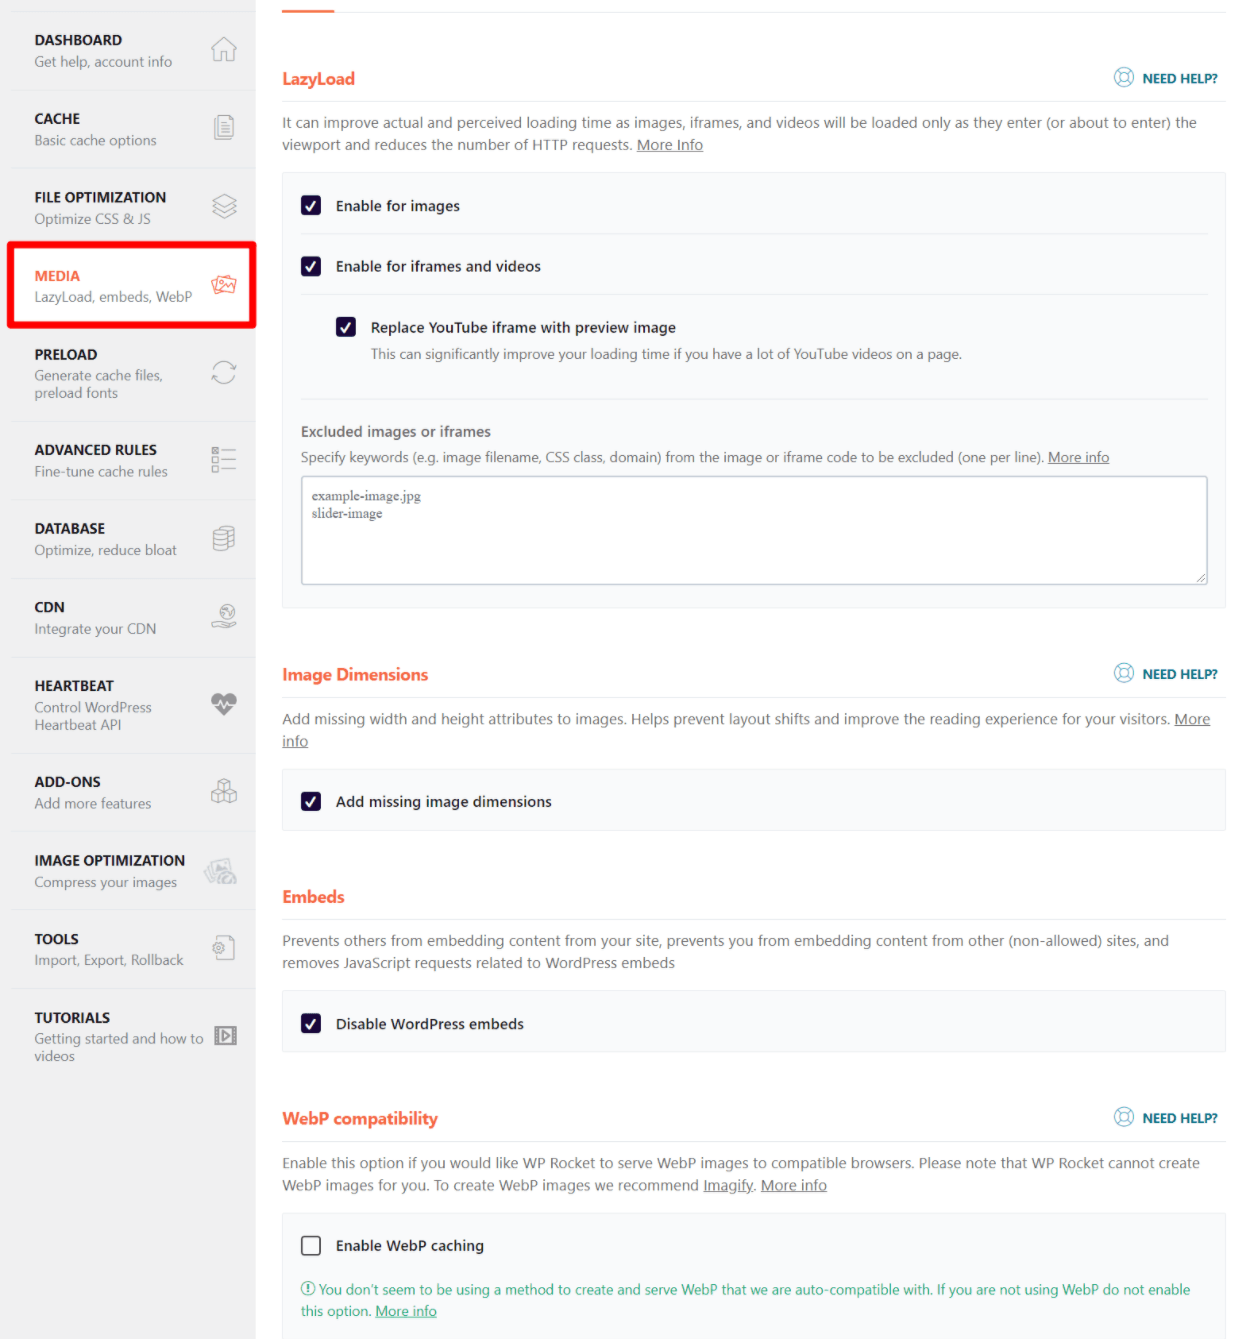
Media
The Media tab helps you optimize your site’s images and videos. You can lazy load both images and videos. For YouTube embeds, there’s a great feature that lets you replace the YouTube embed with a static image thumbnail until a visitor clicks to play the video.
I recommend enabling all of the options except for WebP compatibility, which most sites won’t need:
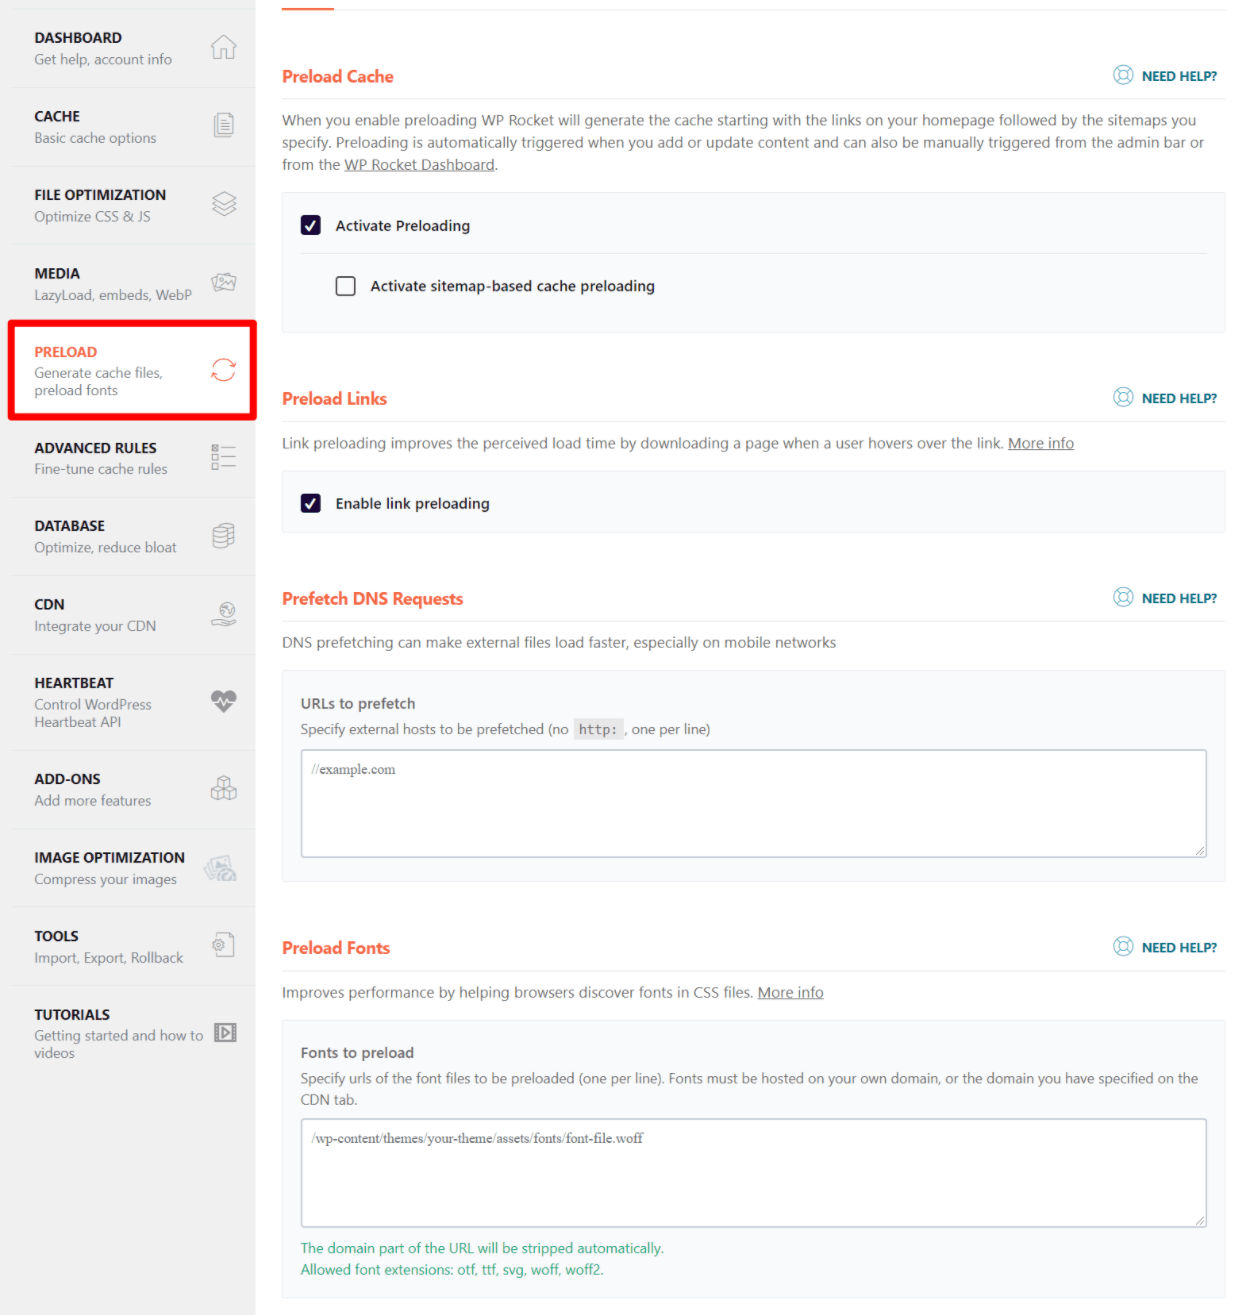
Preload
With preloading, WP Rocket lets you “preload” pages into the cache without waiting for a user to visit (which is how most cache plugins work). This is useful for ensuring that all of your site’s visitors experience fast, cached pages.
For most sites, though, you can just leave all of these settings as the defaults – I don’t recommend changing anything unless you know what you’re doing:
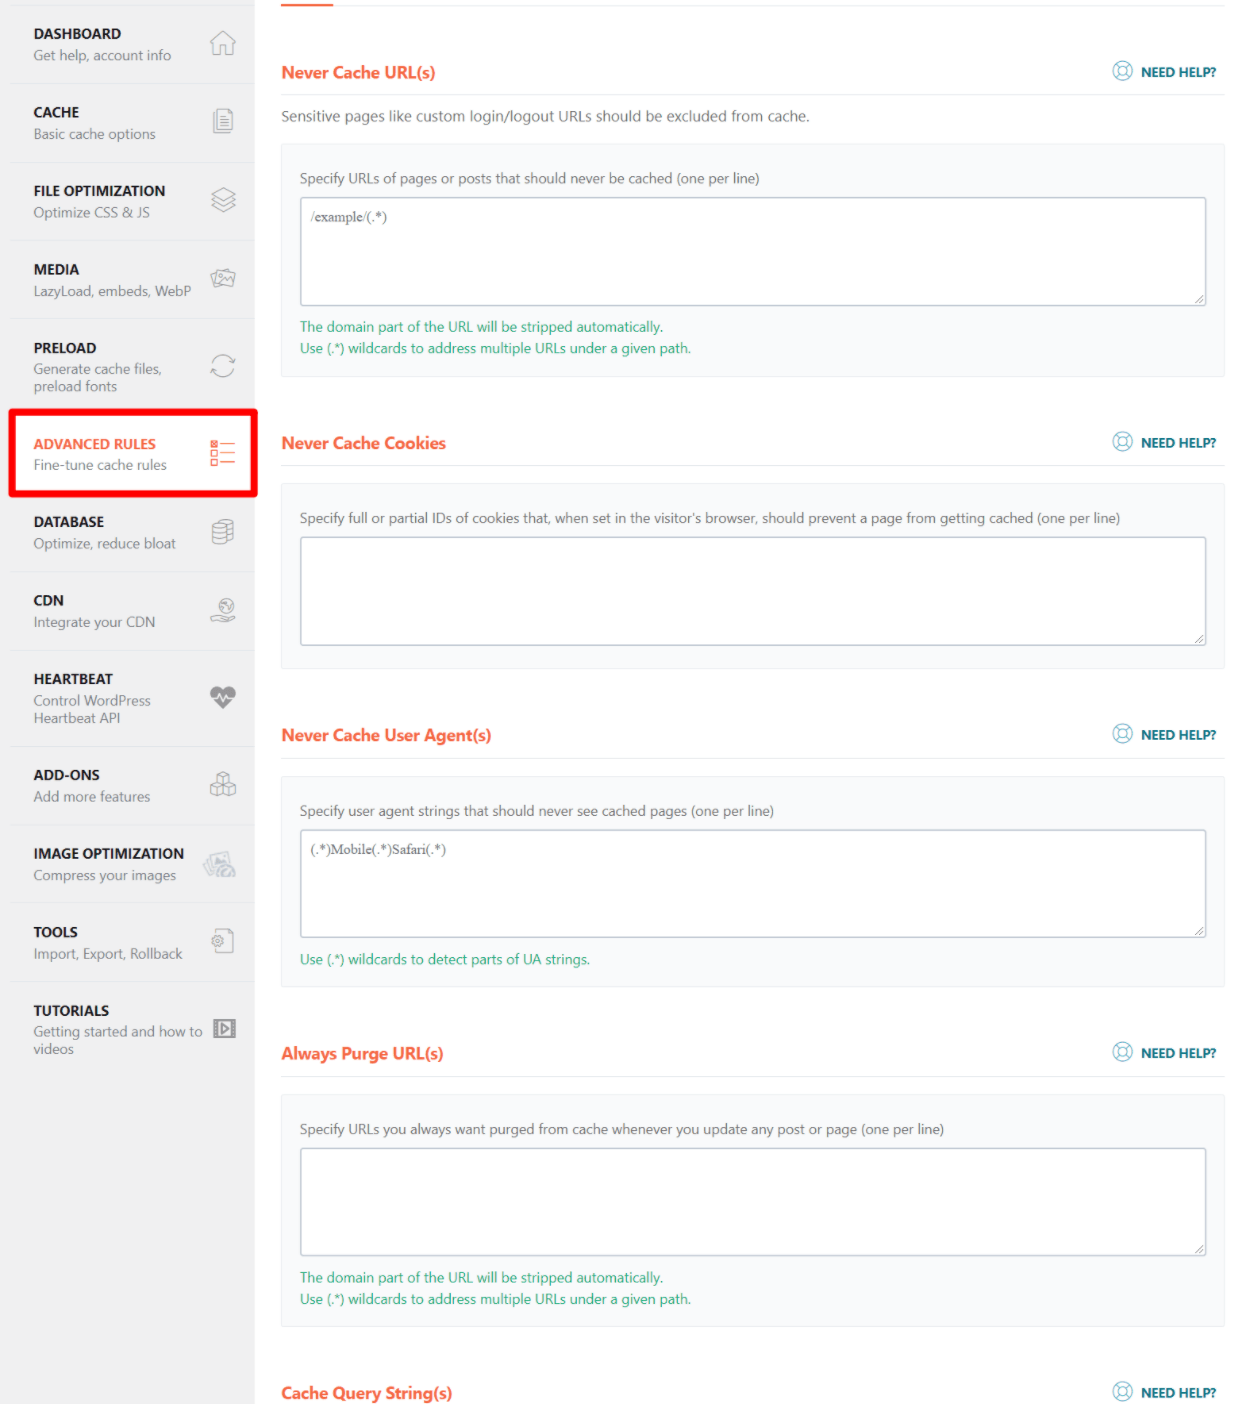
Advanced Rules
The Advanced Rules tab gives you advanced control over caching behavior.
You can exclude certain URLs, cookies, and user agents from caching. You can also specify URLs to always purge when you update a post/page and cache query strings.
One thing you might want to do here is exclude the page that contains your contact form from caching. Sometimes caching can cause problems with forms, so I usually like to exclude my form page just in case.
Other than that, these settings are mostly for advanced users and most people won’t need to configure anything here:
Database
The Database tab lets you clean your site’s database to remove unnecessary junk like post revisions, spam comments, transients, etc.
I recommend taking a backup before cleaning your database – nothing bad should happen, but it’s always better to be safe than sorry.
When you clean things up, I recommend checking all of the boxes except for revisions and auto drafts, unless you’re absolutely positive that it’s safe to remove all your post revisions. Learn more about post revisions here:
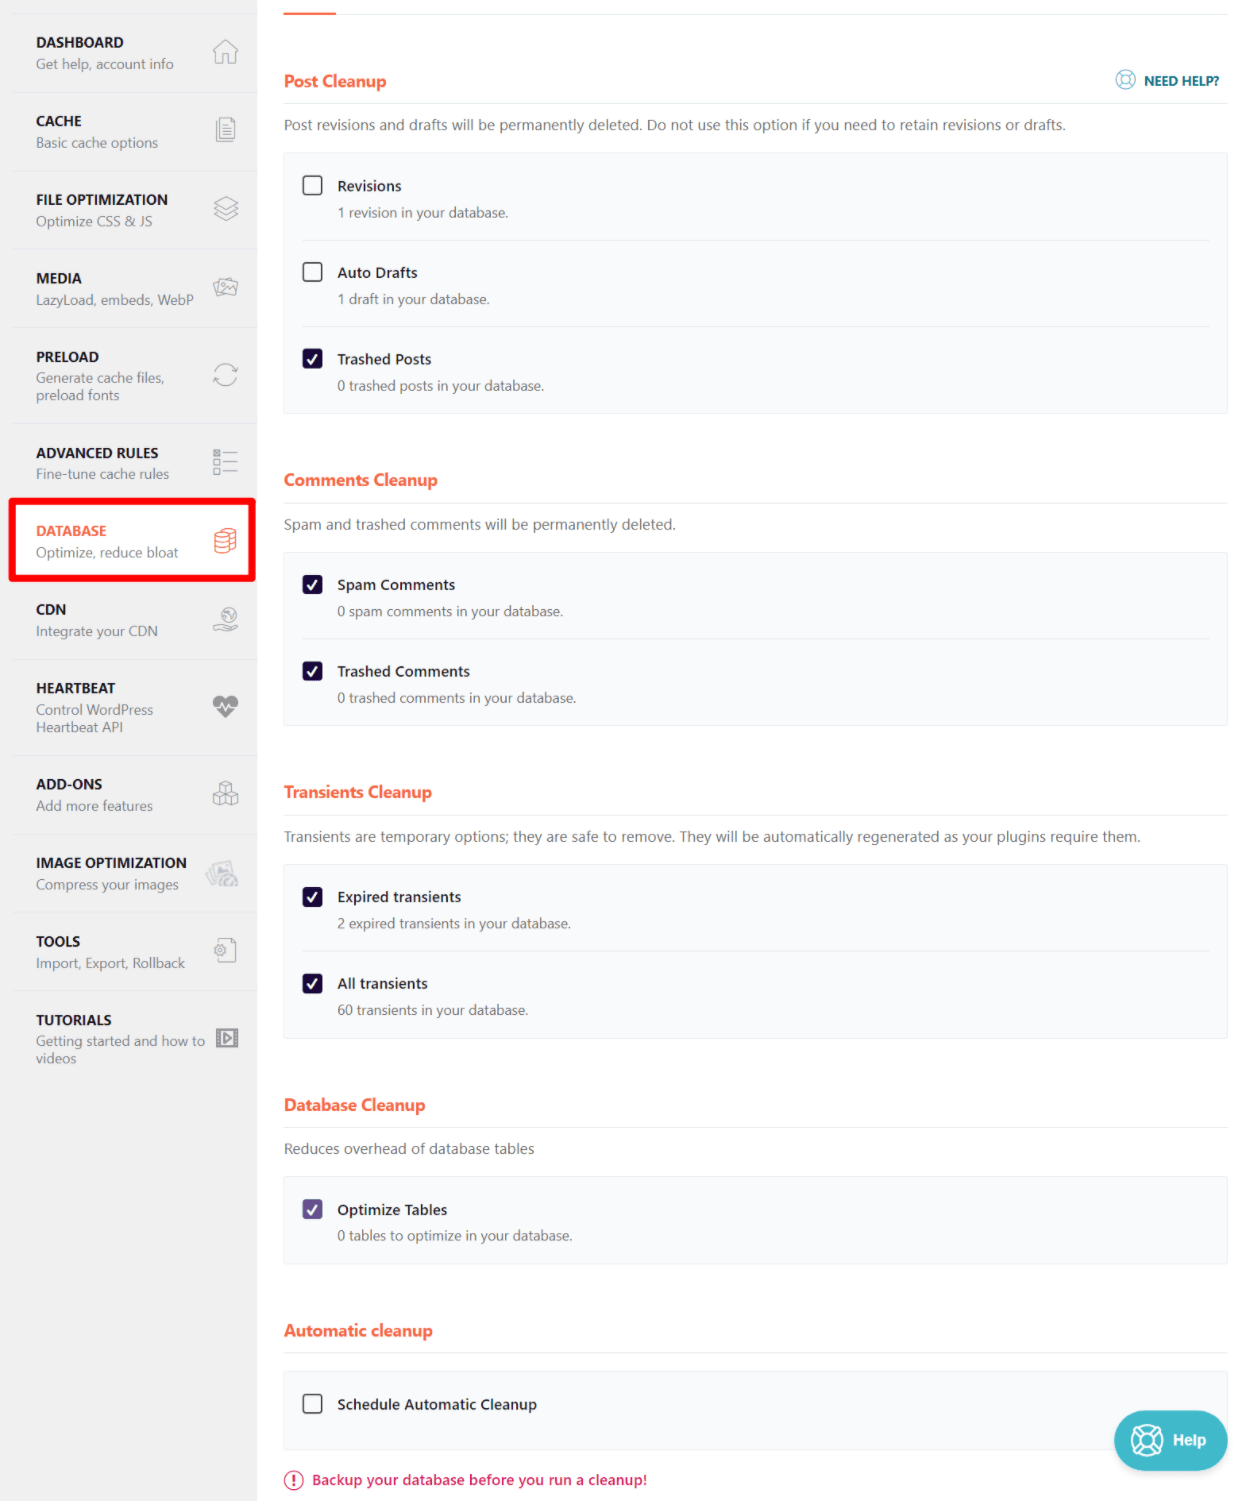
You can also schedule the database cleanup to run automatically if you prefer.
CDN
The CDN tab helps you set up a content delivery network to improve global load times. This is 100% optional and you’ll need to pay extra to use a CDN. WP Rocket just helps you configure your site to use a CDN – the plugin itself doesn’t include its own CDN.
You have two options here:
- You can use WP Rocket’s CDN service, called RocketCDN. It costs $7.99/month for unlimited bandwidth.
- You can use a third-party CDN service like KeyCDN, Bunny CDN, StackPath, etc. If you use one of these services, you can paste your CDN URL into the CDN CNAMES box.
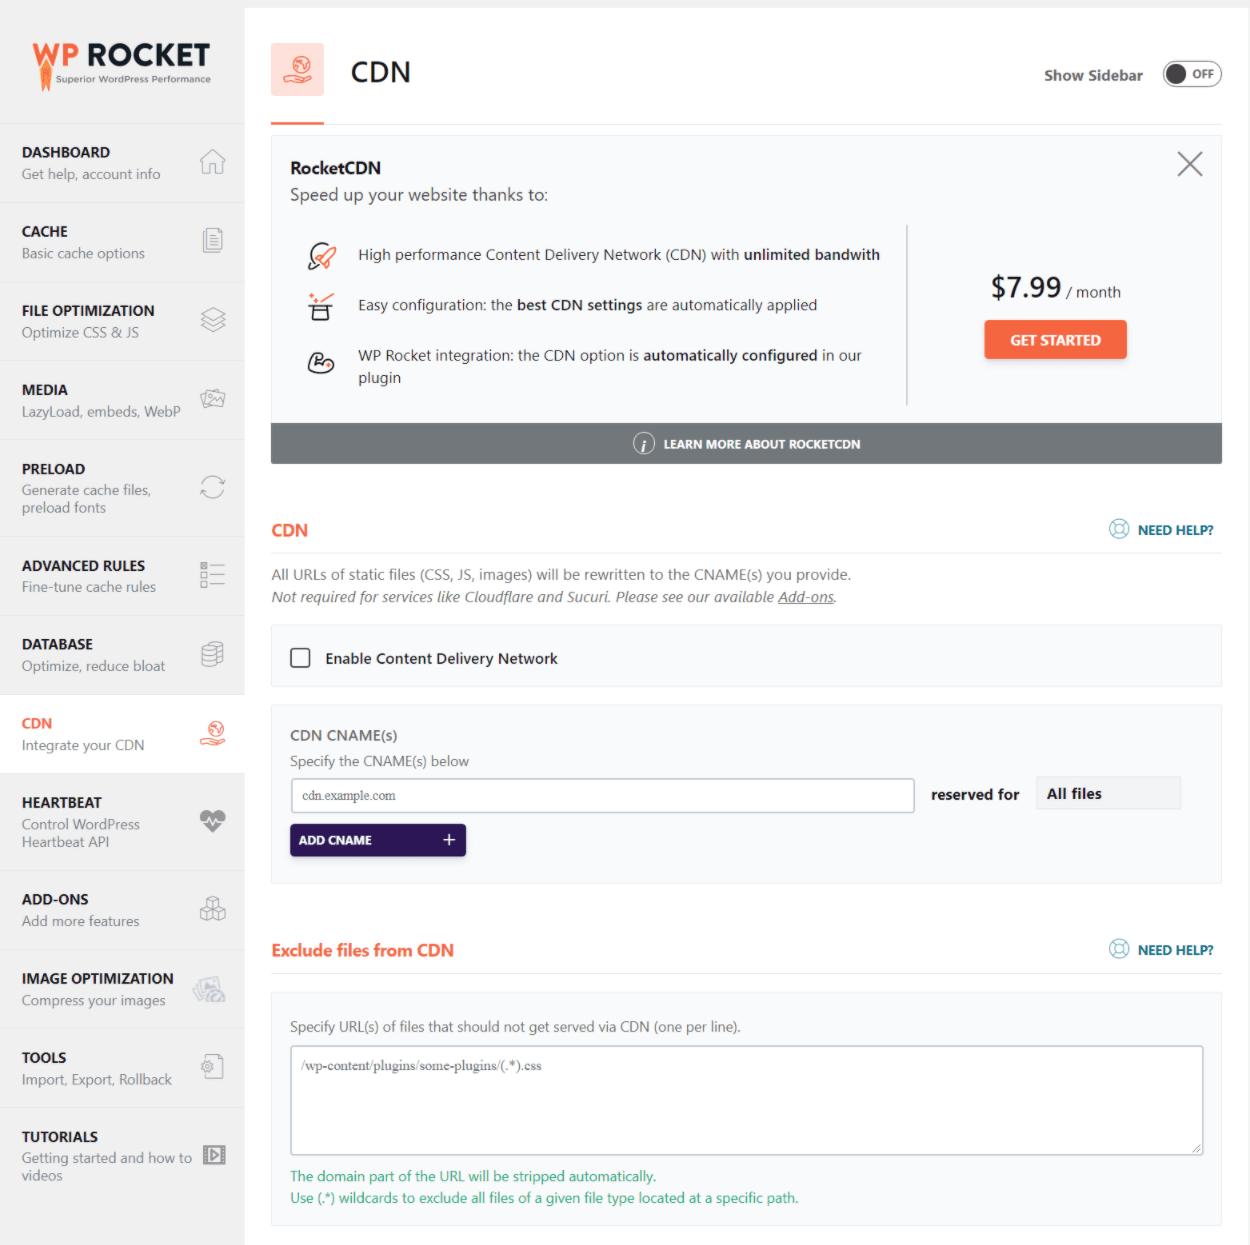
You also have the option to exclude certain files from being served via the CDN – most sites won’t need to do this, though.
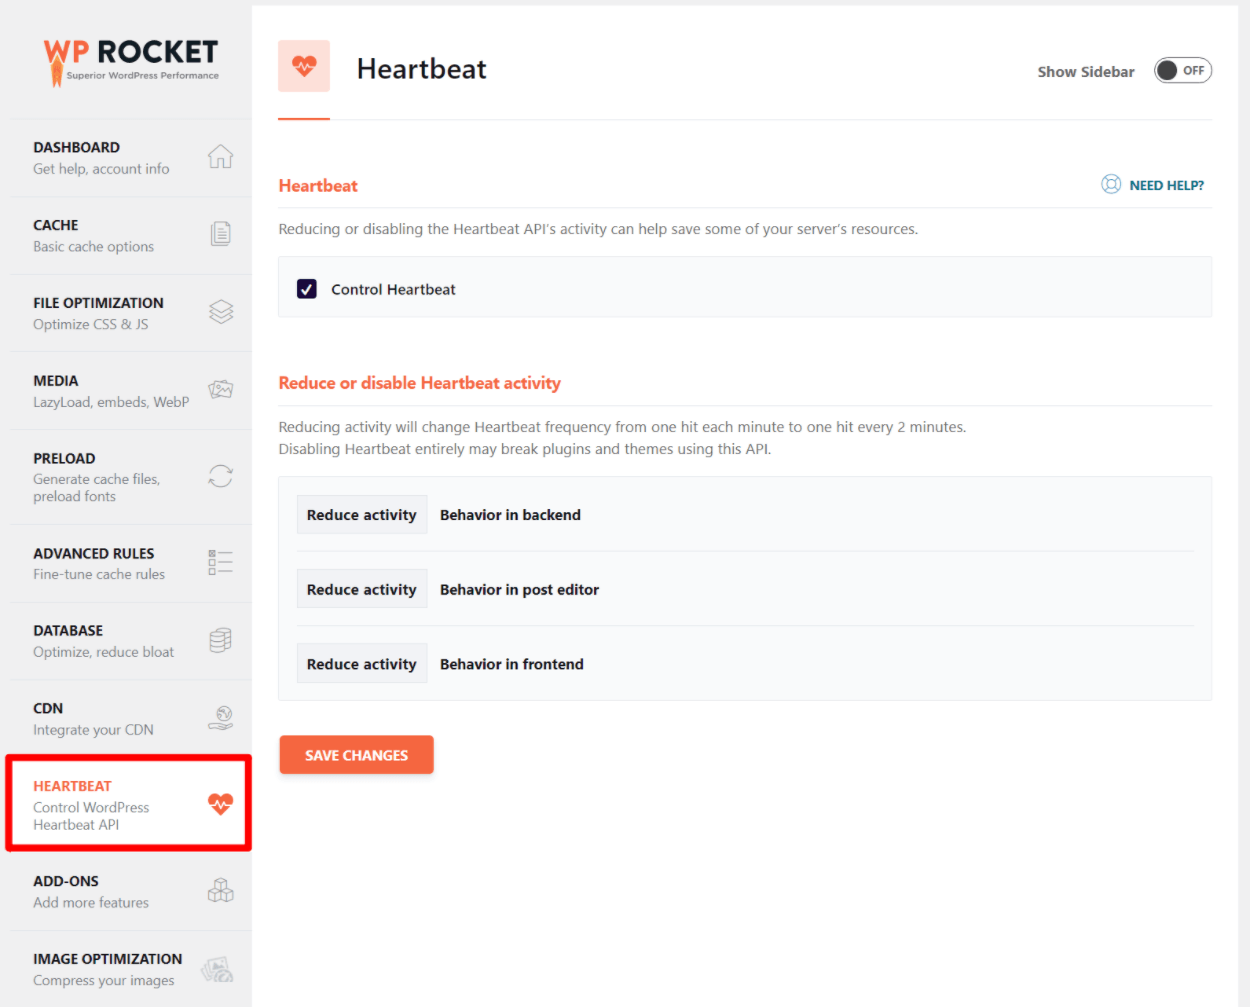
Heartbeat
The Heartbeat tab lets you reduce or disable the WordPress Heartbeat API, which can conserve server resources.
The Heartbeat API is responsible for things like autosaves.
I recommend leaving these settings as the defaults – Reduce activity. You can also disable the Heartbeat API in certain areas if you prefer:
Add-Ons
The Add-Ons tab lets you access WP Rocket’s built-in integrations with some other services. Currently, WP Rocket offers three add-ons:
- Varnish – if your web host/server uses Varnish caching, this lets you purge the Varnish cache when WP Rocket clears its cache.
- Cloudflare – this helps you integrate your site with Cloudflare and clear the Cloudflare cache.
- Sucuri – the same as Cloudflare but for the Sucuri firewall.
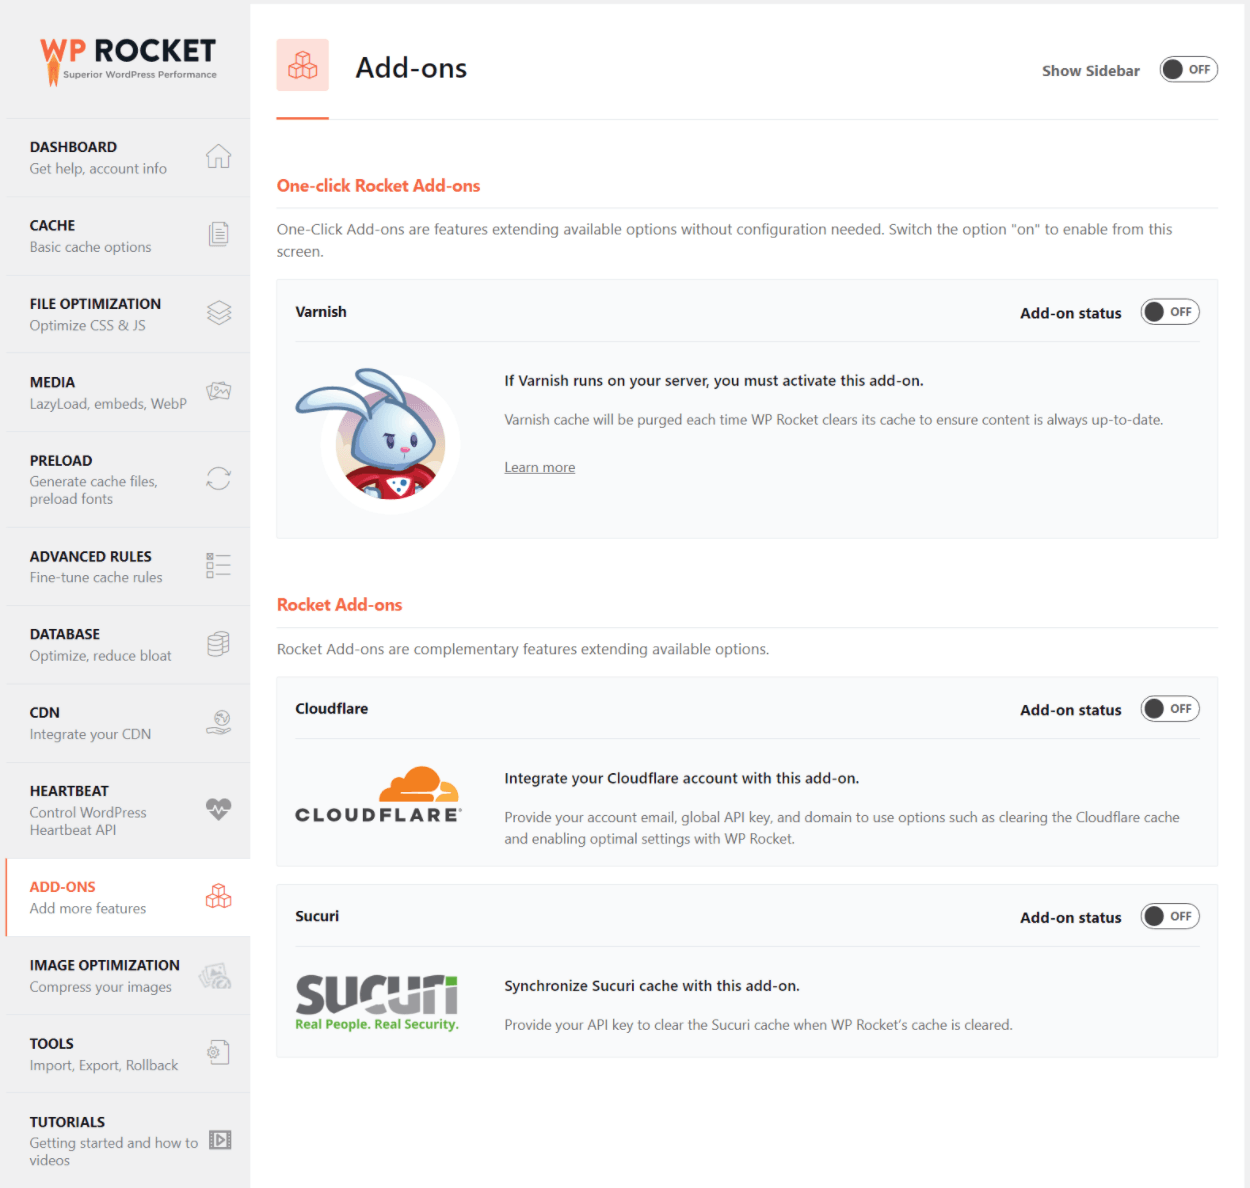
You only need to enable these add-ons if you’re using one of those services – otherwise, leave them disabled.
WP Rocket used to offer add-ons for Google Analytics and Facebook Pixel to host those scripts locally, but has since deprecated those add-ons as of WP Rocket 3.9 because of the new Delay JavaScript Execution feature.
Image Optimization
WP Rocket doesn’t include built-in image optimization – this tab is just a promo for the developer’s Imagify plugin. You can use it to optimize up to 20 MB of images per month for free. After that, you’d need to pay.
For some other options, check out our post with the best WordPress image optimization plugins. Personally, I use ShortPixel.
Tools
The Tools tab lets you import/export settings, which is useful if you’re using WP Rocket on multiple sites and want to quickly apply the same settings to all your sites.
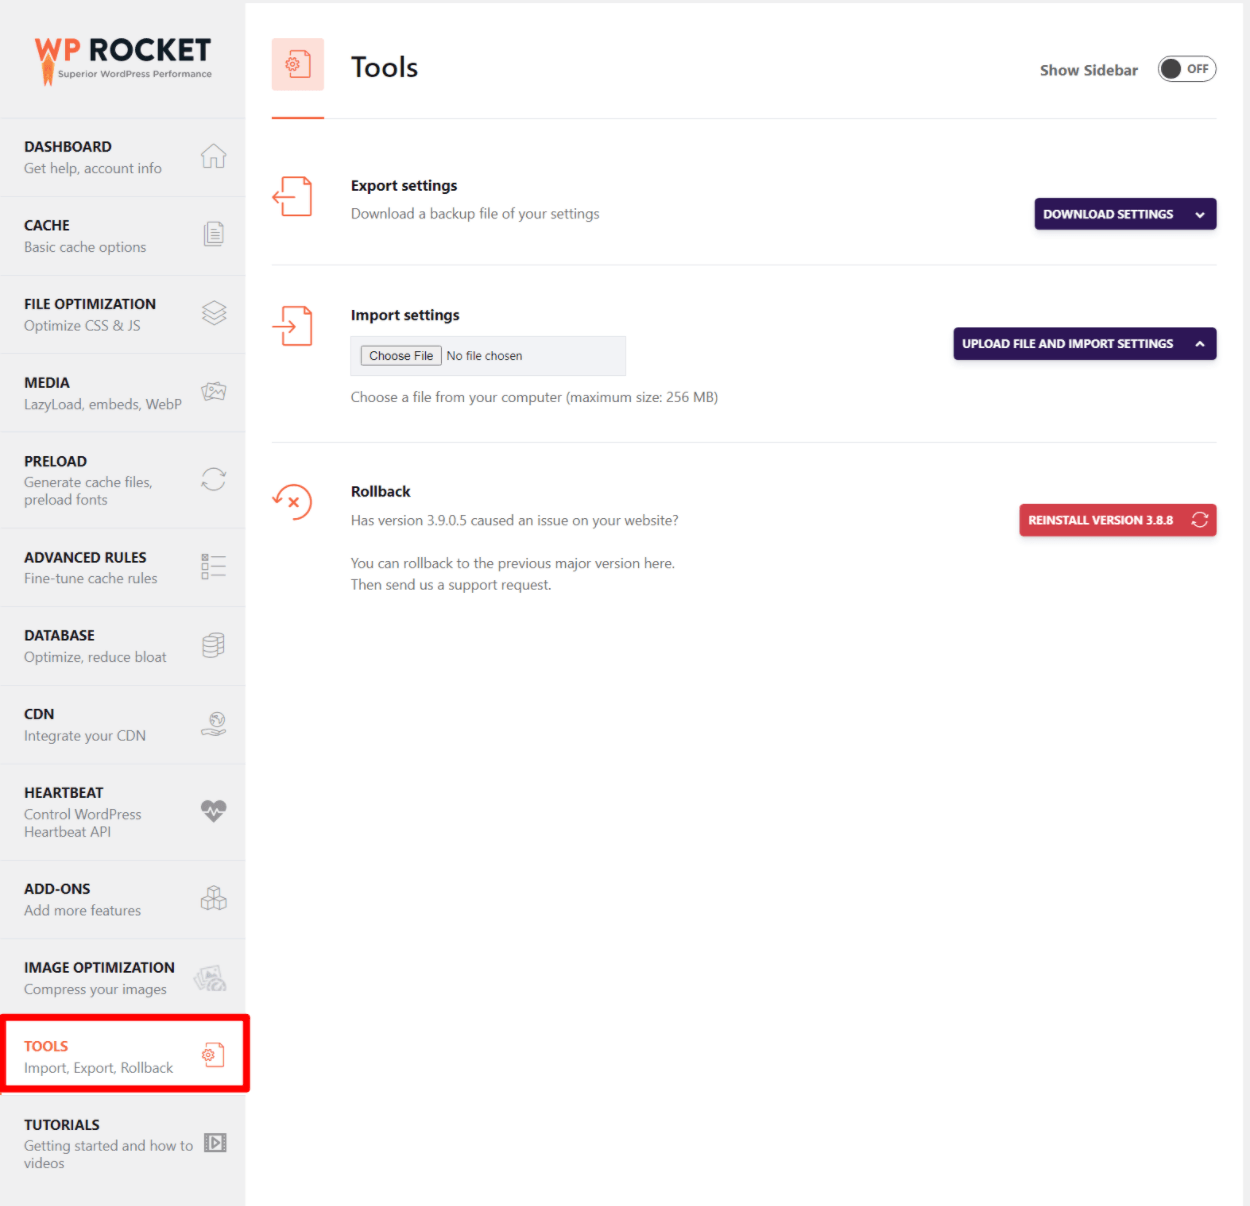
And that’s it! If you follow this guide, you can be confident that you have the best WP Rocket settings.
WP Rocket Pricing
WP Rocket only comes in a premium version. I’ll talk more about whether it’s worth the money in the next section. But first, let’s just go over the pricing details.
Plans start at $49 for use on a single site and go up from there – here are the full prices:
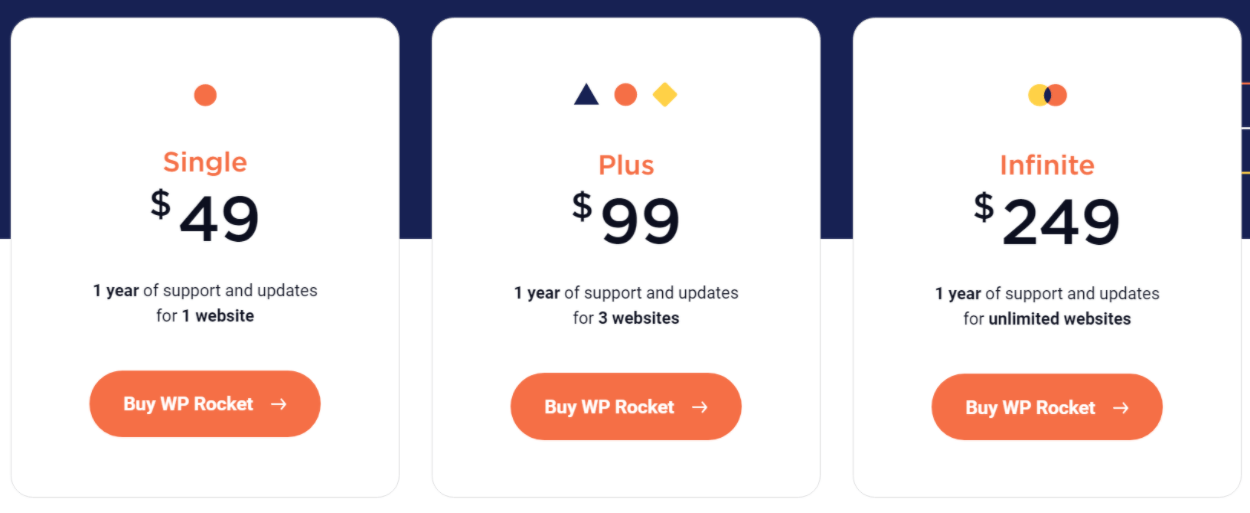
If you renew after the first year to continue receiving support and updates, you’ll get a 30% discount.
WP Rocket Review Final Thoughts: Should You Use It?
Just looking at the plugin itself, WP Rocket is great. The test numbers speak for themselves and the WP Rocket interface is really well-designed and includes lots of useful documentation to help you understand what each setting does.
So if you ask me, “Is WP Rocket a good plugin and will it make a meaningful improvement to WordPress performance?”, the answer is a definite yes.
However, you can find free plugins that implement a lot of the same features that WP Rocket offers (though you’ll typically need to install multiple plugins to achieve this), which can make your decision a little more difficult.
Basically – why should you pay for WP Rocket vs just using those free plugins?
I think there are three reasons.
WP Rocket vs Free Performance Plugins
First, there’s simplicity. WP Rocket simplifies WordPress performance in two ways:
- Single plugin – instead of needing to pair different plugins together, you get all the features in one tool. This simplifies your site and helps you avoid potential compatibility issues.
- Interface – the WP Rocket interface is really well-designed and makes it easy to understand what each feature will do. Compare it to something like W3 Total Cache and it’s night and day.
Second, there’s support. Because it’s a premium plugin, you get access to high-quality support to help you if you run into any issues.
Finally, there’s the fact that WP Rocket just plain has some unique features that can get a little bit more performance out of your site. For example, the new Remove Unused CSS feature is really great. It can regularly shrink ~100-250KB off the size of your site.
At this time, I’m not aware of any other WordPress performance plugin that offers this feature – at least not in such a simple way.
For those three reasons, I think that paying for WP Rocket does make sense for a lot of people, unless you’re on a super tight budget.
If you can’t afford a premium performance plugin, you can still create a fast-loading site with just free plugins, so you shouldn’t feel like you absolutely must have WP Rocket. But if you want the best experience, some unique features to make your site even faster, and premium support, I think WP Rocket is worth the money.
If you want to get started, click the button below to purchase WP Rocket and then follow our tutorial above to configure it.
Of course, your site will only load as quickly as your hosting allows it to. So to go along with WP Rocket, make sure you’re also using one of the best WordPress hosts, too.
Do you still have any questions about WP Rocket or our WP Rocket review? Leave a comment!


Leave a Reply