
Want to start a blog to share your thoughts and ideas with the world?
There’s never been a better time to create a blog. And thanks to some user-friendly free tools, it’s also never been easier to get started, even if you have no technical knowledge.
Who knows – down the line, you might even be able to make a side or full income from your blog. That takes time, but there’s plenty of people proving that it’s possible.
In this post, we’re going to show you the best way to make a blog in 2021 and beyond – using WordPress. Over 39% of all the websites on the Internet use WordPress, including most of the web’s most successful bloggers.
With under an hour of time and less than $50, you can join the ranks of those bloggers – we’re going to show you how.
Keep reading for our step-by-step guide on how to start a blog in 2021 and beyond.
How to Start a Blog FAQ
Before we get started, here are a few FAQs about our tutorial so that you can know what you’re in for.
What platform will I use to start a blog?
We’re going to have you use self-hosted WordPress, which is the most popular way to make a website. We’ll explain why we recommend WordPress in the tutorial.
Do I need to be a developer to launch a blog?
No! Anyone can follow this guide – you definitely don’t need any technical knowledge. Everything that we show you is code-free.
How long does it take to create a blog?
The initial setup process takes less than an hour. Of course, you’ll spend more time than that on adding content and tweaking the design. But you can have a working blog within an hour.
How much does it cost to make a blog?
There are a lot of variable costs, so it’s hard to give one number. At a bare minimum, you could follow every step in this tutorial for just $25 to get started plus ~$15 per month to maintain your blog.
How to Create a Blog
While there are lots of different tools to help you create a blog, WordPress is the most popular and best option, which is why we’re going to use it for this tutorial. Here’s why we like WordPress:
- It’s free.
- You don’t need any special technical knowledge – anyone can use WordPress.
- There are tens of thousands of WordPress themes, which let you control how your blog looks.
- There are tens of thousands of WordPress plugins, which let you add new features to your blog.
- Because it’s so popular, there’s a huge WordPress community which makes it easy to find help with literally anything.
However, it’s important to note that we’re talking about self-hosted WordPress, which is different from WordPress.com. If you want to learn all the differences, check out our full self-hosted WordPress vs WordPress.com comparison…but the basic idea is just that you’re not going to use WordPress.com for this tutorial. Instead, you’re going to use self-hosted WordPress (available at WordPress.org), which is the free, open-source WordPress software.
If you want to learn why self-hosted WordPress is a better option for blogging than WordPress.com, you can check out the comparison. Otherwise, just trust us that self-hosted WordPress is the best 😃 It’s cheaper and gives you more flexibility, which is important for making your blog a success.
What You Need to Start a Blog With WordPress
To create a blog with self-hosted WordPress, you’re going to need a few things – some are free while others will cost a little bit of money:
- A domain name – this costs around $10 per year.
- Web hosting – this costs around $15 per month (but you can get a discount if you pay for a year upfront).
- The WordPress software – this is free.
- A theme – this controls how your blog looks. You can find lots of free themes. If you do want a premium theme, they usually cost about $60.
- Plugins – these add features to your blog. You can find 55,000+ free plugins, so it’s possible to pay zero. However, you also might want some premium plugins, which vary in cost.
Here’s how to set everything up!
1. Choose and Purchase a Domain Name
Your domain name is your blog’s permanent address on the Internet. For example, ours is wpkube.com.
It plays a key role in your blog’s branding and it’s also how people will navigate to your blog, so it’s an important decision that you want to get right.
You have two main options, depending on the direction that you want to go with your blog:
- You can just use your name. For example, johndoe.com. A lot of popular bloggers use this approach and it’s a good option if you want to build your own personal brand.
- You can use a brand name. For example, wpkube.com or pinchofyum.com (a popular food blog). This is a good approach if you want your blog itself to be the brand.
The tricky thing is that only one person can own a domain name at a time. For example, you couldn’t go out there and register wpkube.com because we already own that domain name. Unfortunately, this means that some of your first choices might already be taken, especially if you’re trying to buy a .com (there are also other domain extensions like .org and .net).
To quickly see whether or not a domain name is available, you can use a tool like Instant Domain Search.
Need some help with picking your domain name? Check out our full guide to how to choose a domain name.
How to Purchase Your Domain Name
Once you’ve settled on the perfect name and made sure it’s still available, you need to purchase it so that you own the rights to that domain name. To do that, you can use a service called a domain registrar.
There are a lot of different domain registrars you can use, but we recommend Namecheap because:
- It has excellent prices for most popular extensions. It’s much cheaper than alternatives like GoDaddy.
- It supports two-factor authentication (important for keeping your domain name secure).
- It offers domain privacy for free, which means other people won’t be able to see your contact details when they look up your domain information.
Here’s how to purchase your domain name:
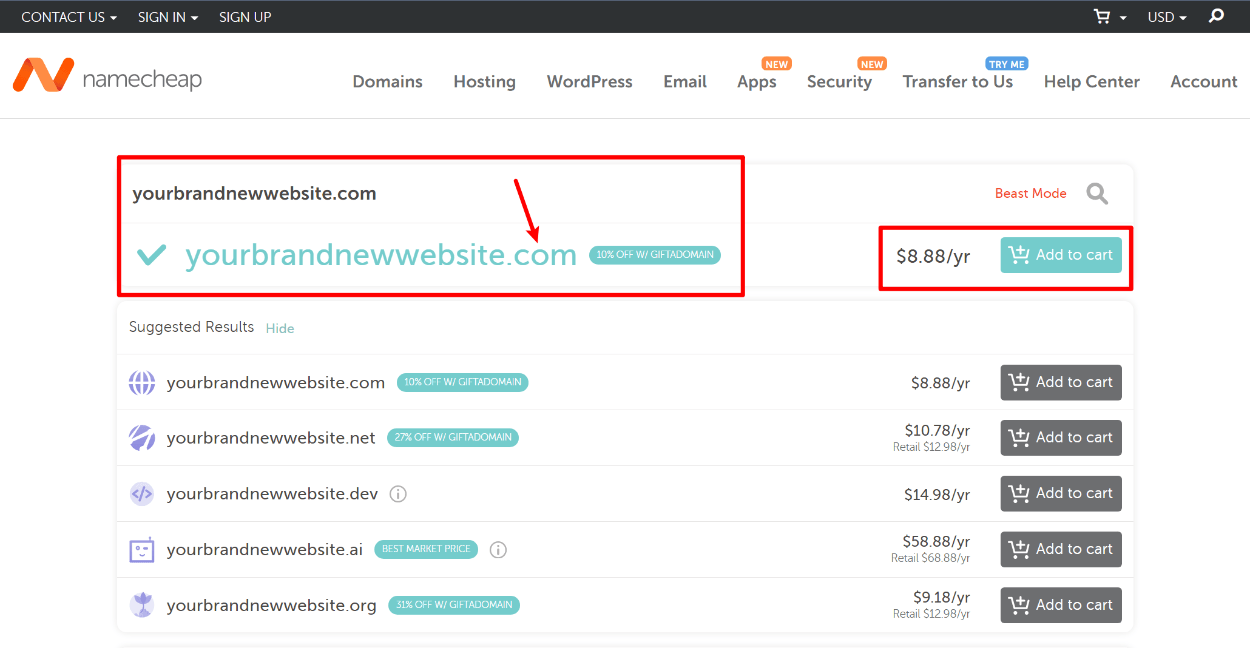
- Go to Namecheap
- Enter your domain in the search box
- Add your domain name to your cart (make sure you choose the proper domain extension – e.g. “.com”)
- Complete the checkout process to finalize your purchase.
2. Create Your Flywheel Hosting Account
Whereas your domain name is your blog’s public address on the Internet, your web hosting is the behind-the-scenes engine that actually powers your blog’s software and serves up your site’s content to visitors from around the world.
To make your blog successful, you want to choose a host that will:
- Load your site quickly, because people don’t like reading a slow-loading blog.
- Load your site reliably, so that your blog is always available and doesn’t experience downtime.
While there are lots of quality WordPress hosts out there, we specifically recommend a host named Flywheel for a few reasons:
- Prices start at just $15 per month. This is a little more than the really cheap WordPress hosts, but it’s really good value for the features that you get.
- You can focus on blogging because Flywheel handles the technical stuff. Flywheel is what’s known as a “managed WordPress host”, which basically means that Flywheel handles stuff like maintenance and security for you so that you can just focus on creating content and growing your blog. This is really great for beginners who don’t want to deal with server management.
- Flywheel has excellent support. So if you hit any snags, all you need to do is reach out via live chat and Flywheel will help you out.
Again, Flywheel costs $15 per month and that plan will be totally fine when you’re just getting started. As your blog grows, you might need to upgrade to a higher plan, but that’s a good problem to have 🙂
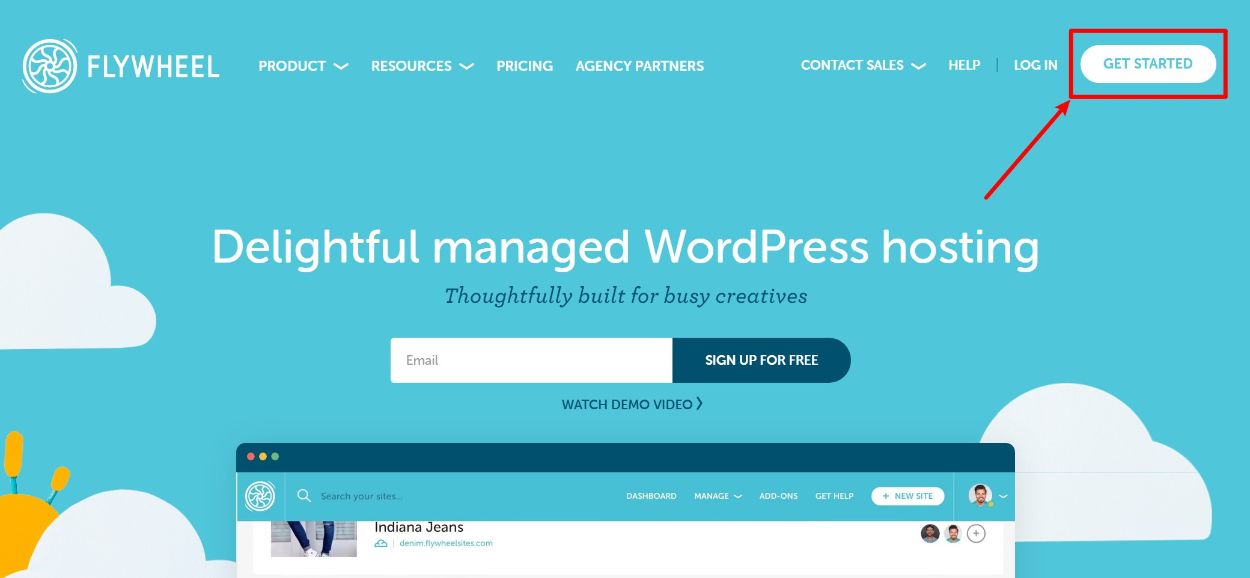
To get started, click the button below to go to Flywheel and register for your account. You can create your account for free to check it out – you only need to pay when you’re ready to launch your actual site.
Click the Get Started button in the top-right corner:
First, you’ll be prompted to enter your basic account details:
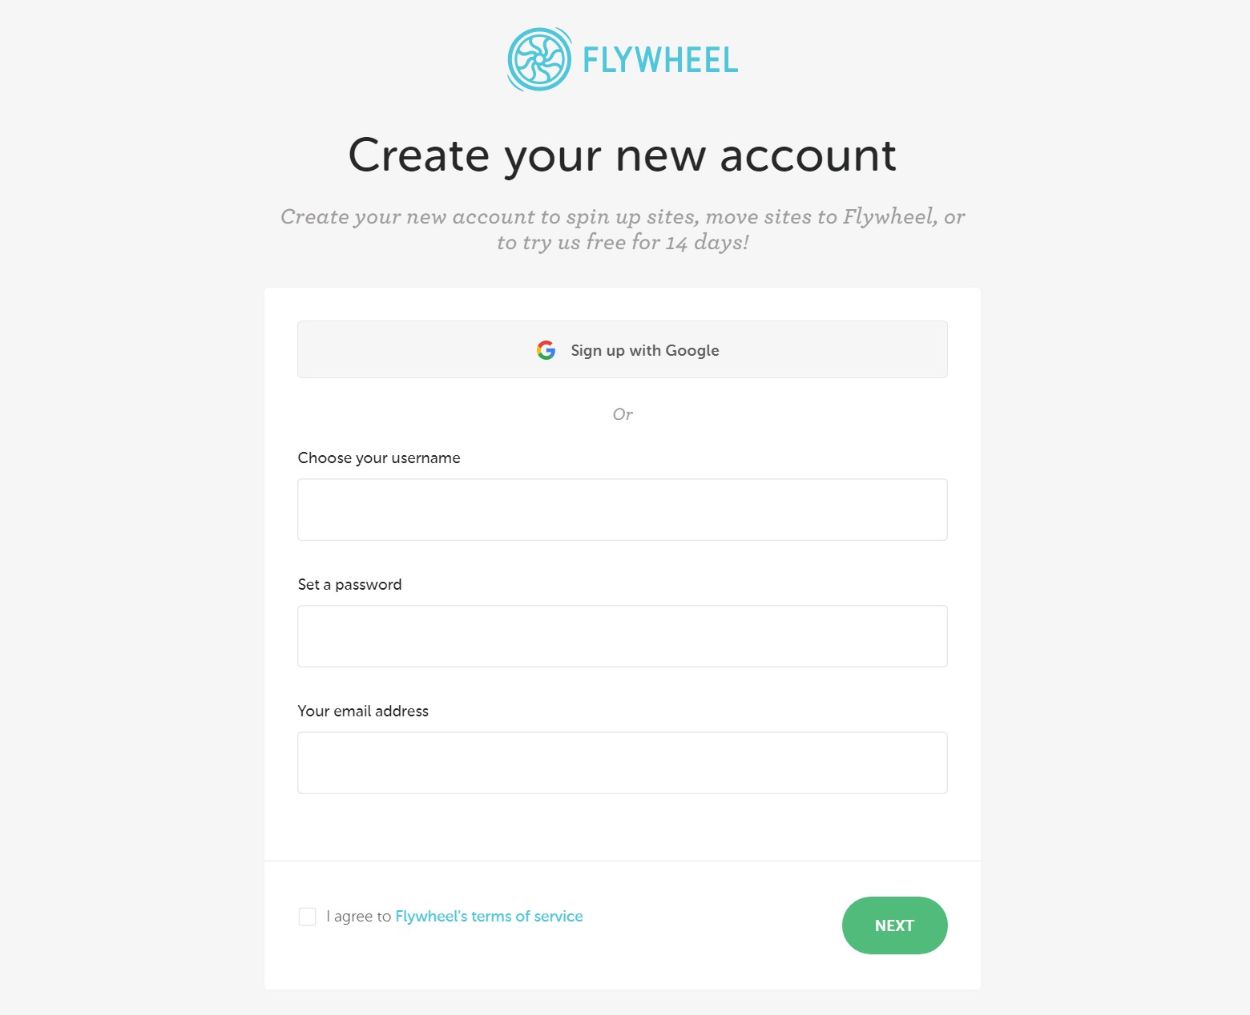
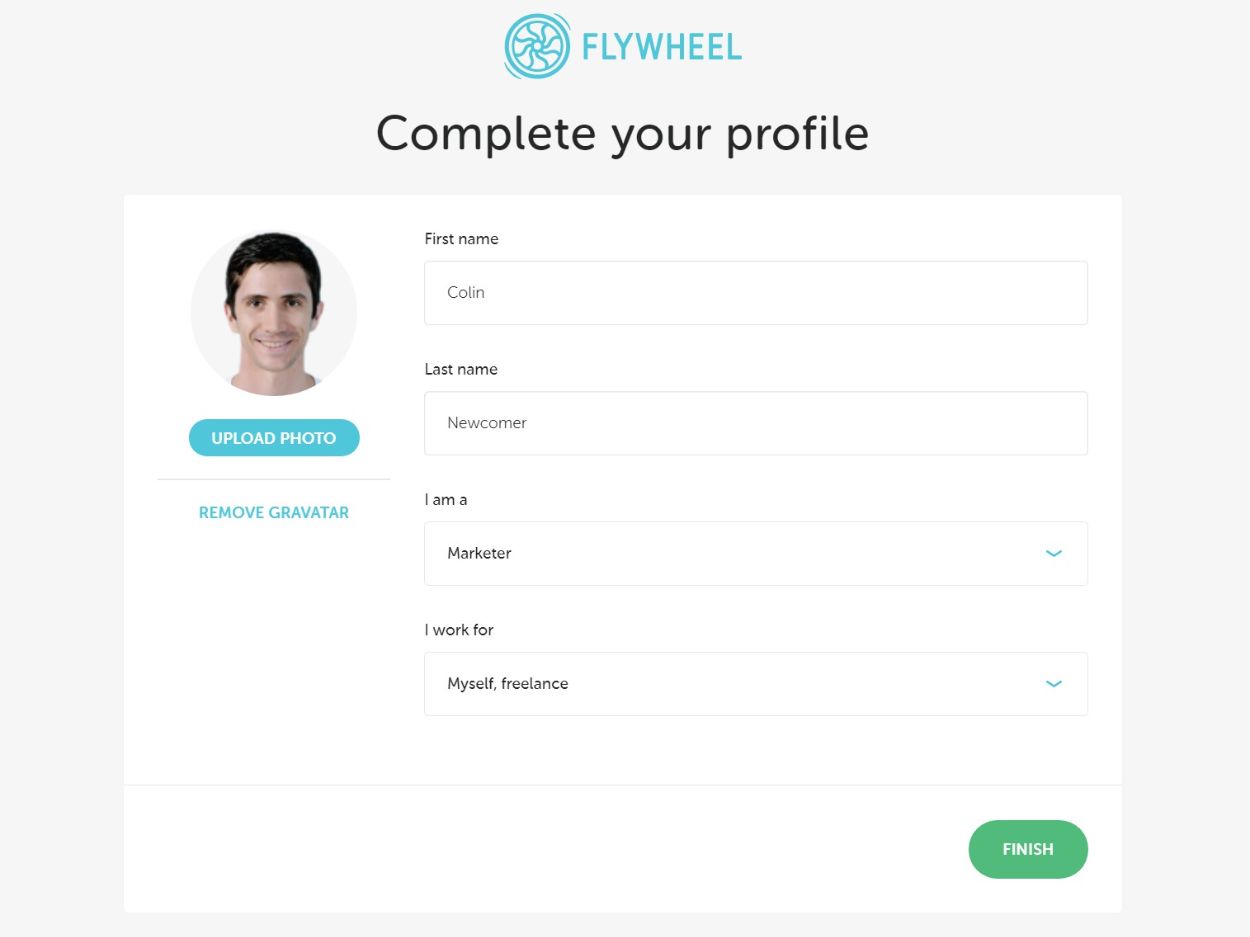
Then, fill out a few additional details and click Finish:
3. Choose Plan and Install WordPress via the Flywheel Dashboard
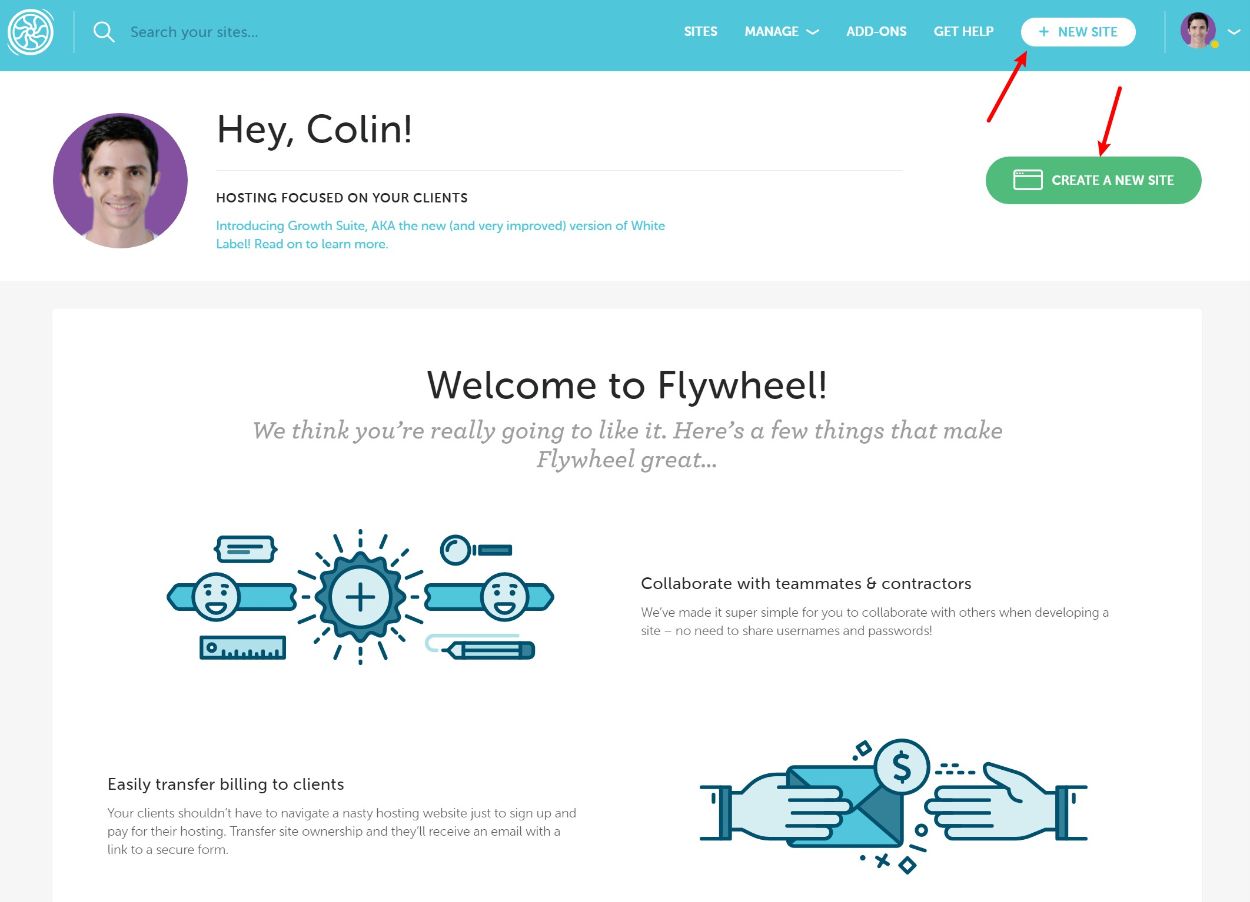
Now, you should be in your Flywheel dashboard, which means you’re ready to install WordPress and get started building your actual website.
Click any of the buttons to Create a New Site – this will let you install the WordPress software and launch your blog:
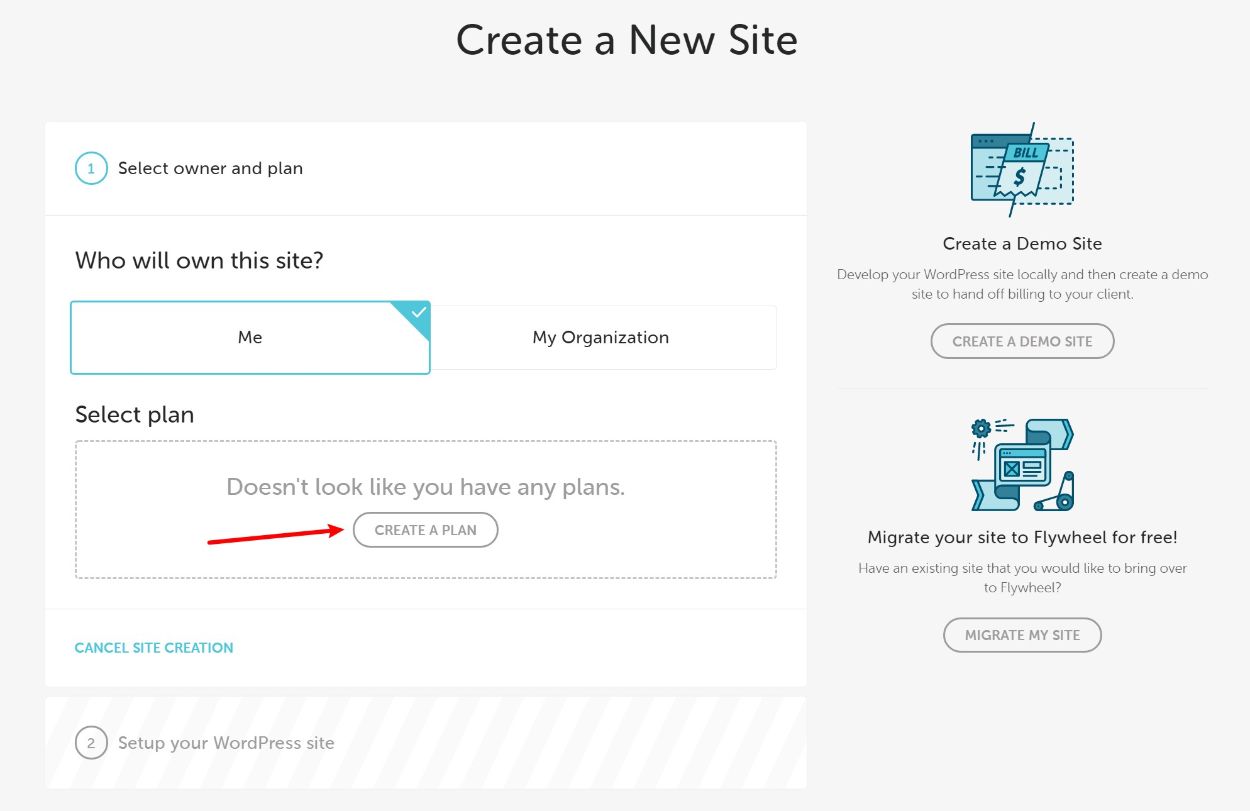
Now, you’ll be prompted to create a plan, which is where you actually need to pull out your credit card and make your purchase:
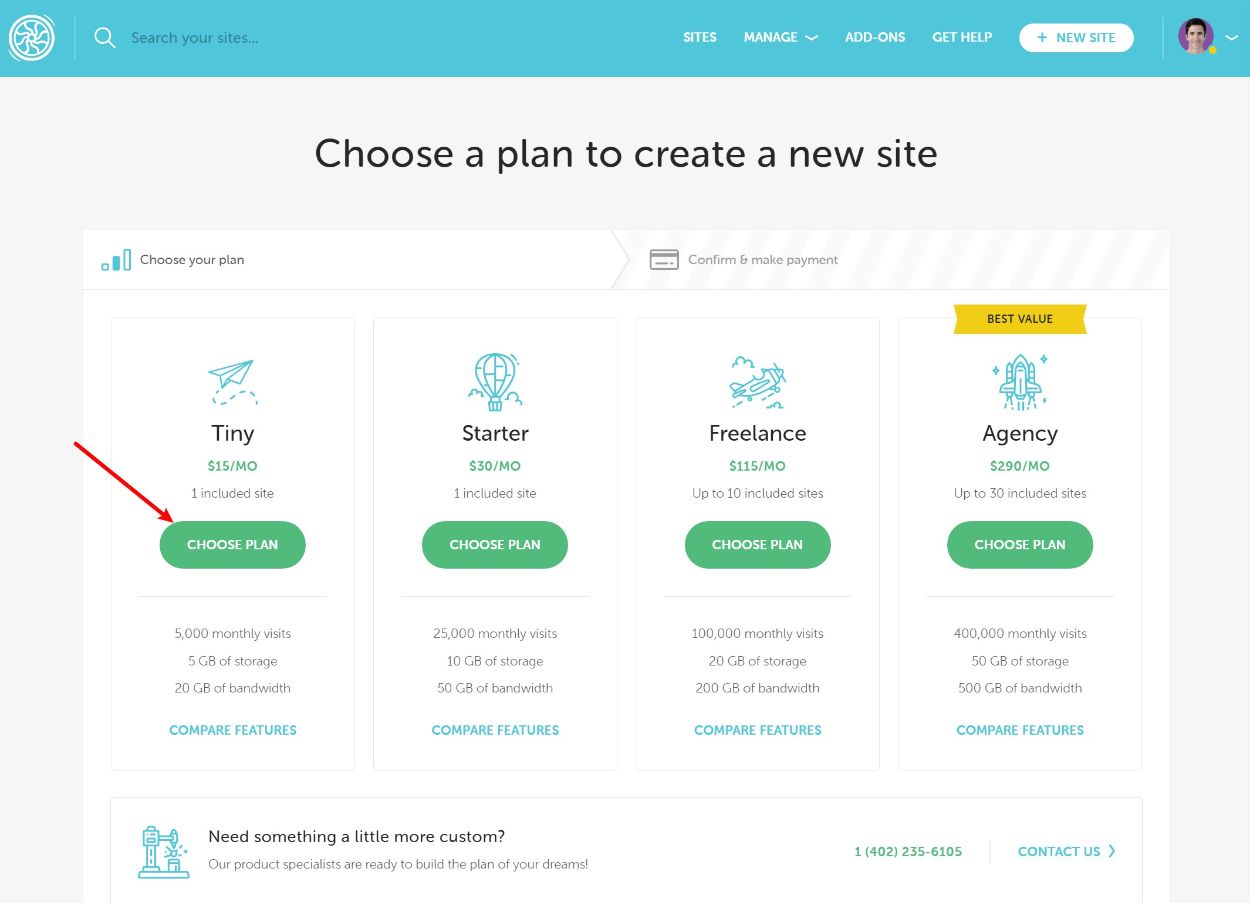
Since you’re just getting started, you should choose the Tiny plan. You can always upgrade later as your site grows.:
Now, you’ll need to enter your payment details and make your purchase. Most of the fields are self-explanatory – the only important choice is the Datacenter drop-down. You’ll want to choose the location that’s closest to your target audience. For example, if your blog focuses on Canadians, choose the Canada data center.
You can also enter our exclusive Flywheel coupon code to save some money:
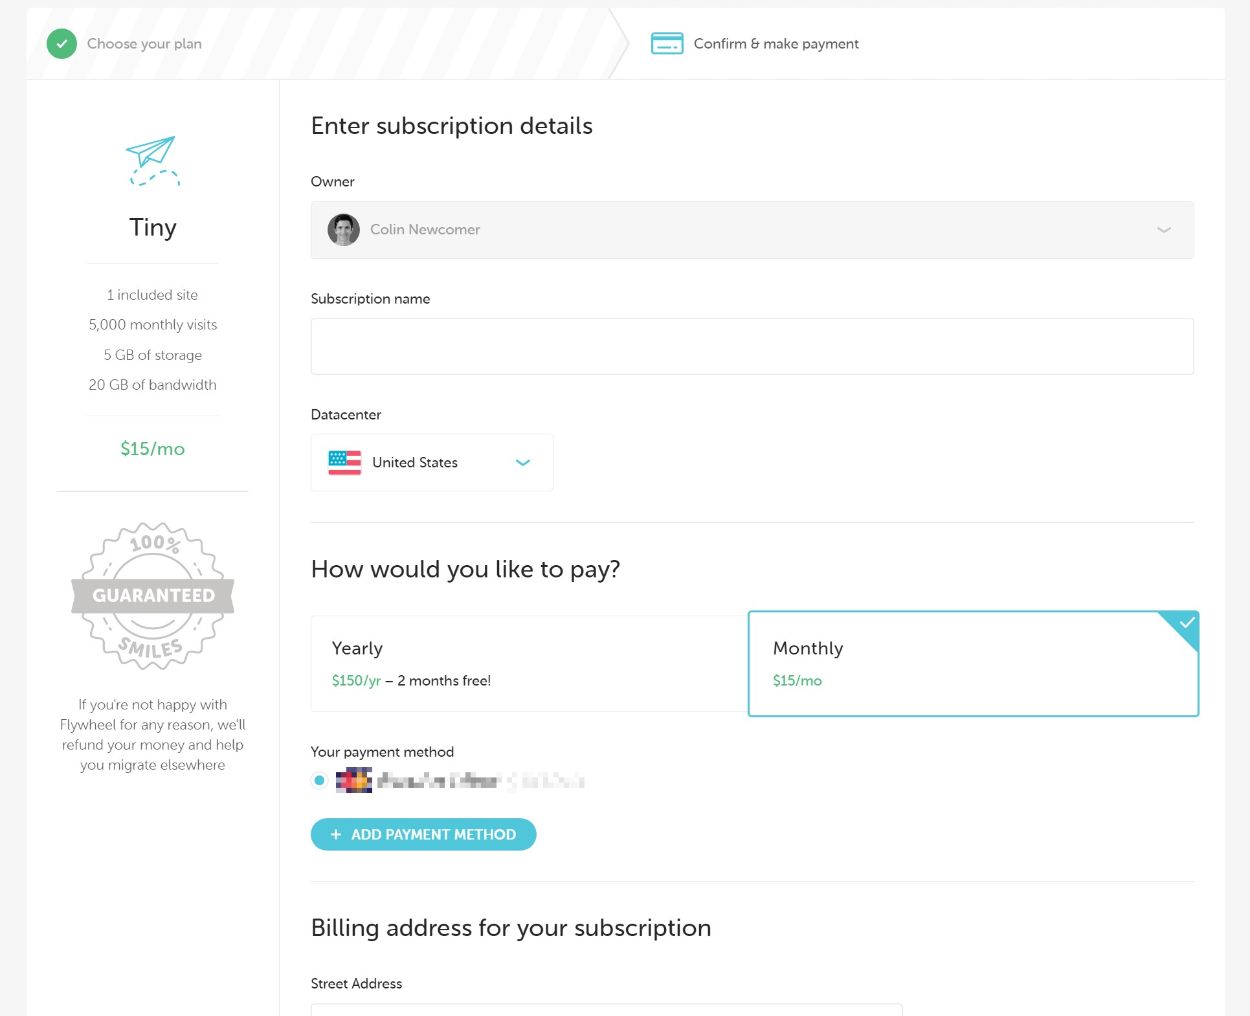
Once you set up your plan, you can follow the remaining steps to create your WordPress site. In the install wizard, you’ll be prompted to enter your WordPress account credentials. These are what you’ll use to log in to your actual blog, so make sure that you remember them.
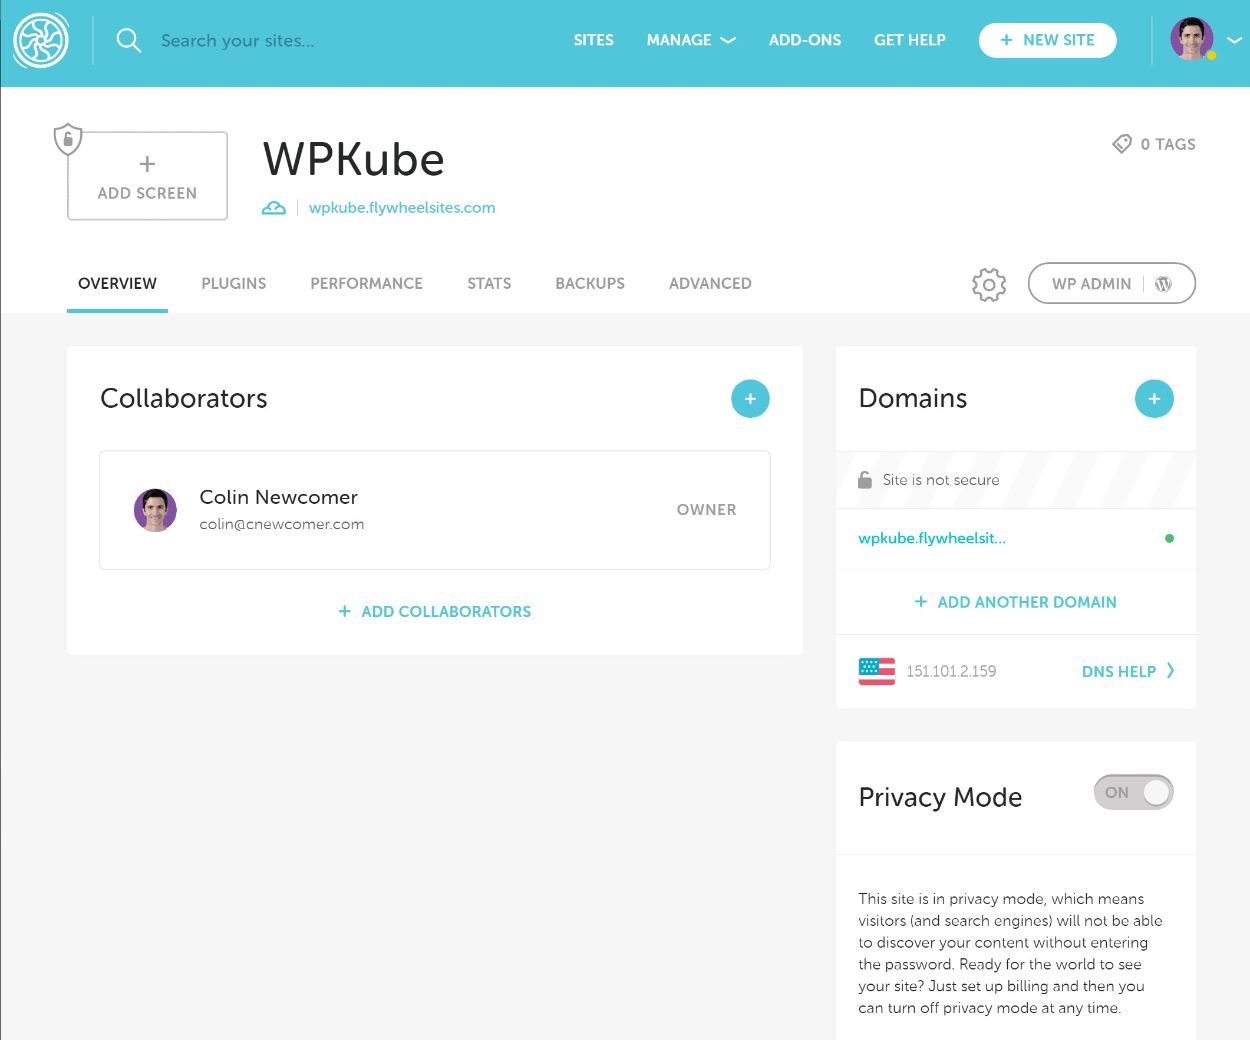
Once you finish this install process, you should be able to view your site inside the Flywheel interface:
4. Point Your Domain Name to Your Web Hosting and Go Live
Now that you have your blog’s hosting and domain name, the next step is to link the two together. This is probably the most technical part of the entire process, but don’t worry because it’s still pretty simple!
There are a few steps involved here, but Flywheel already has a really detailed tutorial for Namecheap so I’m not going to reinvent the wheel. Or, if you used a different domain registrar, Flywheel also has tutorials for other popular registrars.
If you hit any snags, you can reach out to Flywheel’s support staff and they’ll be happy to help you out.
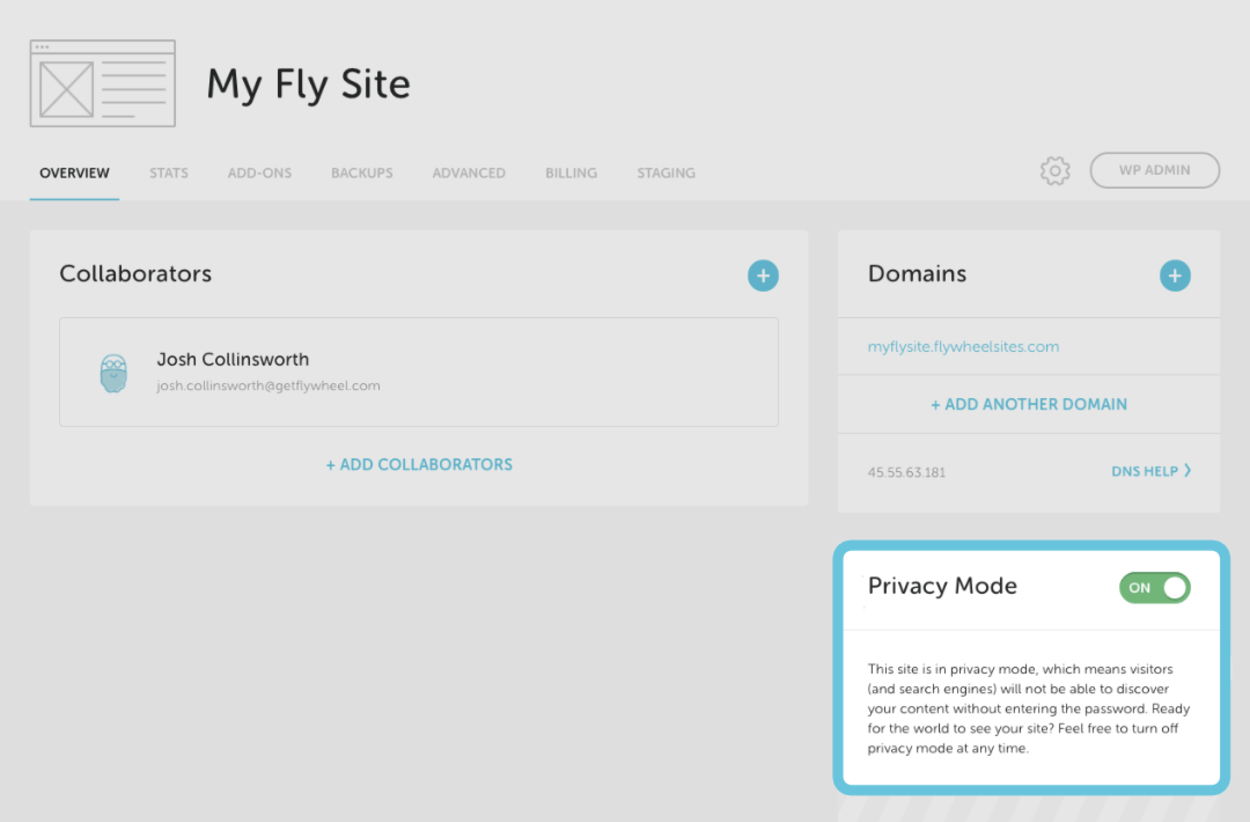
At this point, you’ll also want to disable privacy mode in your site’s dashboard in Flywheel. Flywheel enables this by default so that your blog is private to start. However, once you add your domain name, you’re ready to make it public:
5. Access Your WordPress Dashboard
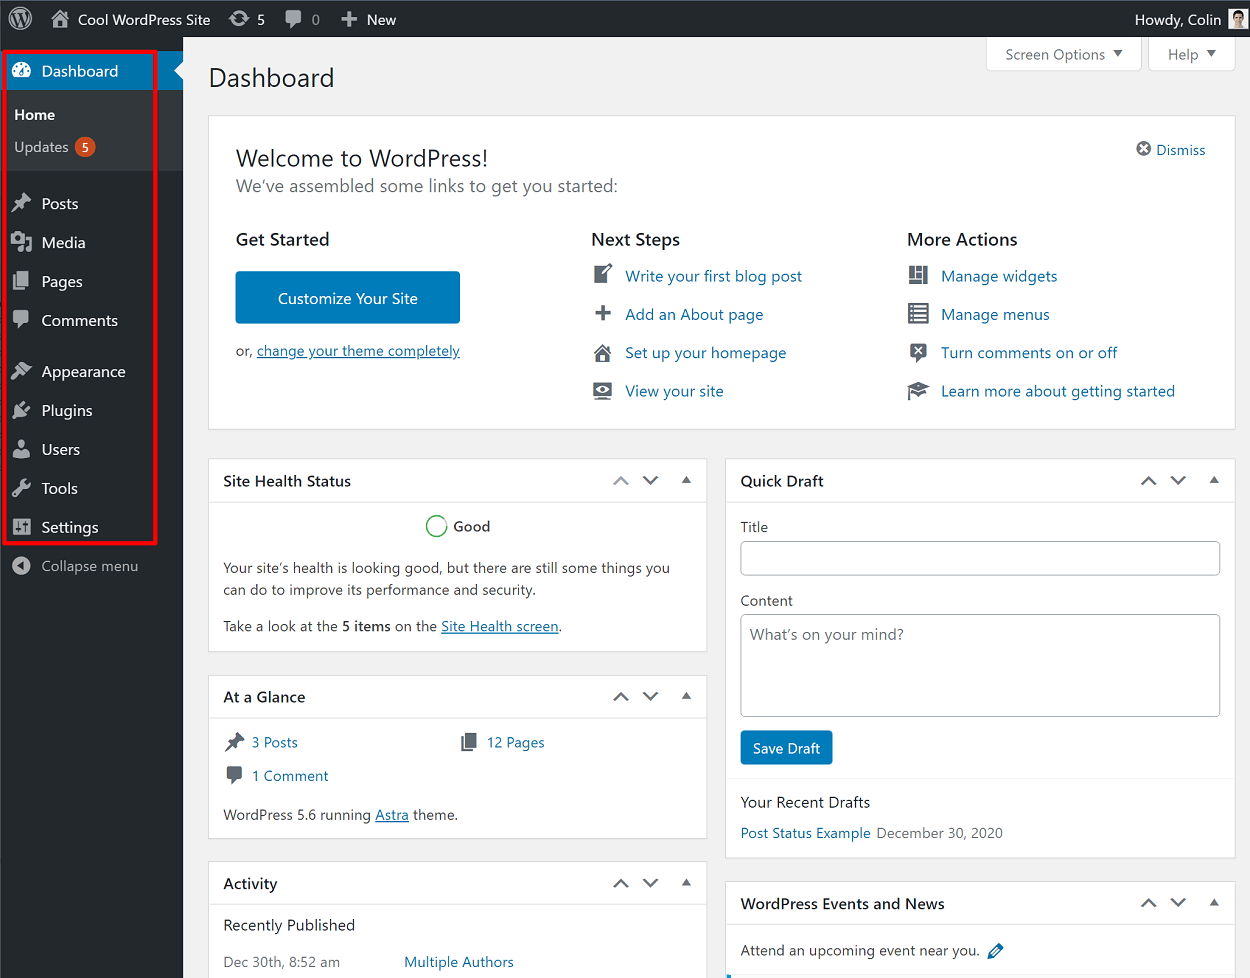
Now, you’re ready to access your WordPress dashboard, which is basically the control panel for your blog.
To access your dashboard, go to yourblog.com/wp-admin and log in using the credentials that you chose in the Flywheel site setup wizard (Step #3). These are not the same as your Flywheel account – these are the credentials you entered when setting up your WordPress install inside the Flywheel dashboard.
For example, if your blog is coolblog.com, you’d go to coolblog.com/wp-admin.
A Look At the WordPress Dashboard
Again, the WordPress dashboard is basically the control panel for your blog. This is where you can manage:
- Your blog posts and other content
- How your blog looks (via a theme)
- What functionality your blog has (via plugins)
- Basic configuration settings about your blog
How to Write Your First Blog Post
In the next steps, we’ll cover controlling how your blog looks via a theme and adding features via plugins. But before that, why not take a quick detour to do something fun – write your first blog post.
To do that, go to Posts → Add New in your WordPress dashboard. This will launch the block editor, which is what you can use to add your blog content.
To add text, all you do is click and type. For other elements, like images, quotes, or buttons, you can click the “plus” icon to add a new “block”. You can also use blocks to control layout, like adding columns or spacing:
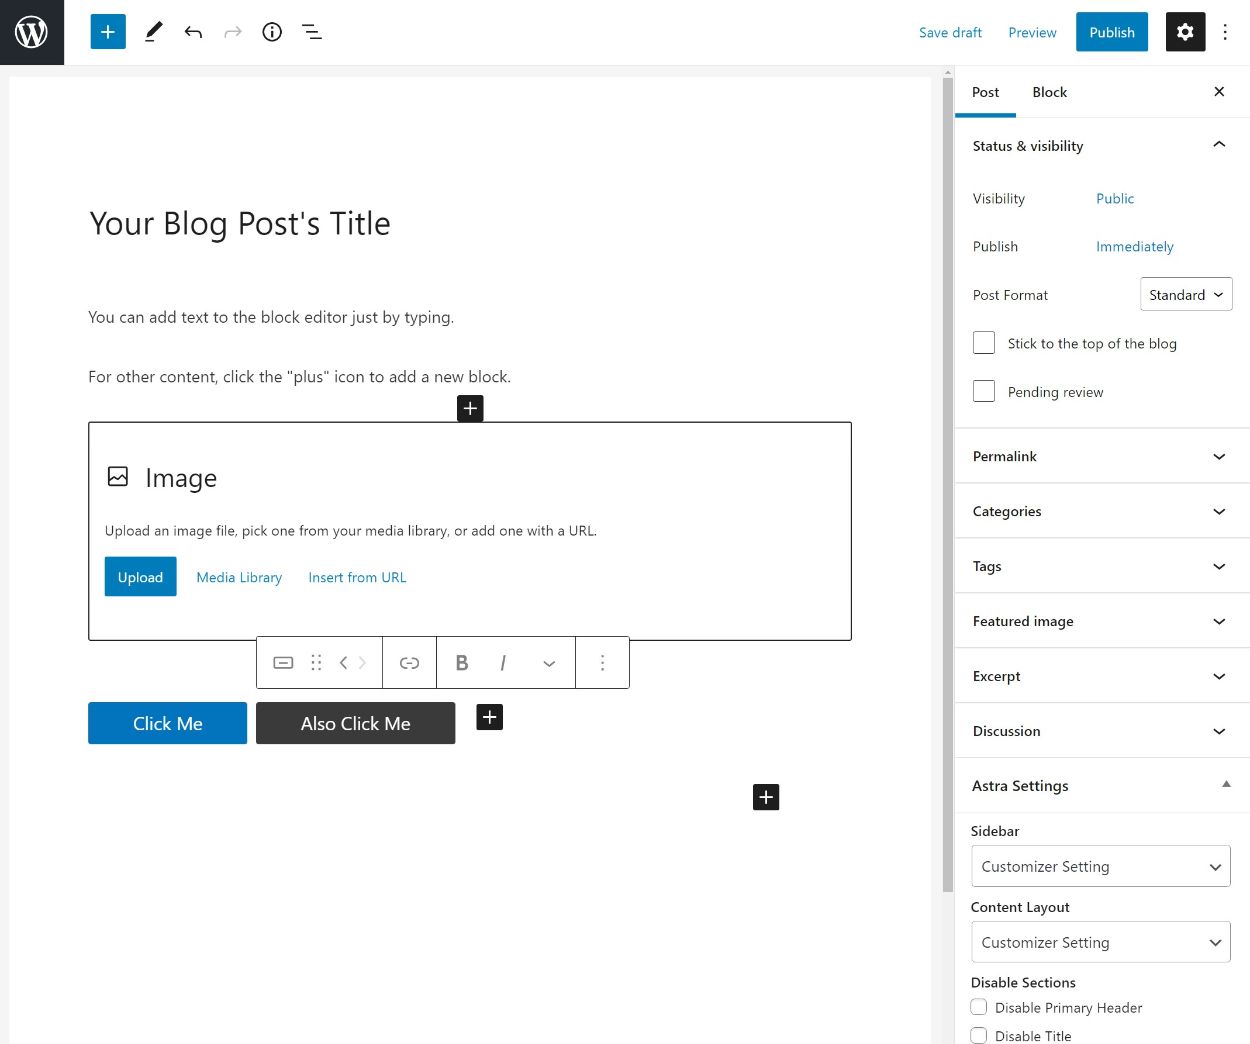
For more on how the editor works, you can check out our full guide to the WordPress editor.
6. Install and Customize Your Own Theme
Your blog’s theme controls how your site looks to visitors, which makes it an important consideration. You can think of it kind of like your blog’s “clothing”.
You can easily change themes without affecting any of your existing content, so don’t worry if you’ve already published a blog post.
Where Can You Find and Install Free Themes?
If you don’t want to pay any money for your theme, the best place to search is the official WordPress.org theme directory.
All of the themes listed there are:
- 100% free
- Code checked by the WordPress Theme Review Team
- Tagged for easy searching
Some good free options to get started with are:
All of these themes are multipurpose, which means you can use them for literally any type of blog. They also include lots of importable demo sites.
Once you find a theme that you like, you need to install it on your site. Here’s how to install a WordPress theme (click for a more detailed guide):
- Go to Appearance → Themes in your WordPress dashboard
- Click on Add New
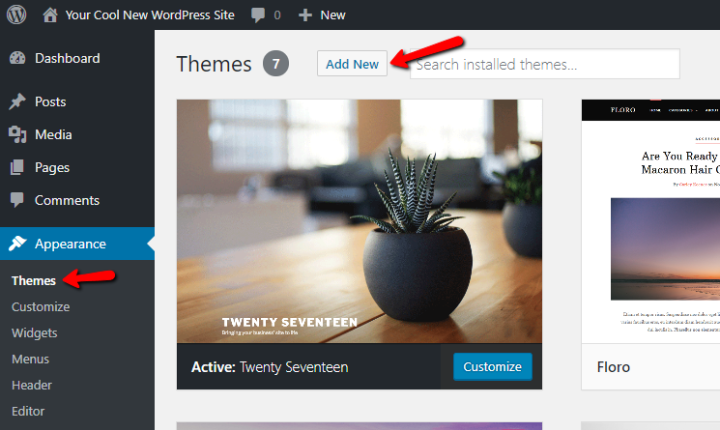
- On the next screen, search for the name of the theme that you found
- Hover over the theme and click Install
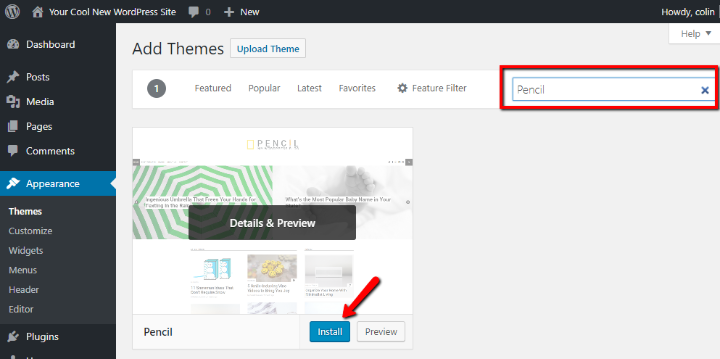
- Wait for the Install button to change to Activate
- Click the Activate button to make your theme live
That’s it! Your new WordPress theme is installed and active.
What Can You Find Premium WordPress Themes?
Premium themes often offer better designs and more features. If you can swing the budget, they usually offer the best experience.
Here are some good places to find premium themes:
- Elegant Themes – Elegant Themes makes a very popular and flexible theme called Divi. It costs $89 and you can use it for literally any type of site via its visual, drag-and-drop builder. You may also want to read our review of Elegant Themes and use our exclusive Elegant Themes coupon to get 20% off.
- Pixelgrade – They offer beautiful WordPress themes that are easy to use and customize.
- MeridianThemes – MeridianThemes sells 11 different themes, all of which make a great option for a blog. You can purchase individual themes for $59 or get access to all 11 themes for $89.
We also share lists of niche-focused themes on our blog in the WordPress themes category.
Once you find a premium theme that you like, make sure you download the ZIP file of the theme from the site where you purchased the theme.
Then, here’s how to install a premium WordPress theme:
- Go to Appearance → Themes in your WordPress dashboard
- Click on Add New
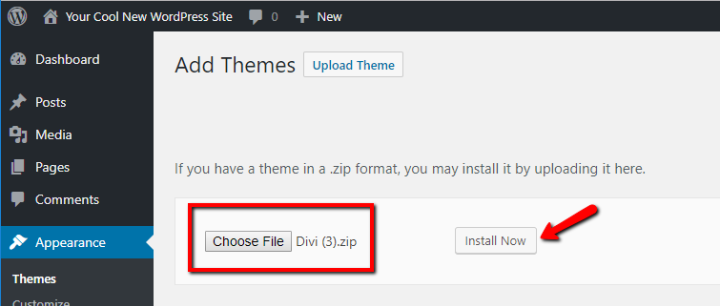
- On the next screen, click Upload Theme
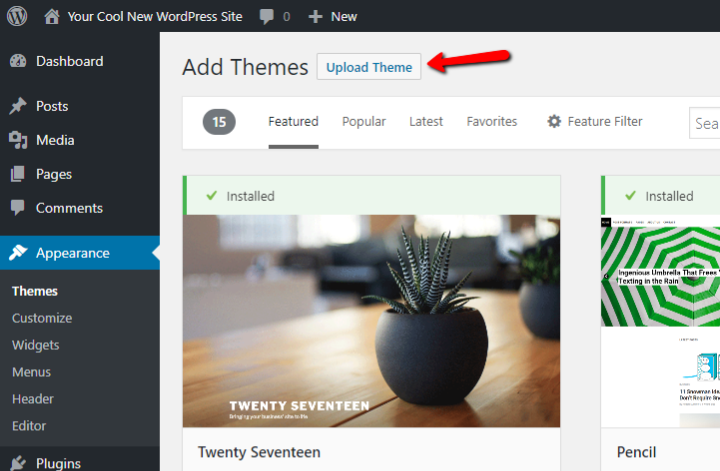
- Click Choose File and select the ZIP file of the theme
- Then, click Install Now
- Wait for WordPress to install the theme
- Click Activate to make the theme live on your blog
That’s it! You just installed and activated a premium WordPress theme.
7. Add Functionality to Your Blog With WordPress Plugins
While WordPress themes are mostly just about appearances, WordPress plugins are all about adding additional functionality to your blog.
For example, you might want a contact form so that your readers can get in touch with you. WordPress plugins are what add functionality like that.
Where Can You Find WordPress Plugins?
We’ve put together a post with some of the best WordPress plugins for bloggers, but if you’d prefer to forge out on your own, you can browse tens of thousands of both free and premium WordPress plugins:
- Official WordPress.org plugin directory – a massive collection of over 55,000 free WordPress plugins that you can easily install right from your WordPress dashboard.
- Elegant Themes – in addition to themes, they have tons of helpful plugins.
- CodeCanyon – a huge third-party marketplace of premium plugins.
We also publish lots of useful plugin lists on our blog in the best WordPress plugins category.
How to Install WordPress Plugins
Once you find a plugin that you like, here’s how to install it:
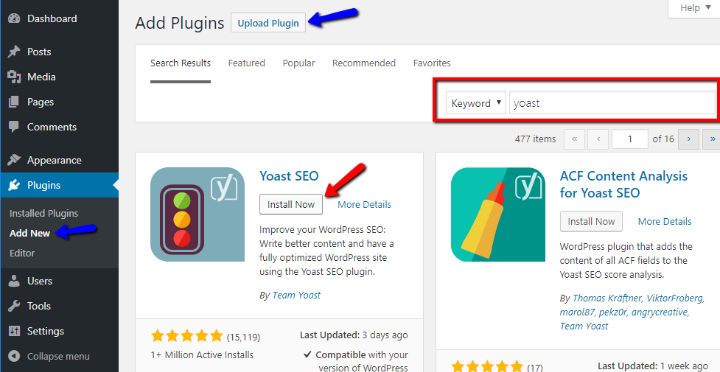
- Go to Plugins → Add New
If you found the plugin at WordPress .org:
- Search for the name of the plugin
- Click Install Now
- Wait for WordPress to install the plugin, then click Activate
If you purchased a premium plugin:
- Click Upload Plugin and upload the ZIP file
Launch Your Blog Today!
At this point, you have a fully-functioning blog built on WordPress. You’ve learned how to write your first blog post and also how to control your blog’s looks with themes and add features with plugins.
Now, all that’s left to do is start writing blog posts that people love to read. Beyond that, you’ll probably also want to:
- Discover tactics to get traffic to your blog
- Find ways to make money from your blog
We hope you found this guide helpful, and congratulations on launching your blog!
Still have any questions about how to start a blog? Ask us in the comments section and we’ll try to help!






WordPress got a huge community and good resources like plugins and themes which can be used instantly without any coding skills. Apart from all these its free to use…
That’s what I love about WordPress. You can turn your site into anything with the available plugins & themes, without spending much money.
Thanks for stopping by, Bharat.
It’s a good idea to conduct extensive research as well before you start any website. Think about what your website’s primary keyword phrases will be, and then Google those phrases to find out how tough your competition will be. If everything on the first page is a top-tier, authoritative website, it’s a strong clue that it may be a while before you blog starts to pick up any real traffic.
Well said, Jack. Keyword research is very important part and one should conduct extensive research before starting a website / blog.
Thanks for the comment, Jack. Hope you had a great weekend.
Hey Mohd and Dev,
WordPress has become an industry standard leader for a reason.
There are other CMS platforms such as Joomla and Drupal out there but they are hardly (if ever) considered as an option for blogging or internet marketing.
I have seen just ONE person use Joomla! as their CMS in the past (an IMer from the UK) and I have to say the membership area was very, very cool.
If I had the time I would definitely like to check out at least Joomla!
Have you guys tried other CMS resources besides WordPress?
Sergio
Hey Sergio,
Well said, mate. WordPress has become a CMS that people love to use.
There is no other CMS like WordPress (except Joomla) where we can get hundreds of thousands of plugins & theme for free.
I’ve used Pligg CMS, which is used for creating social bookmarking sites. I created one with it – Blokube.com It’s not the best cms, but I hadn’t have a choice. If I knew I could achieve the similar functionality with WordPress, than I wouldn’t have been using Pligg.
Thanks for coming over here and commenting. Your support is greatly appreciated, Sergi.
-Dev
thank you for sharing this very interesting post with us i really enjoyed reading about it, it is very helpful with great information.
Your welcome, Andrew and thanks for stopping by.
Very thorough article!! The idea of setting up WP seems like daunting task, but good work for simplifying and making an easy read. I’ll def reference this for clients. -mark
Excellent info. Really helpful and informative article. Now I know that it is really easy to start a blog on WordPress. Thanks for sharing with us.
Excellent post, thanks for sharing. I have to agree that WordPress is also my personal favorite, and rightly so. This is indeed a great way to start your blog, and also the easiest and fastest way to get indexed and actually rank in Google. I also like the link cloaking plugin called “Pretty Link”, great for cloaking affiliate links.
Nice in-depth Article. I want to know which theme you use and is it fully customized. I am not able to finalize theme for my blog and reading reviews on various themes. Kindly suggest good one or which you are using. Thank you.