
Not sure how to migrate Blogger to WordPress?
Thankfully, it’s actually pretty easy to move Blogger to WordPress because WordPress gives you a tool that can automate most of the process.
However, there are some important details to consider when setting everything up and there are still a few tasks that you’ll need to perform manually to ensure a complete migration.
To help you with seamlessly moving from Blogger to WordPress, we’ve written this step-by-step guide. It covers every single step in detail, along with 18+ screenshots to help guide you through the process.
We’ll start with a few common questions about the Blogger to WordPress migration process and then we’ll get right into the tutorial…
Blogger to WordPress Migration FAQ
Before we get to the step-by-step Blogger to WordPress import tutorial, let’s quickly run over a few common questions you might have…
The actual Blogger to WordPress migration process doesn’t cost any money. However, you will need to pay for hosting to create your WordPress site.
You can automatically migrate all of your Blogger posts to WordPress. It literally just takes a few clicks – you can export everything from Blogger to a single .xml file and then import that file to WordPress.
You will need to manually migrate your Blogger pages. You will also need to manually recreate your Blogger theme, layouts, and gadgets.
This guide will teach you how to properly redirect your entire Blogger site to the equivalent content on your new WordPress site. That is, someone visiting a specific post on Blogger will be taken to that same post on WordPress.
This tutorial on how to move Blogger to WordPress requires zero specialized knowledge. All you need to do is click a bunch of buttons – anyone can follow this.
There’s no way to automatically convert your Blogger theme to WordPress. However, you can find flexible WordPress themes that will let you create a similar design without requiring any technical knowledge.
How to Migrate Blogger to WordPress
Here are the basic steps for moving Blogger to WordPress – keep reading for detailed instructions for each part:
- Purchase WordPress hosting
- Install the WordPress software and set up your domain name
- Export your Blogger content (posts)
- Import your Blogger content (posts) to WordPress
- Set up your WordPress permalink structure
- Create the proper redirects on Blogger to send traffic to your WordPress site
- Set up your WordPress theme
- Migrate your Blogger pages (you need to do this part manually)
1. Purchase WordPress Hosting
If you want to create a site with WordPress.org, you’ll need your own web hosting, which is a bit different from how Blogger works.
Your web host is what powers the WordPress software and makes your site available to visitors.
To see all of the best options, you can read our full post on the best WordPress hosting.
Overall, though, we recommend GreenGeeks as a good affordable option for most new WordPress users.
Here’s why:
- The prices are quite affordable for what you get – you’ll pay just ~$45 for your entire first year when you use our GreenGeeks discount. You also get a free domain name, which is great if you’re not already using a custom domain on Blogger.
- GreenGeeks offers pretty good performance for the money, which means your site will load fast (very important).
- GreenGeeks makes it easy to install the WordPress software. All you need to do is click a few buttons. That means you can jump right into migrating Blogger to WordPress.
To go to GreenGeeks and take advantage of our GreenGeeks discount, you can click the button below:

For most sites, the cheapest Lite plan should be fine.
If you’re still using a Blogspot subdomain – e.g. yoursite.blogspot.com – GreenGeeks will also give you a free custom domain name that you can use for your site.
If you’re already using a custom domain name on Blogger and you want to keep that same domain name on WordPress, I recommend pointing your custom domain name to your new WordPress hosting and temporarily changing your Blogger blog to a free yoursite.blogspot.com domain during the migration process.
However, keep in mind that this will cause a little downtime as people who visit your site might see your unfinished WordPress site until you move your Blogger content over.
If you’re not sure how to point your custom domain name to your new WordPress site, the GreenGeeks support staff will be happy to help.
2. Install WordPress On Your Web Hosting
Once you’ve purchased web hosting, you need to install WordPress on your hosting plan.
Most hosts, including GreenGeeks, offer easy-to-use WordPress installer tools.
At GreenGeeks, you can find this tool by looking for the WordPress option under Softaculous Apps Installer in your GreenGeeks cPanel dashboard.
For more details, we have a detailed guide that shows you how to install WordPress on pretty much any host (including the cPanel that GreenGeeks offers), as well as a more complete guide on how to create a WordPress website.
Or, you can reach out to your host’s support if you’re still not sure how to set things up.
3. Export Your Blogger Content (Posts)
Once you’ve set up your WordPress site, you’re ready to start importing Blogger to WordPress.
To kick things off, you’ll need to export all of your existing posts from your Blogger site:
- Open your Blogger dashboard.
- Click on the Settings tab in the sidebar.
- Scroll down to the Manage Blog section.
- Click the Back up content link, which should open a popup.
- In the popup, click the Download option.
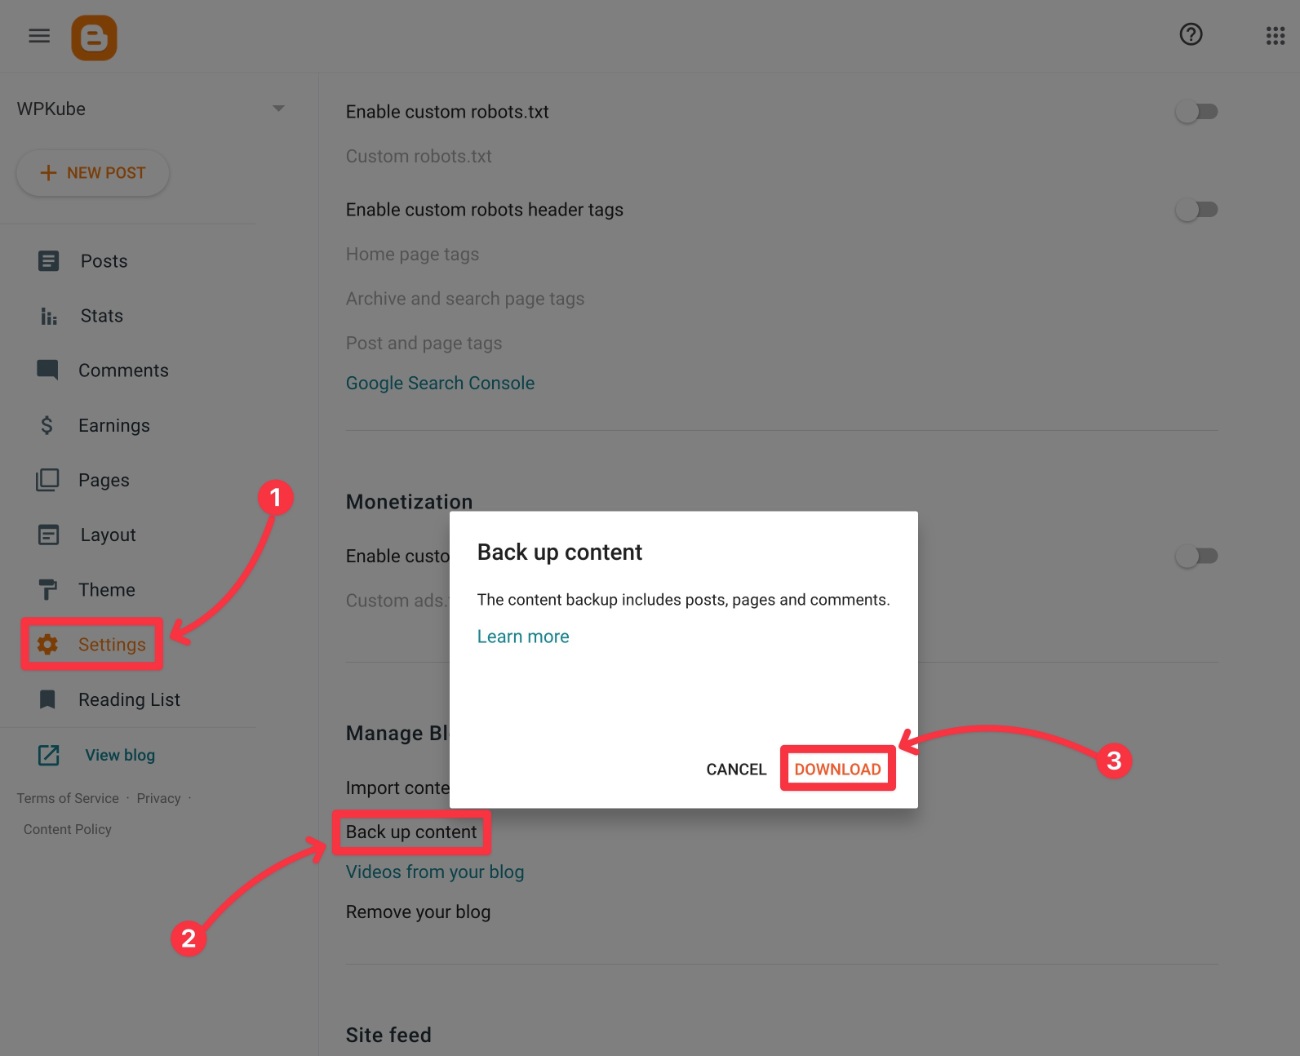
This should download a single .xml file to your local computer – it should be named something like blog-[date].xml. For example, blog-02-20-2023.xml.
Keep this file handy because you’re going to need it in the next step.
4. Import Your Blogger Posts Into the New WordPress Site
Now that you’ve exported your posts from Blogger, the next step is to import that content to your new WordPress site.
Here’s what to do:
- Log in to your WordPress site’s dashboard. You can access it by going to youractualdomain.com/wp-admin and logging in with the credentials that you entered while using your host’s WordPress installer.
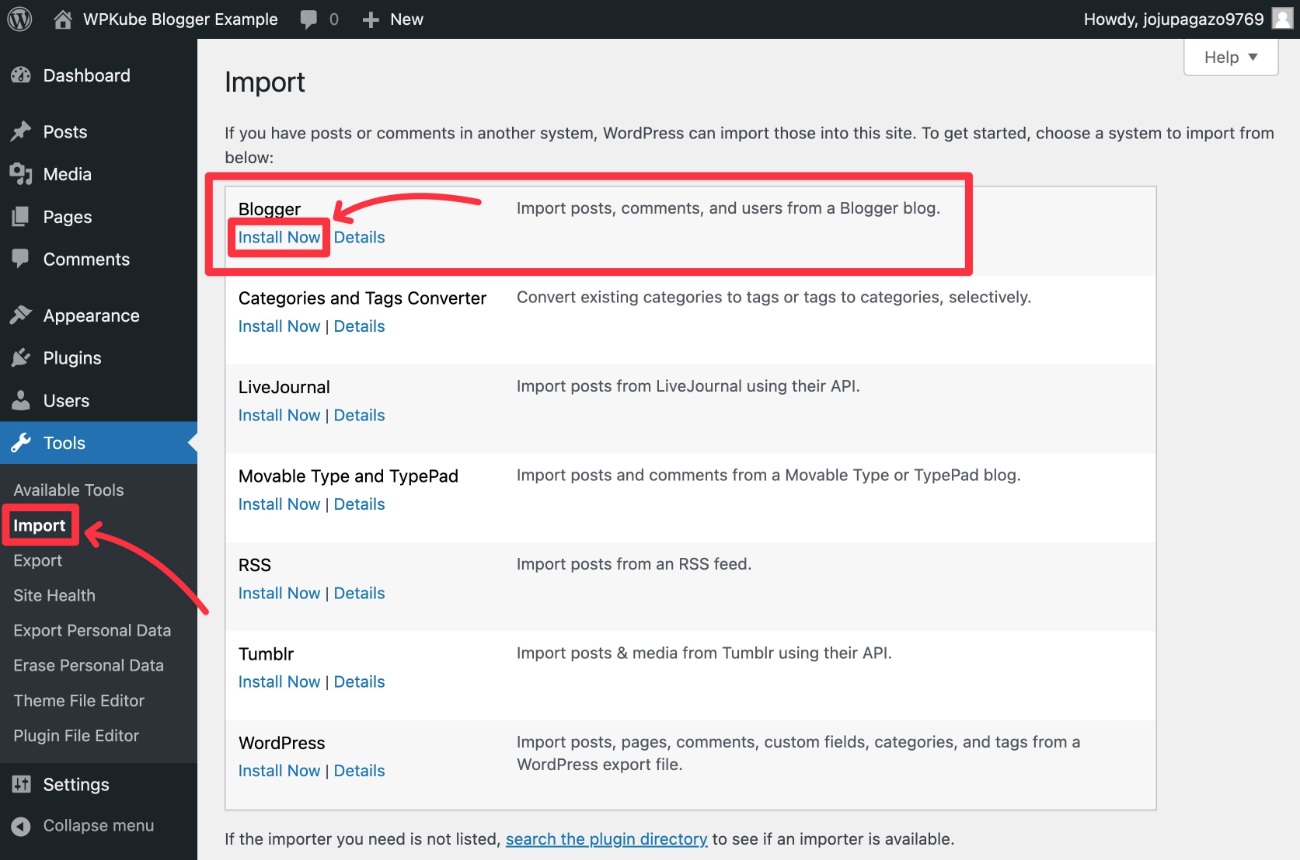
- Go to Tools → Import in the menu sidebar of the WordPress dashboard.
- Click Install Now under the Blogger tool.
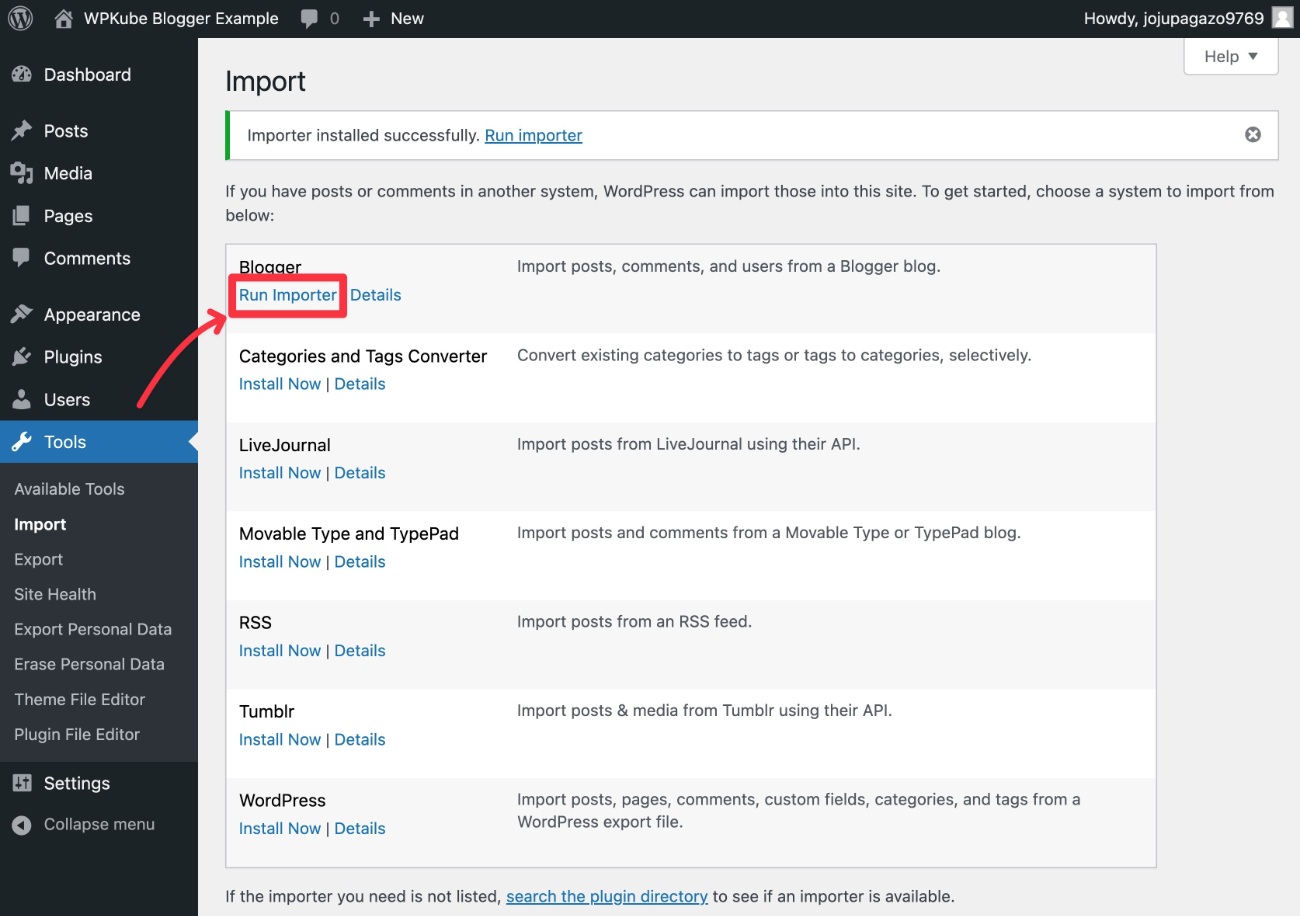
After you click Install Now, that same link should change to Run Importer. Click the Run Importer option to continue.
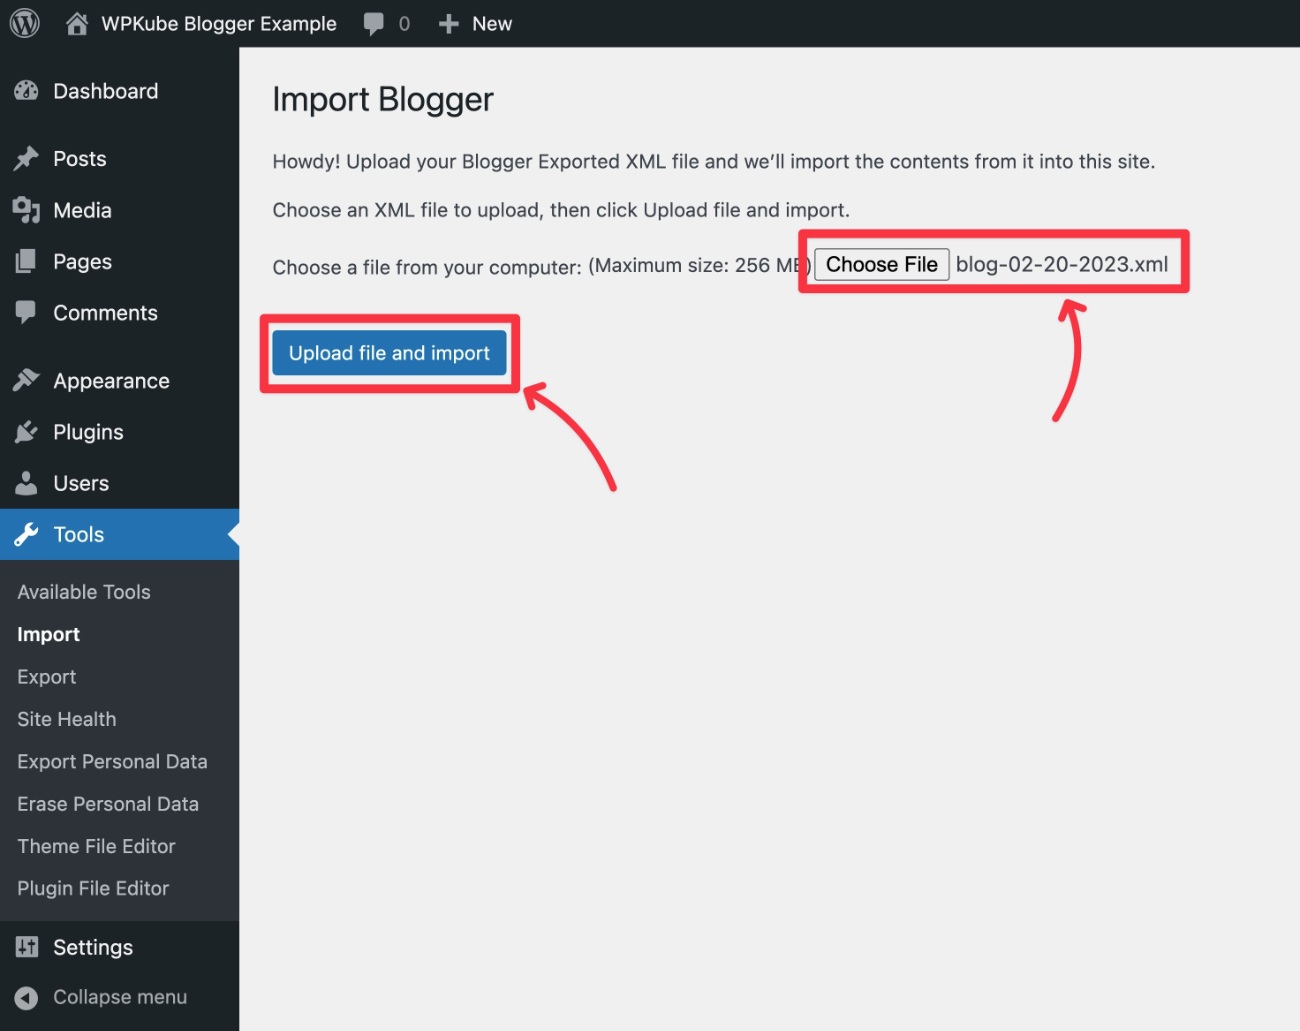
On the next screen, you’ll be prompted to select and upload the XML file that you downloaded from Blogger in the previous step.
Select the file using the Choose File button and then click Upload file and import.
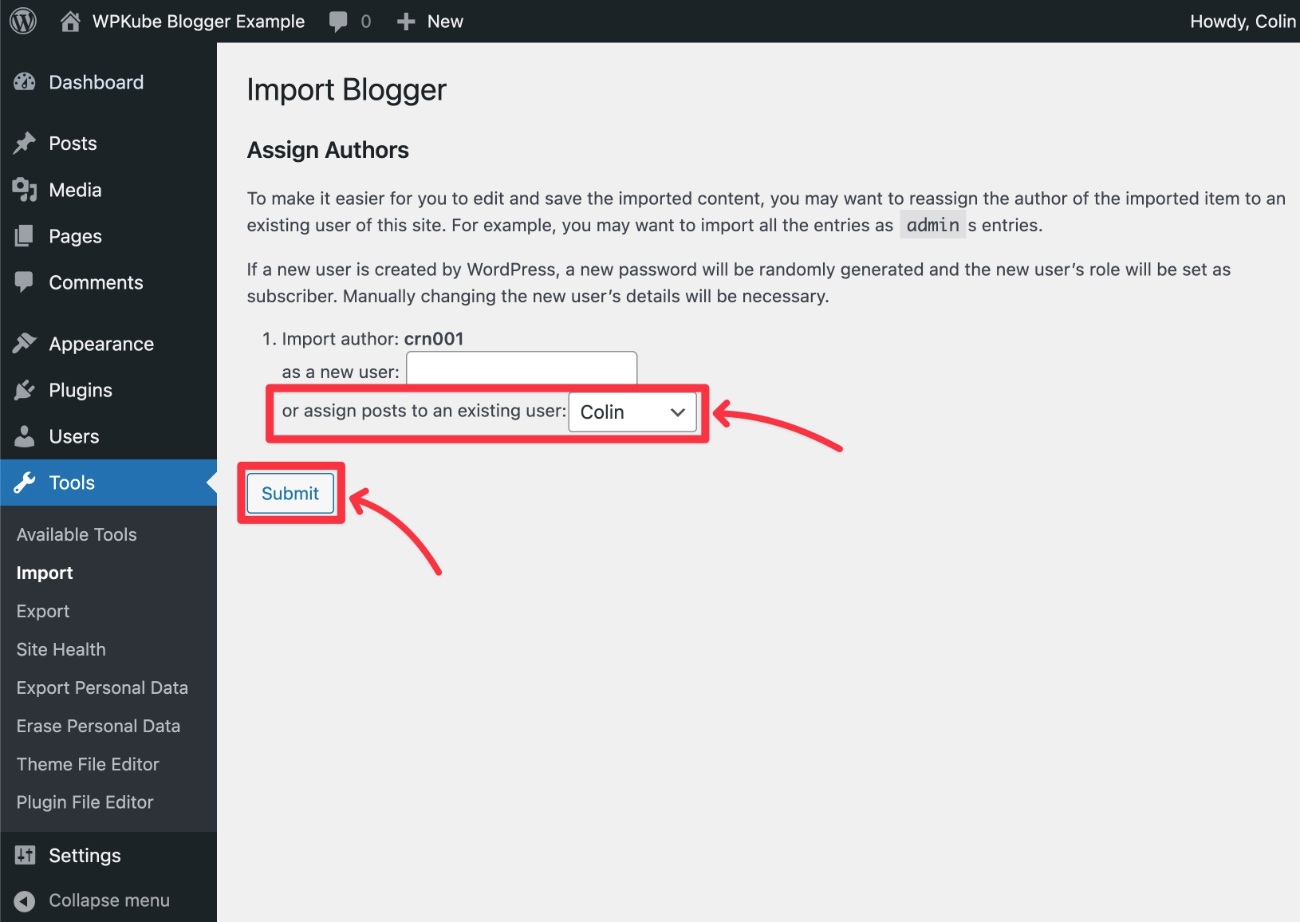
Now, you’ll be prompted to assign your existing Blogger posts to a WordPress user. You can choose any existing user or create a new user.
Most of the time you’ll want to use the assign posts to an existing user drop-down to select your own WordPress account. This will set your own WordPress account as the author for all of the posts from Blogger.
Once you’ve made that choice, click Submit.
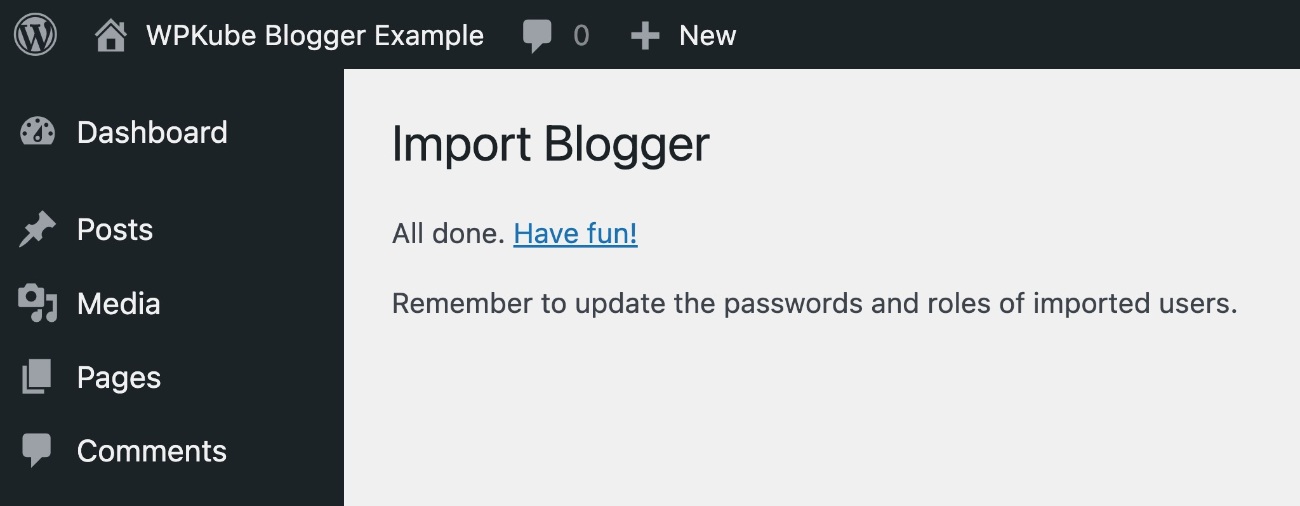
WordPress will now import all of your Blogger content. Once it’s finished, you should see a success message.
As part of this process, WordPress should automatically import the images that you used on your Blogger site. However, we recommend testing this by looking at some imported posts on your site and making sure the images are loading from your domain, rather than the .blogspot.com subdomain.
Also, this process only imports your Blogger posts. We’ll cover moving pages and other content later on.
5. Set Your WordPress Permalink Structure
Your WordPress site’s permalink structure controls the structure of your site’s URLs.
To ensure a seamless Blogger to WordPress migration, the easiest option is typically to configure WordPress to use the same permalink structure as Blogger.
Here’s how to do this:
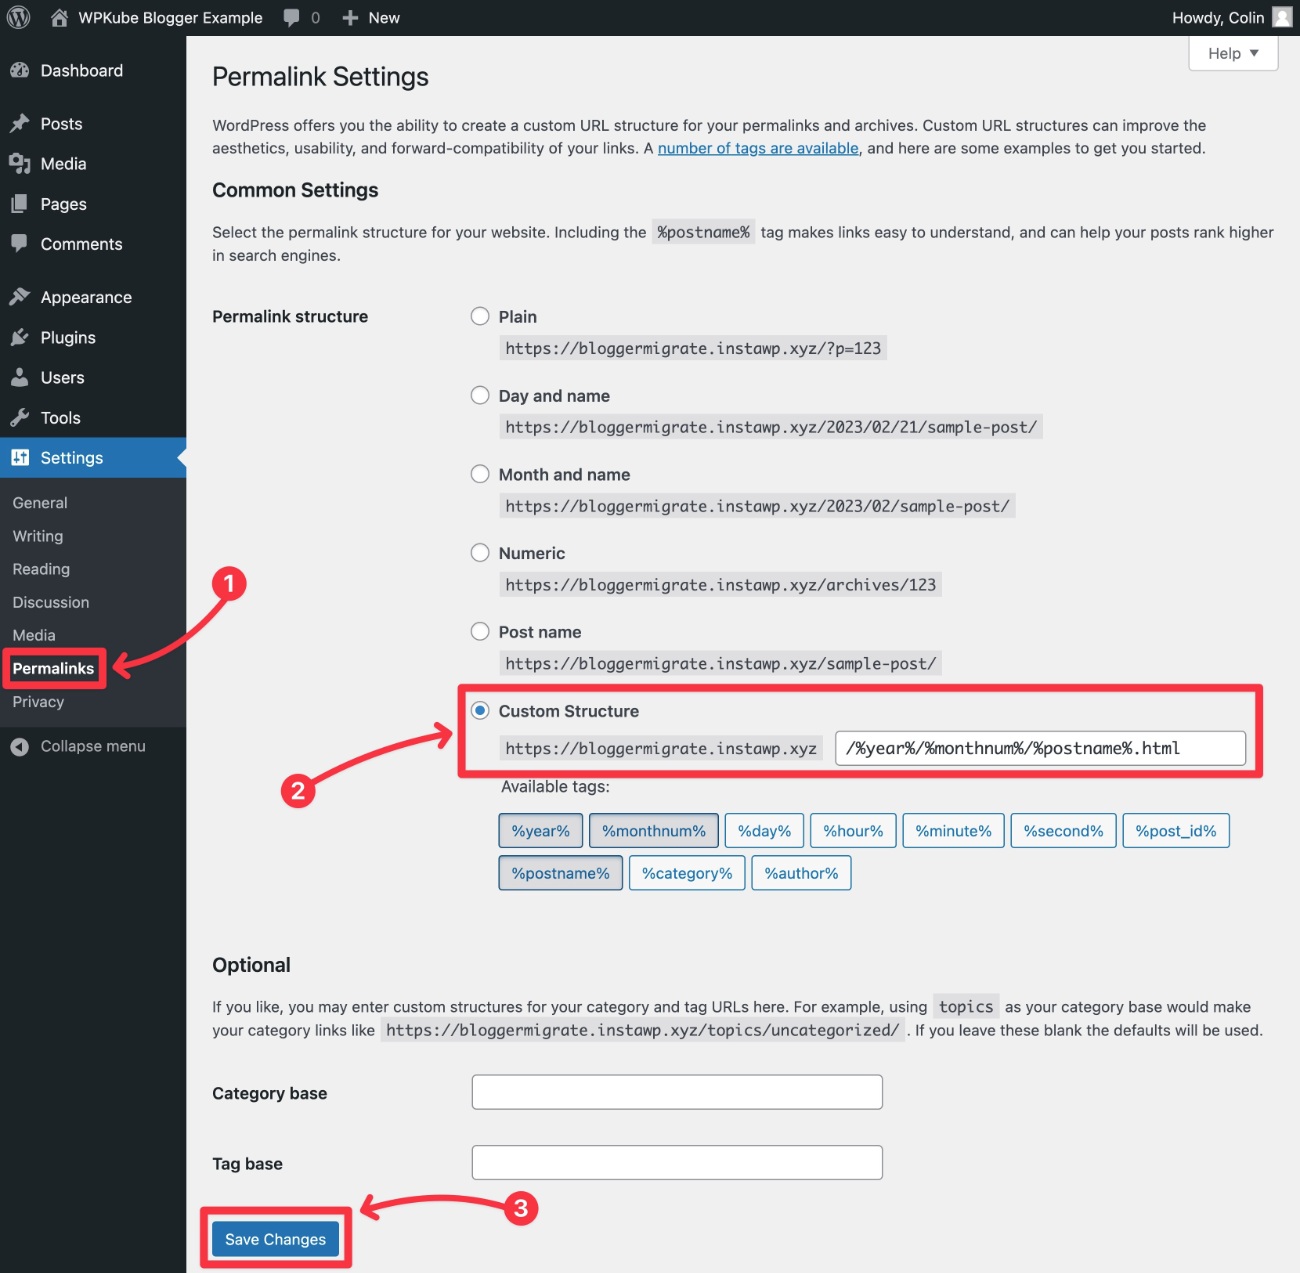
- Open your WordPress dashboard.
- Go to Settings → Permalinks.
- Choose Custom Structure.
- Add this text to the Custom Structure box –
/%year%/%monthnum%/%postname%.html - Click Save Changes at the bottom.
With that being said, you don’t have to use the same structure. You can choose a different structure and then redirect your Blogger content to the new structure.
If you use the free tool in the next section, it’s actually pretty easy to do this if you’re moving from a .blogspot.com domain to a custom domain name – e.g. yoursite.blogspot.com to yoursite.com.
Most WordPress users prefer just using the Post Name structure, rather than including dates in the URL like Blogger does.
If you’re using the same custom domain name on each site (e.g. yoursite.com on Blogger and yoursite.com on WordPress), it’s a little more complex to set up this type of redirect. As such, I recommend using the same permalink structure for now as I showed you above.
If you still want to change your site’s permalink structure with the same domain name, I recommend hiring a developer or using this permalink redirect generator tool from Yoast SEO. Again, this is a little more technical, so it’s outside the scope of this tutorial.
6. Redirect Your Blogger Site to WordPress
Now that you’ve moved all of your Blogger posts to your WordPress site, you’ll want to set up a redirect so that anyone who visits your old Blogger site will be automatically taken to the corresponding content on your new WordPress site.
This helps preserve your existing traffic and SEO efforts.
There are two parts here:
- Redirecting Blogger posts to WordPress
- Redirecting the Blogger RSS feed to WordPress
Redirect Posts and Contents
To properly redirect Blogger Posts to WordPress on a 1:1 basis, you’ll first need to generate the Blogger redirect code and then add it to your Blogger site.
Generate Redirect Code
To generate the proper code for your site, you can use the free Blogger to WordPress plugin.
To start, you’ll need to install the plugin on your WordPress site:
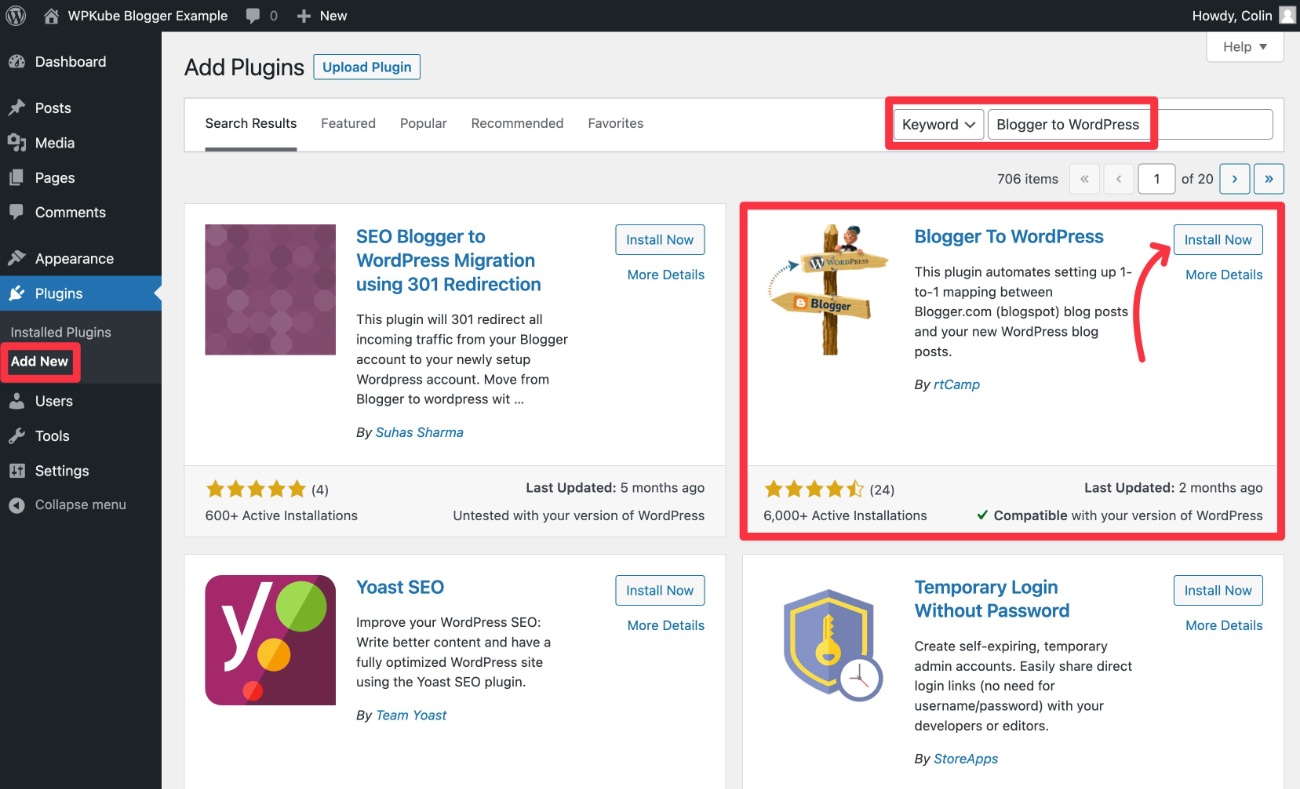
- Go to Plugins → Add New in your WordPress dashboard.
- Search for “Blogger to WordPress”.
- Click the Install Now button under the plugin result – you want the plugin by rtCamp.
- After the installation process finishes, click the Activate button (which will replace the Install Now button).
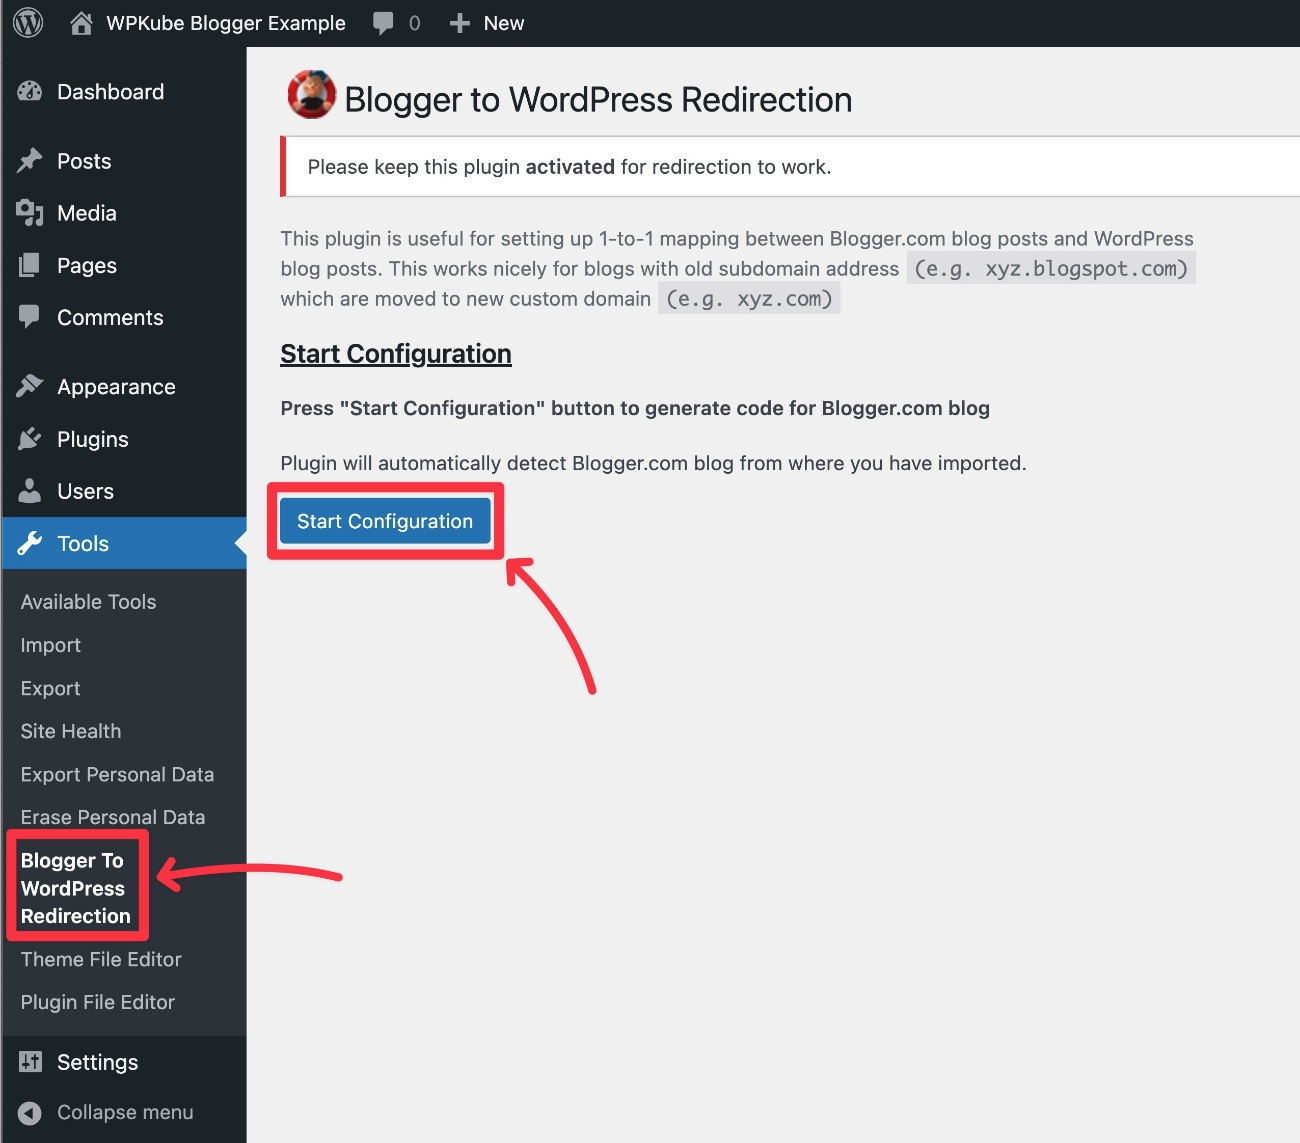
Once you’ve activated the plugin, go to Tools → Blogger to WordPress Redirection. Then, click the Start Configuration button.
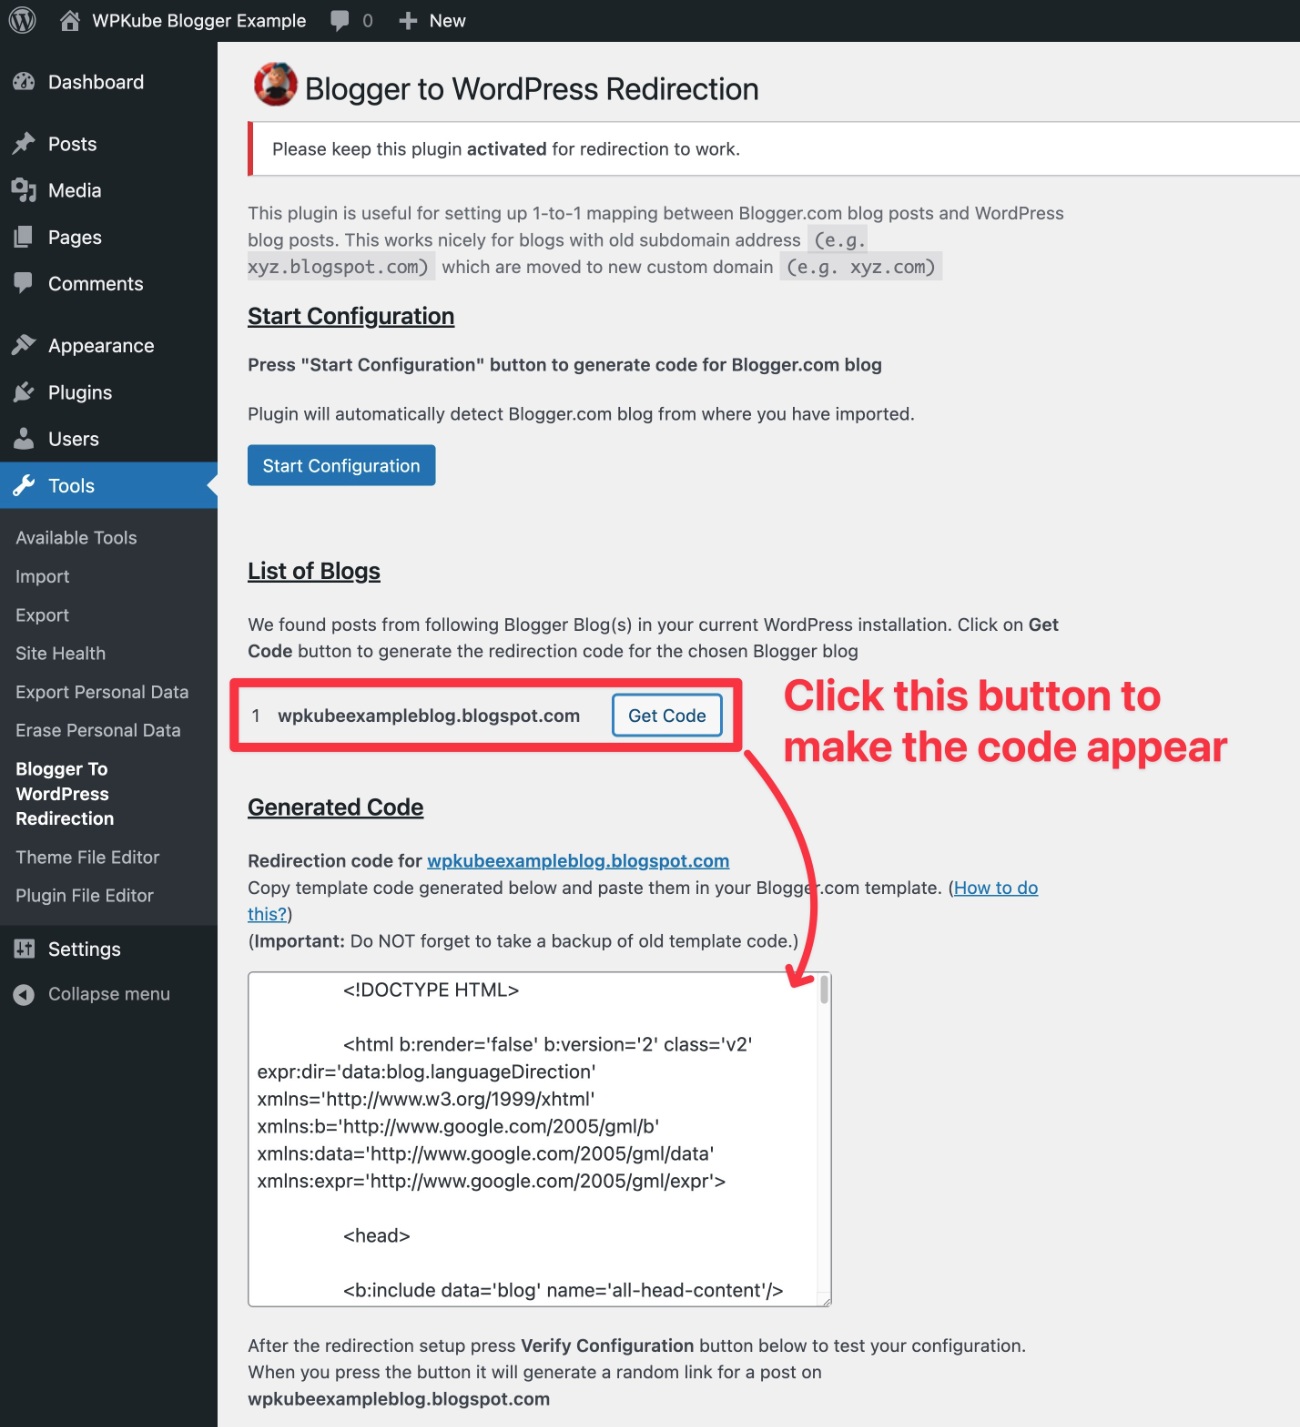
You should then see your Blogger site appear in the List of Blogs section.
Click the Get Code button next to your Blogger site. The plugin will now provide you with the relevant redirection code.
Add Redirect Code to Blogger
You’ll need to copy this code and then add it to your Blogger template:
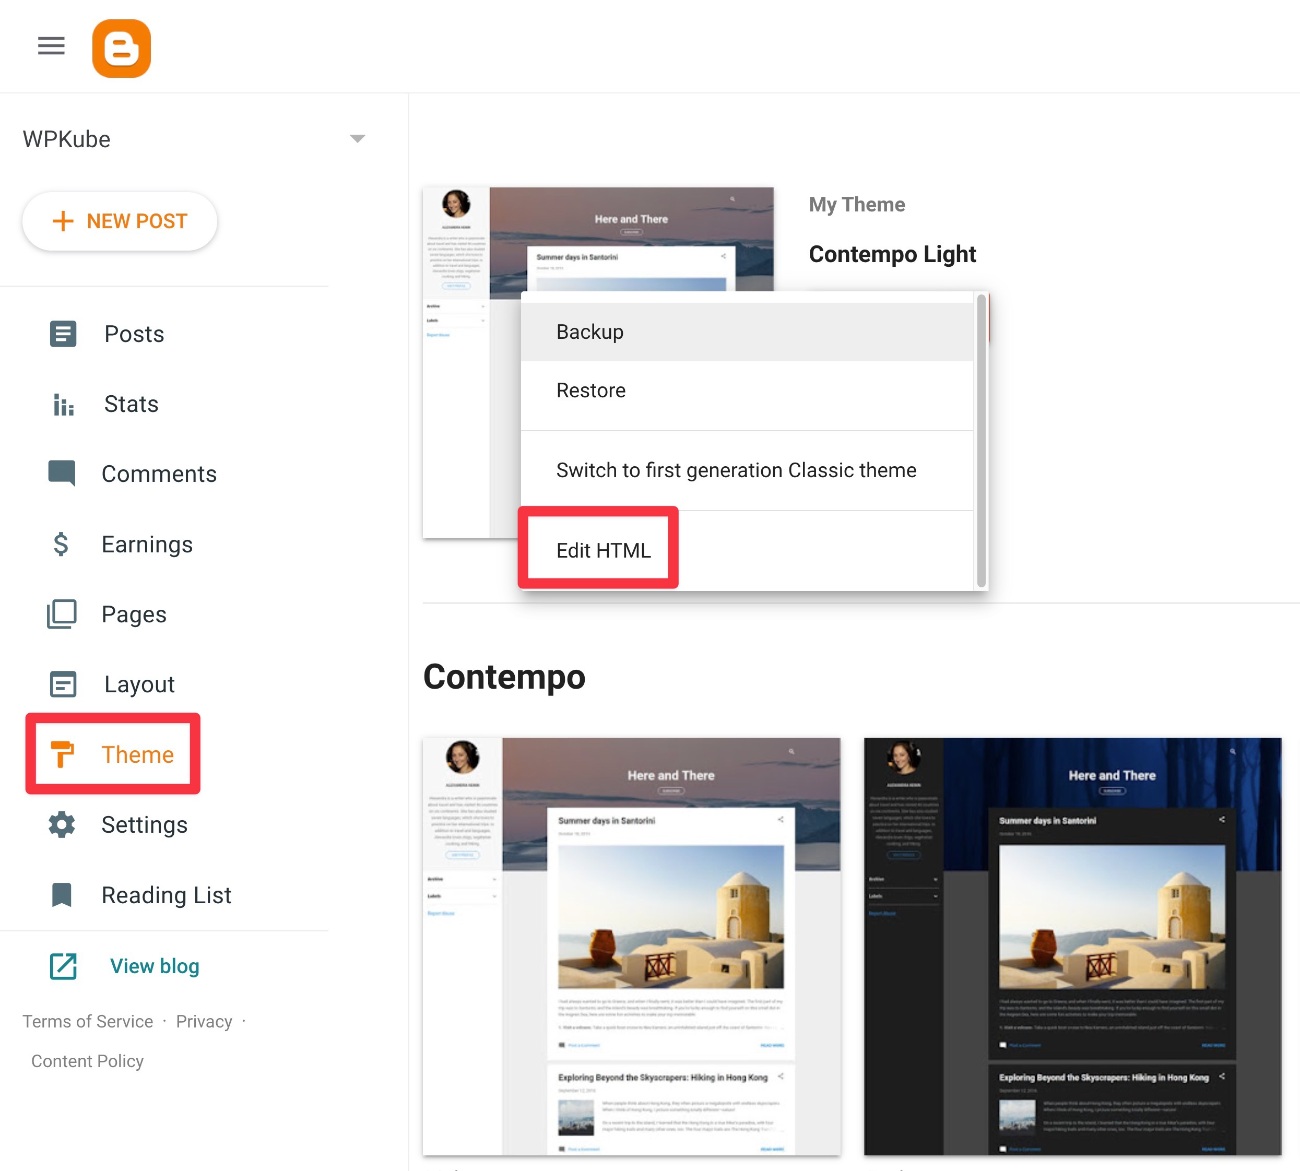
- Open your Blogger dashboard.
- Select the Theme tab in the sidebar.
- Click the down arrow next to the Customize button to expand a menu with more options.
- Choose Edit HTML.
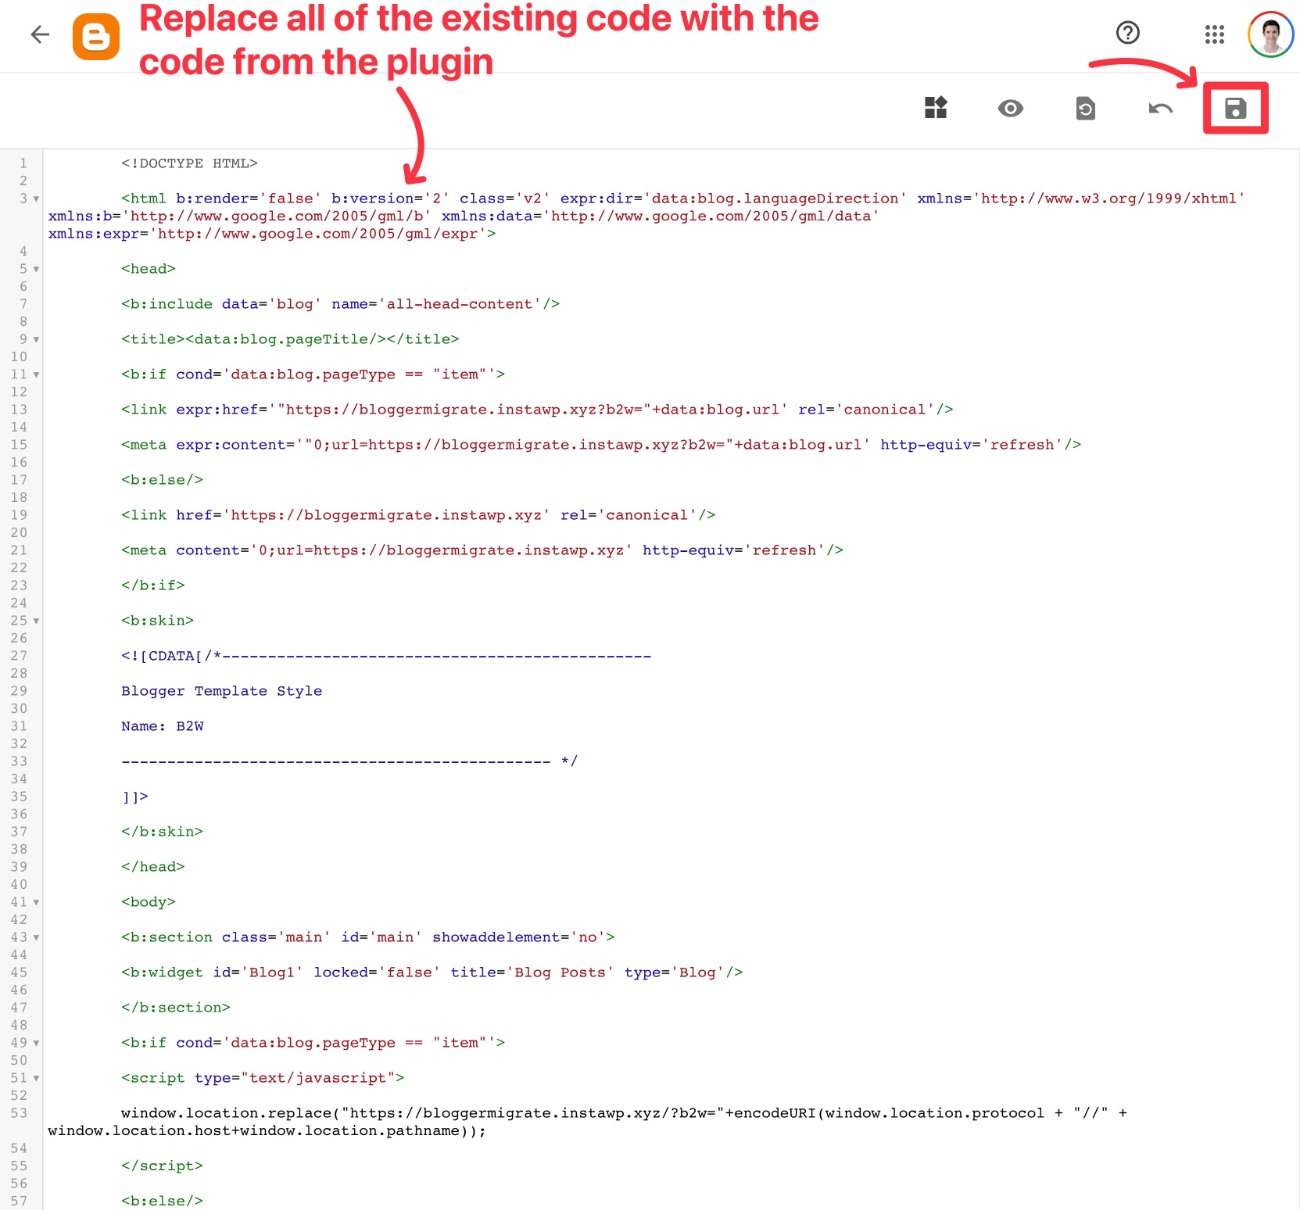
You should now see a code editor:
- Copy the existing code to a safe place, just so you have a backup in case you ever want to revert these changes.
- Delete all of the existing code from the editor.
- Paste in the code that you got from the WordPress plugin.
- Click the floppy disk icon to save your changes.
You’ll also need to add the redirect to the mobile version of your Blogger site:
- Select the Theme tab in the sidebar.
- Click the down arrow next to the Customize button to expand a menu with more options.
- Choose Mobile Settings.
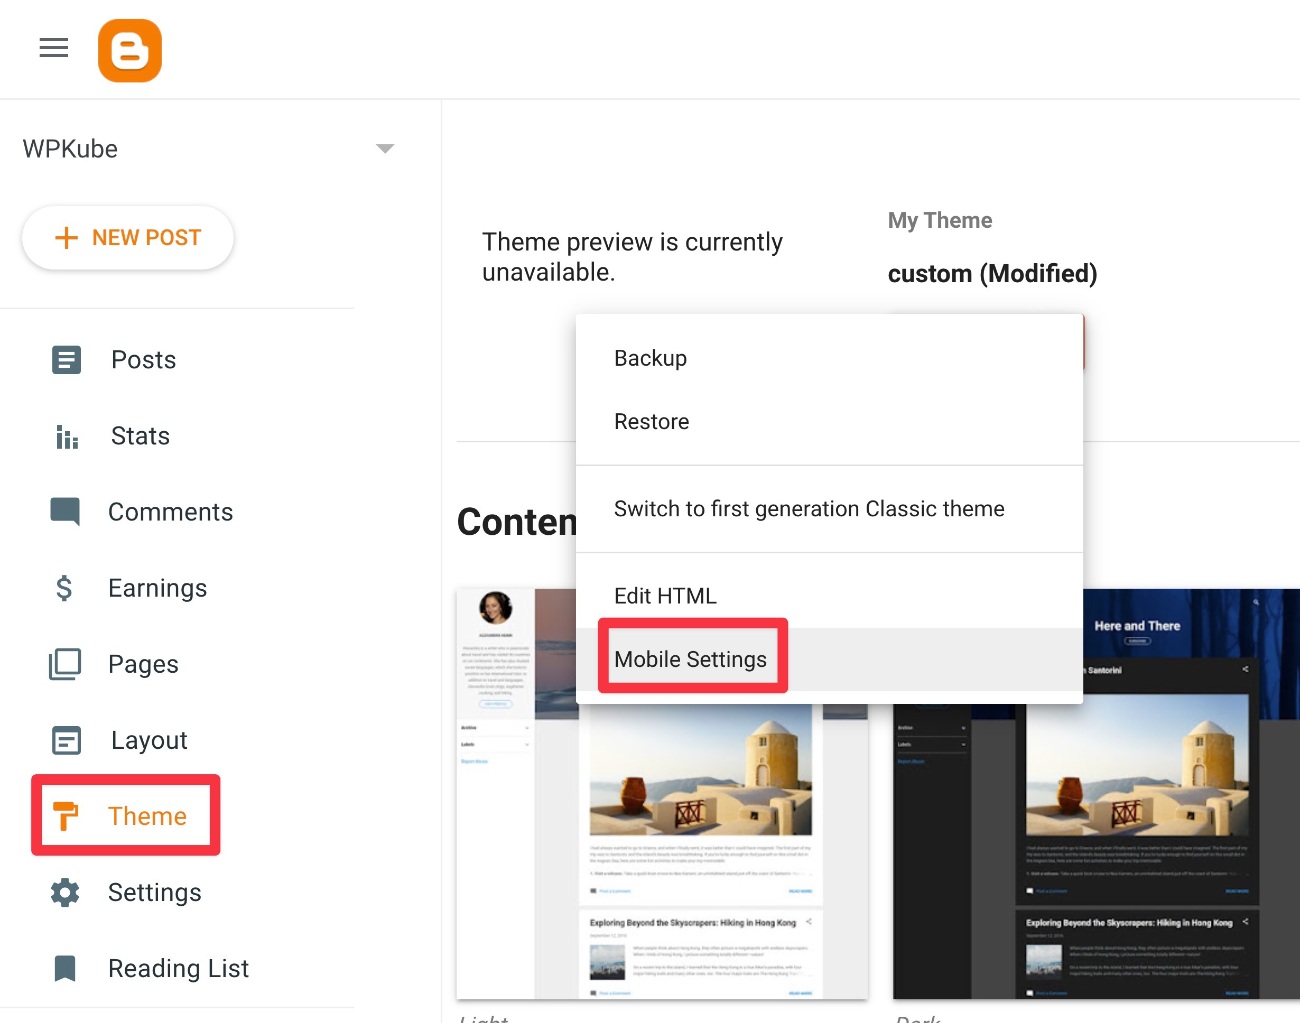
Then, configure your site to use the desktop theme on mobile devices and save your changes.
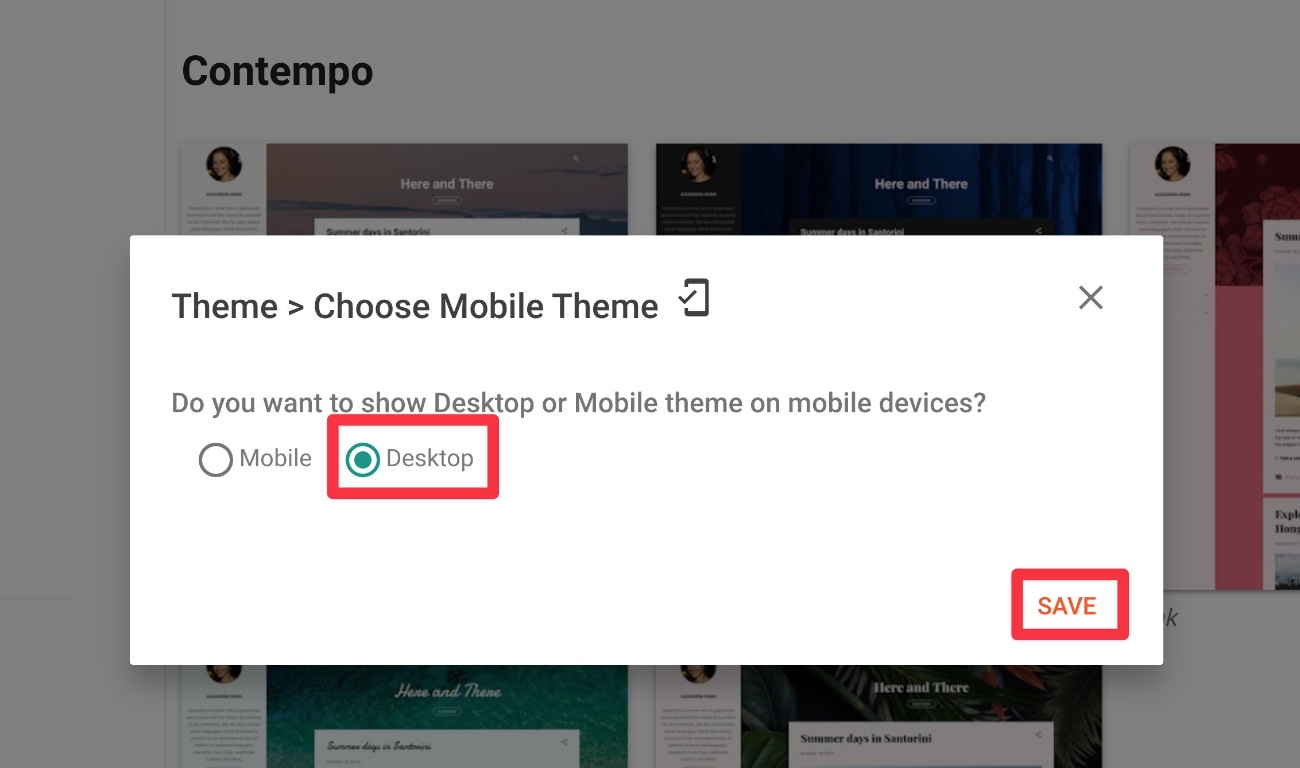
Now, both mobile and desktop visitors should be redirected to your WordPress site.
Test Redirect
To make sure you did everything right, go back to the plugin’s settings in your WordPress dashboard and click the Verifiy Configuration button at the bottom of the interface.
Then, open the test link. It should automatically redirect you from the Blogger site to your new WordPress site.
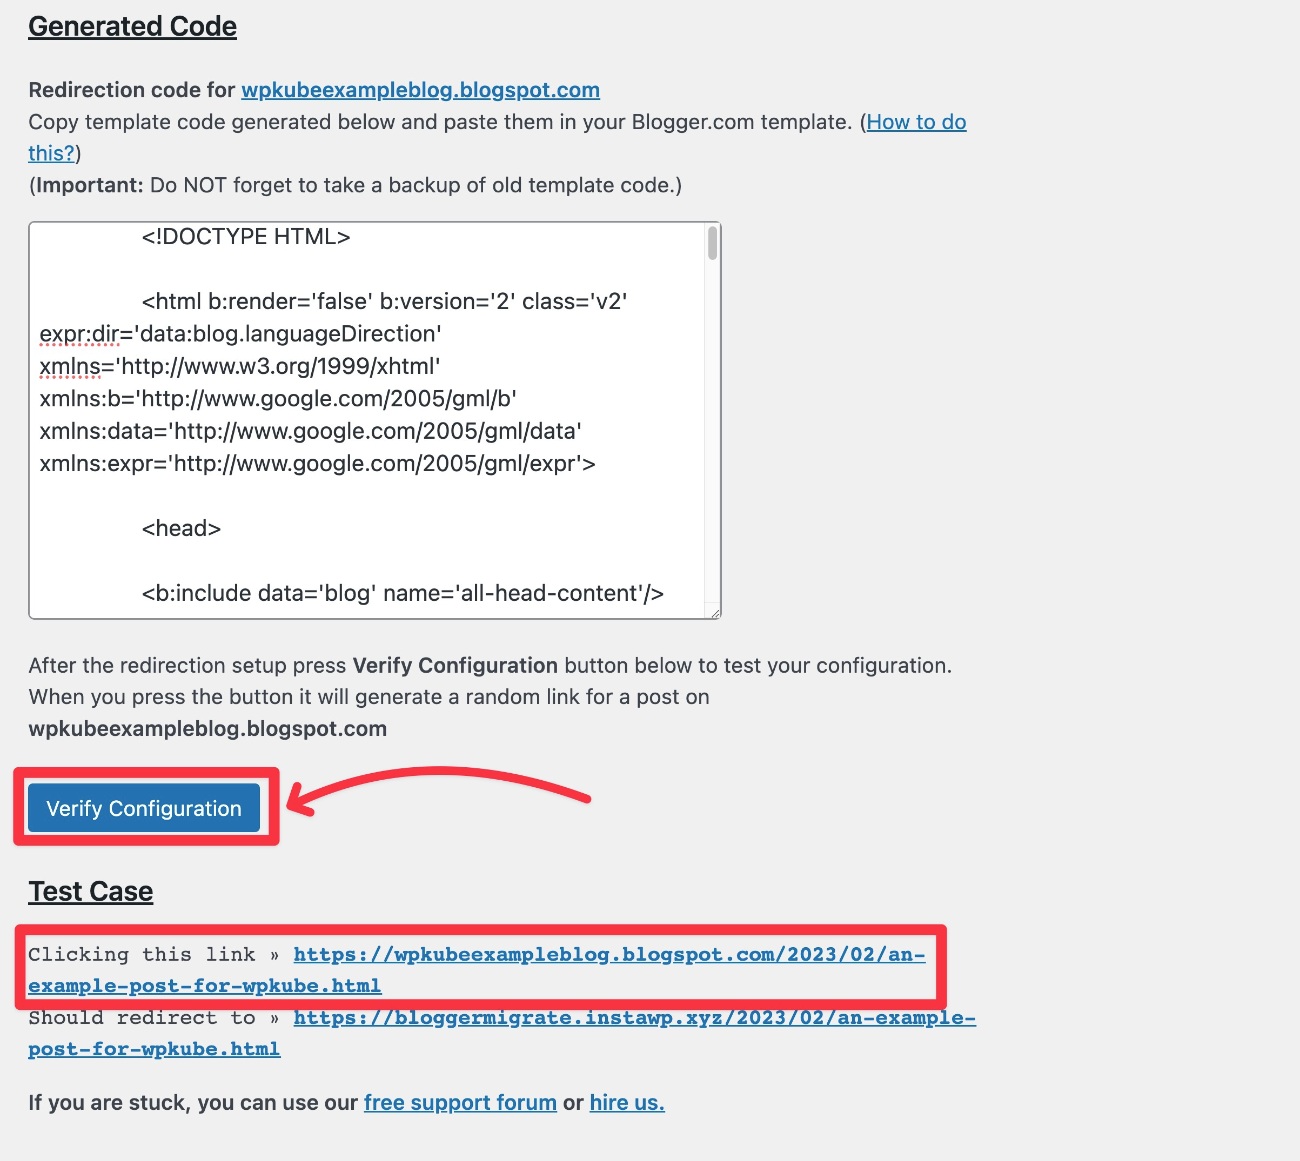
If you changed your WordPress site’s permalink structure, you should notice that the URL structures look a little different.
For example, after switching to just the Post Name WordPress permalink structure, you can see that the dates are removed from the URL on WordPress.
The plugin handles this automatically – there’s no need to do anything differently on your end.

Again – this only works if you’re moving from a yoursite.blogspot.com subdomain to yoursite.com.
If you’re using yoursite.com for both Blogger and WordPress, you’ll need to manually set up a 301 redirect if you want to change the permalink structure.
Redirect Your Blogger RSS Feed
In addition to redirecting your Blogger content to WordPress, you’ll also want to set up a redirect to redirect your Blogger RSS feed to your WordPress RSS feed.
This ensures that any users who subscribed to your Blogger site’s RSS feed will continue to receive new content that you publish on your WordPress site.
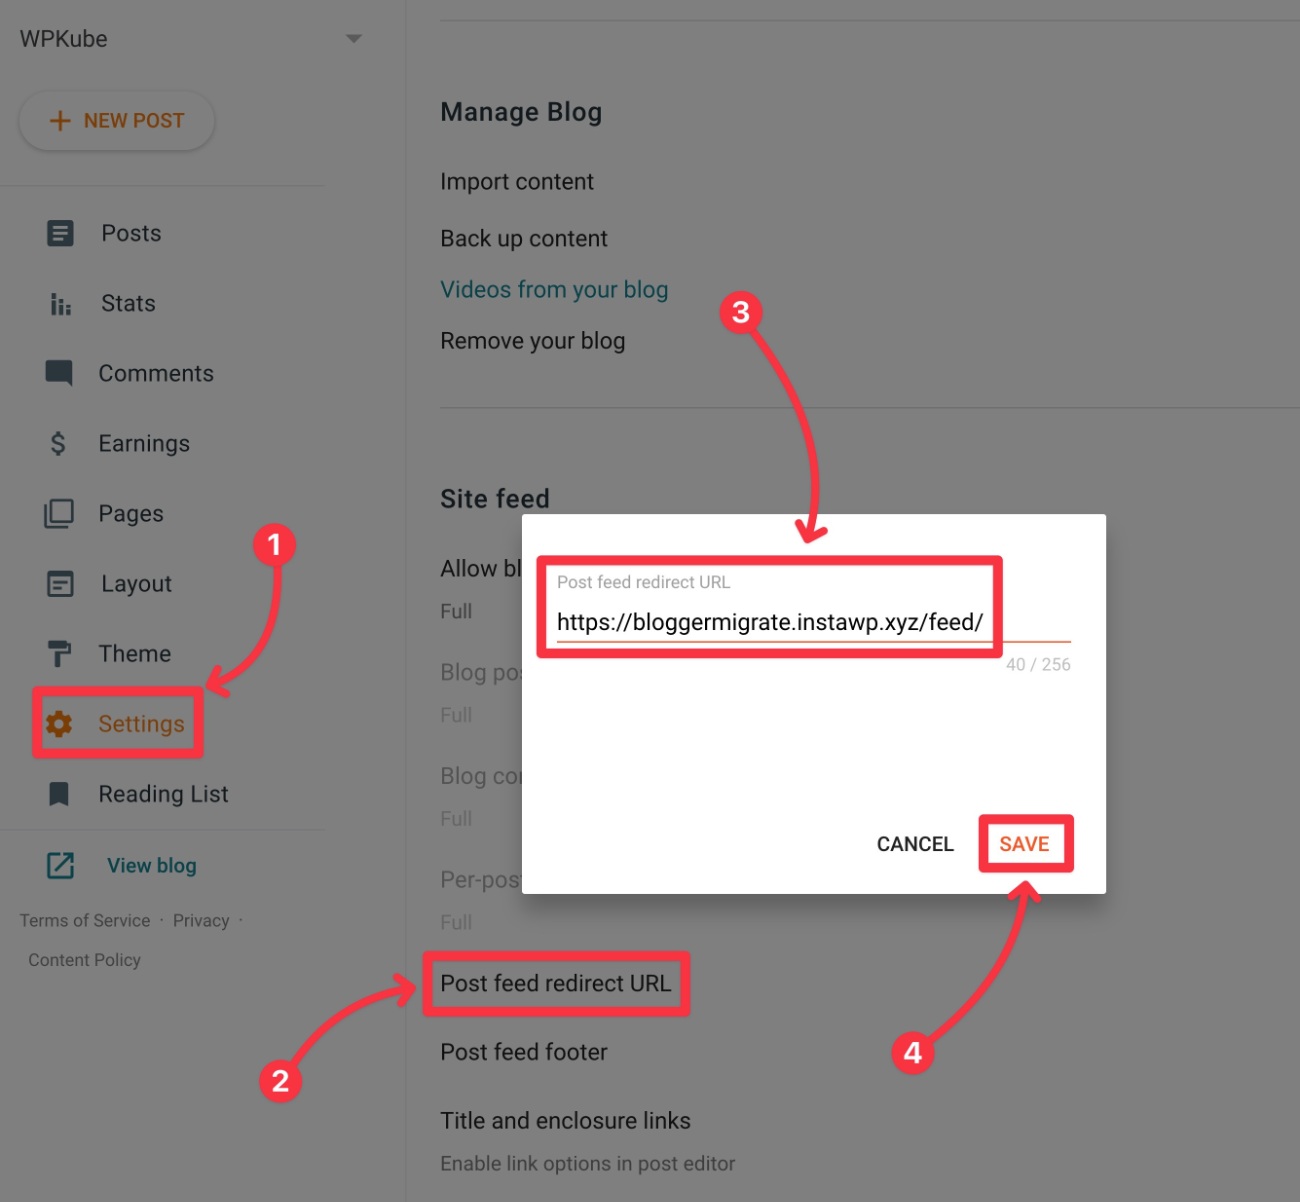
Here’s how to do this:
- Go to the Settings tab in your Blogger dashboard.
- Scroll down to the Site feed section.
- Click Post feed redirect URL.
- Paste in your WordPress RSS feed link – by default, that will be yourdomain.com/feed. Make sure to replace yourdomain.com with the actual domain of your WordPress site.
- Click save.
7. Set Up Your WordPress Theme (Similar to Blogger Themes and Layouts)
Unfortunately, there’s no way to automatically migrate your Blogger theme and layouts to WordPress.
However, this isn’t necessarily a bad thing, because WordPress has a much larger collection of themes and layout options for you to choose from.
Let’s quickly go through setting up the design of your WordPress site, including how to access similar functionality to the Blogger Layouts tool.
Choose Your WordPress Theme
To start, you’ll want to choose your WordPress theme, which controls the baseline design of your site.
With WordPress, you get access to thousands of free and paid themes:
- To find free themes, you can go to the WordPress.org theme directory.
- To find premium themes, you can search Google or check out our collection of the best WordPress themes.
For the most flexibility, you can consider one of the flexible multipurpose themes like Astra (our review), GeneratePress (our review), Neve, or Kadence (our review).
To install a WordPress theme, go to Appearance → Themes → Add New in your WordPress dashboard.
For more details, we have a complete guide on how to install and set up a WordPress theme.
How to Control the Layout of Your Theme (Blogger Gadgets)
To help you control the layout of parts of your site, WordPress widgets fulfill roughly the same role as Blogger gadgets.
For example, Blogger gadgets let you customize your blog’s sidebar and WordPress widgets let you do the same.
To access your site’s widgets, you can go to Appearance → Widgets.
To customize other layout elements – e.g. your header placement — you’ll typically rely on your theme’s settings. You can usually access these by going to Appearance → Customize.
8. Move Your Blogger Pages to WordPress
Unfortunately, the Blogger to WordPress migration tool only lets you migrate your Blogger posts, not your Blogger pages.
If you want to bring over your Blogger pages, you’ll need to do that manually by essentially copying and pasting the content.
To add a new page in WordPress, you can go to Pages → Add New.
For most designs, you can just use the native WordPress editor.
If you want more design control, you can install a WordPress page builder plugin such as Elementor to add visual, drag-and-drop design capabilities to your site. You can read our Elementor plugin review to learn more about how it works.
Migrate Blogger to WordPress Today
That wraps up our guide on how to migrate Blogger to WordPress.
If you follow the method in this tutorial, you should be able to move all of your content with minimal to no interruption to your site.
Once you get everything going on WordPress, you’ll be able to benefit from the added power and flexibility that WordPress gives you.
Most notably, you’ll be able to install WordPress plugins to add key features to your site such as forms, social media integrations, and lots more. To discover some of the best plugins to use, you can check out our various roundup lists:
- SEO plugins
- Form plugins
- Page builder plugins (visual, drag-and-drop design)
- Social media plugins
- Online course plugins
- Security plugins
- Email list building plugins
- Membership plugins
Do you still have any questions about how to migrate Blogger to WordPress? Let us know in the comments.


Hi,
I think this statement: “In short, if you truly want to make money with your site and drastically increase the amount of customization options, you should move your site to WordPress.org” is not true especially the part about making money blogging.
One of the highest earner blogger in the world is this: lindaikeji.blogspot.com. She started with Blogger and have not change up till today.
Banjo
Absolutely Tayo. It’s a subjective statement, and you can certainly make money with other platforms like Blogger, but I simply feel that Blogger lacks in customization options and the Blogger sites usually look less professional once completed. Once again, it’s subjective, but I try to recommend solutions that make it easy for every level of entrepreneur/blogger, and WordPress always allows me to free up time for other business tasks because my Blogger sites just don’t seem as intuitive to me. Thanks for the comment!
Hello Tayo,
Truly Linda Ikeji is an exeption to the statement Joel made but if you take the average statistics of the websites running on WordPress.org and those running on the Blogger platform, you will agree with me that the difference is huge.
Yes! Finally something about script.
Glad to be of service. 🙂
Umm… it’s so confusing. Can you make a video upon on it? please!