
Setting up Google Analytics Goals isn’t hard, but when using WooCommerce with PayPal, a bit of tweaking is required in order to get accurate data.
Maybe some of you have noticed that you’re getting some strange and inaccurate information in your Goals. That’s because the transactions (conversions) are credited to PayPal, rather than the original traffic source (your site). We’ll get to that issue soon enough, but first let’s get through a couple of things.
Why should you use Google Analytics Goals?
Because Goals are a great way to measure how well your site fulfills your desired objectives. You can see how many people landed on a specific page and what did they do after that. Did they leave? Did they browse other pages? And more important – did they convert?
For example, if 100 people entered your product’s page, but only 5 of them bought the product, it could mean there’s something wrong with that page. It could be a technical issue, which prevents people to successfully purchase your product, or the page isn’t properly optimized for conversions. Either way, measures have to be taken and testing has to be done.
How to set up Google Analytics
Step 1: Sign up, of course.
Go to Google Analytics and click on Access Google Analytics (top-right).
Note: You don’t need to create an account for every website you got. You can add multiple websites (properties) into the same account.
Step 2: Set up your account properties.
This is basically some simple information about your website. Its name, URL, industry (niche), time zone, etc. Nothing complicated.
Step 3: Insert the tracking code on your website.
Go into your Analytics account, click Admin in the top menu bar, make sure your Account and Property are selected correctly, then click on Tracking Info. A list will drop down; click on Tracking Code.
![]()
You’ll end up on the tracking code page, which looks something like this:
![]()
You need to copy that code as is and add it on every page that you wish to track. Usually, this code is placed inside your theme’s header.php, right before the </head> tag. By doing so, the code will be applied to all pages, which I recommend. Some might say that adding the code right before the </head> tag is not that good because that’s not the best place to add Java, and I won’t argue. I add it there because Google recommends it.
It can take some time (even a couple of days) until you’ll get Status: Receiving Data in the Tracking Code section, so don’t panic.
Now that you have an Analytics account, let’s get to the point.
Setting up WooCoomerce for Google Analytics
First of all, make sure you have PayPal set as your Payment Gateway. Got to WooCommerce -> Settings -> Checkout, and scroll down to Payment Gateways:
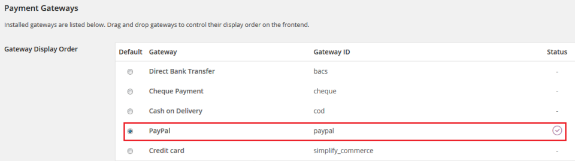
Now scroll back up and click the PayPal sub-menu button:
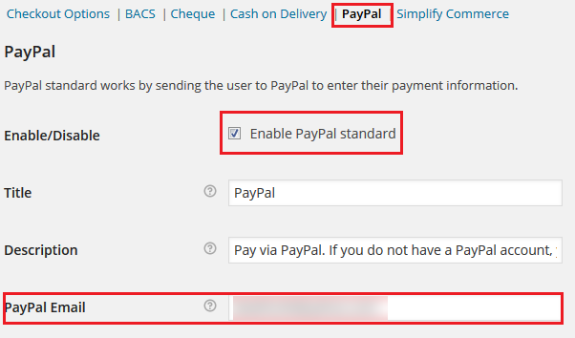
Insert your PayPal email and make sure that Enable PayPal standard is ticked. After that, scroll down under Advanced options and add the Receiver Email (it should usually be the same as your PayPal email).
Now, you need the WooCommerce Google Analytics Integration plugin. In the past this was part of WooCommerce, but since the 2.1 version, it needs to be installed separately. Install the plugin, then go to WooCommerce’s settings and click on the Integration tab. Make your settings look like this:
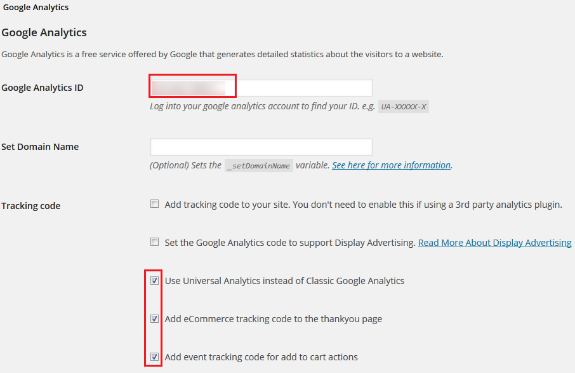
Enter your Google Analytics ID, which you can find on the Tracking Code page, and then tick the last three options. I haven’t added anything in the Set Domain Name because that’s for tracking across multiple domains and sub-domains. You can read more about that by following the provided link.
Setting up PayPal
Basically, what we need to do is to redirect the users to WooCommerce’s “thank you” page after they’ve made a purchase.
Log into your PayPal account, go to Profile -> My Selling Tools -> Website Preferences (press update):
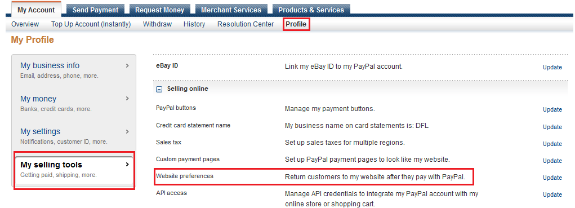
Under Website Payment Preferences, turn on Auto Return. Then you need to add http://yourdomain.com/checkout/order-received/?utm_nooverride=1 in the Return URL box. The whole thing should look like this:
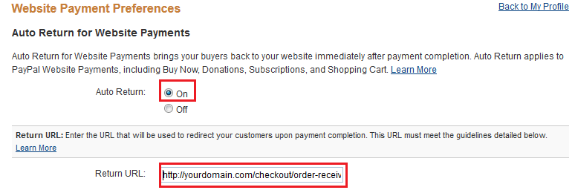
Note: Instead of yourdomain.com, you should add your real domain name, of course. I just added that for the sake of the example.
Now, we’ve turned Auto Return on so we can make sure that the user is redirected back to the WooCommerce “thank you” page after the payment. This is really important because that page is the Goal page. Once that page is hit, Google Analytics will count it as a successful conversion.
We also added this ?utm_nooverride=1 at the end of the URL to ensure that the transactions are credited to the original traffic source (your site), rather than PayPal.
That’s it for WooCommerce and Paypal. Let’s move on to the Goals.
Setting up Goals in Google Analytics
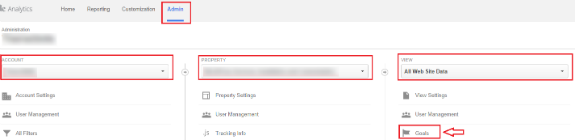
Log into your Analytics account, go to Admin at the top menu bar, make sure your Account and Property are correctly selected, then at the last column (View) click on Goals:
Then click on New Goal.
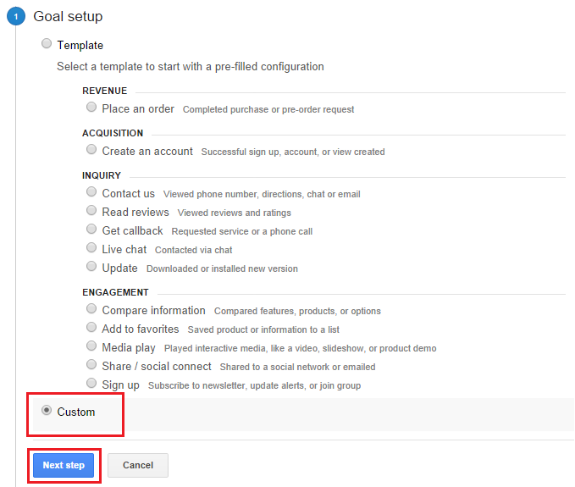
1. Goal Setup: Check Custom and press Next Step.
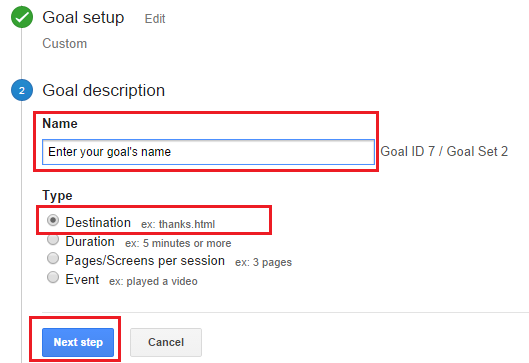
2. Goal Description: Enter your Goal’s name and select Destination. Press Next Step.
3. Goal Details:
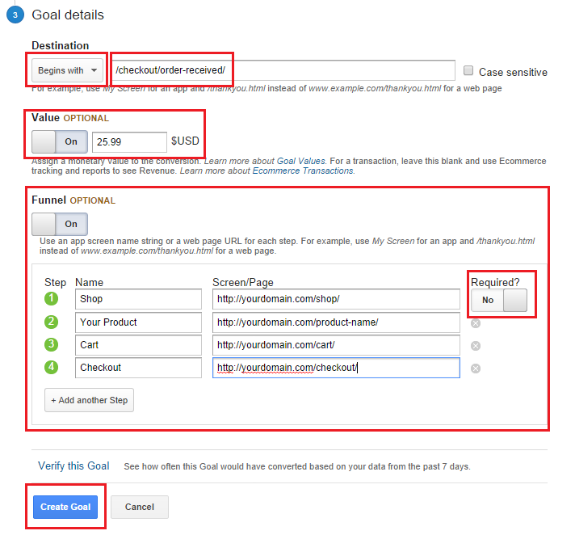
- For Destination select Begins with, then add /checkout/order-received/.
- Turn on Value if you are making a Funnel like mine, which goes through a product. If you have several products and just want to make a simple Funnel, like Shop -> Cart -> Checkout, then you don’t need to add a value because you don’t know what product was purchased. I usually make several different Funnels, not just one.
- Turn Funnel on because it’s very useful. Every user must take some steps in order to become a customer, and the Funnel gives you a visual representation of the conversion data between each step.
- If you make the first step of the Funnel required, entries below step 1 won’t count towards the Funnel Conversion Rate.
- Press Create Goal and you’re good to go.
There could still be a problem, though. If the user closes the tab before the redirection to the destination page (thank you page) is complete, the transaction won’t be considered as finalized by Google Analytics. But usually most customers wait until they are redirected to the “thank you” page.
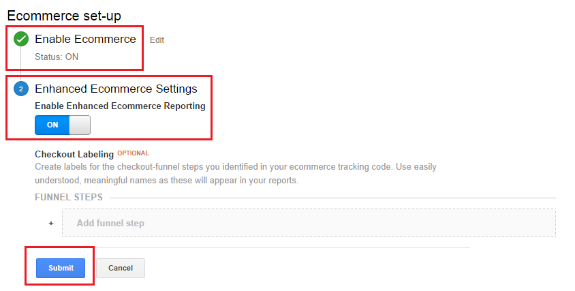
I also suggest enabling your Ecommerce Settings in your Google Analytics. Go to Admin in the top menu bar, and in the 3rd column (View) click on Ecommerce Settings:

Once there, turn on Enable E-commerce, click Next Step, and then turn on Enhanced Ecommerce Settings as well. Press Submit.
And we’re done! Not as hard as you expected, huh?
Hope this post will finally help you get some accurate conversion data in Google Analytics Goals!


Thanks for sharing..! Actually, I am going to install some ecommerce plugin on my buddypress blog. This make me sense about woocommerce optimization and it is really useful tips to me..! 🙂
thanks, been looking how to intergrate analytics and woo commerce to track sales, see if your tutorial works over the coming weeks
thanks for posting!
The guide is nice but honestly the funnel configuration shouldn’t include the /shop or /product pages, at least if it’s the only funnel you’re going to look at: you’re mixing in the 99% sessions of the site and so the data is going to reflect that, making analysis of the shopping funnel harder and even useless.
Instead of that, start the funnel by the cart then -> user data -> payment -> confirmation of payment and if you want to look at the data of /shop or /product or whatever, configure another funnel just for that. in my experience its better to do that, but it’s my opinion only!
Brilliant tutorial, woothemes should be producing content like this. so much misinformation around the web regarding woocommerce and its capabilities
Hey Nick,
Glad you feel that way — thanks for the nice words :).
Nice Turorial, but still I have this paypal account used for multiple e-commerce websites. So how can I set the Auto Return in Paypal when I can’t fill the Return Url field?
Thanks so much for this tutorial! I’ve been building WordPress sites for over a decade now, but my friends and I just started our first eCommerce store selling eSports pins at LitLoot and I was struggling to get Google Analytics properly configured with WooCommerce. Much thanks!
Great blog.
This plugin is outdated and seems to have been deserted: WooCommerce Google Analytics Integration plugin.
Would you have any suggestions for an alternative?
Hi,
Thanks for your very useful post. I get a somewhat different problem but directly related trying to track my Woocommerce funnels in Google Analytics. As I use a redirection plugin, I created my own thank you page for all my products and I correctly set up all the goals (one per product). In my GA goals, I set the different steps the funnel has to follow to record a sale:
1. Spectific product page url (landing page)
2. Checkout page (I use another plugin to skip the cart page, this it goes directly to the checkout)
3. The realized goal: the thank you page url.
I’ve set “Yes” at the question “Required?” in the GA goal path.
I’ve test and it correctly tracks the sales, but even if I use different paths: one goal per product (what is changing is the #1 of the funnel, the product pages url, that is different from one goal to another) and even if it is tick “Required”, I get ALL my goals recording the same thing: if someone buy a product one time, it records like if ALL of my products have been bought one time…
As a solution, I think I can create a different thank you page for every product, but it is really heavy solution to do something so simple. Why GA does not follow every funnel as a distinct one?
Thanks a lot if you can help!