
Trying to figure out how to migrate from WordPress.com to WordPress.org? Our step-by-step guide will show you exactly how to get the job done.
Moving to WordPress.org will give you more control over your site and let you install your own plugins and themes without needing to pay for the pricier WordPress.com Business plan.
Thankfully, WordPress.com makes it pretty easy to migrate your site to WordPress.org, even if you’re using the free WordPress.com plan.
In this step-by-step guide, you’ll learn all about moving from WordPress.com to WordPress.org in the fastest, most complete way.
Let’s dig in!
Note – our WordPress.com to WordPress.org migration tutorial is focused on helping you migrate a free WordPress.com site or a site that you’ve created with one of the cheaper WordPress.com paid plans including Personal or Premium.
If you’re using the Business or eCommerce plans, you can install a migration plugin and migrate your site much like a self-hosted WordPress site. We recommend installing the All-in-One WP Migration plugin and using that to migrate your WordPress.com site to WordPress.org. More on this later.
What You Need to Migrate WordPress.com to WordPress.org
If you want to follow our tutorial to migrate from WordPress.com to WordPress.org, you’re going to need a few things.
- A domain name for your WordPress.org site if you aren’t using a custom domain yet. If you are already using a custom domain name with WordPress.com, you can keep the same domain.
- A hosting account for your new WordPress.org site – check out the best WordPress hosts here
- A WordPress.org site – we’ll talk about how to set one up if you don’t have one already
- Direct access to your WordPress.com account, so have the login information ready so we can transfer the files over
Step 1: Sign In To WordPress.com and Export Your Site’s Data
To start, you want to export all the data from your old WordPress.com site.
You’ll download a file that contains your site’s data to your local computer. Then, you can upload that file to your WordPress.org site.
Here’s how:
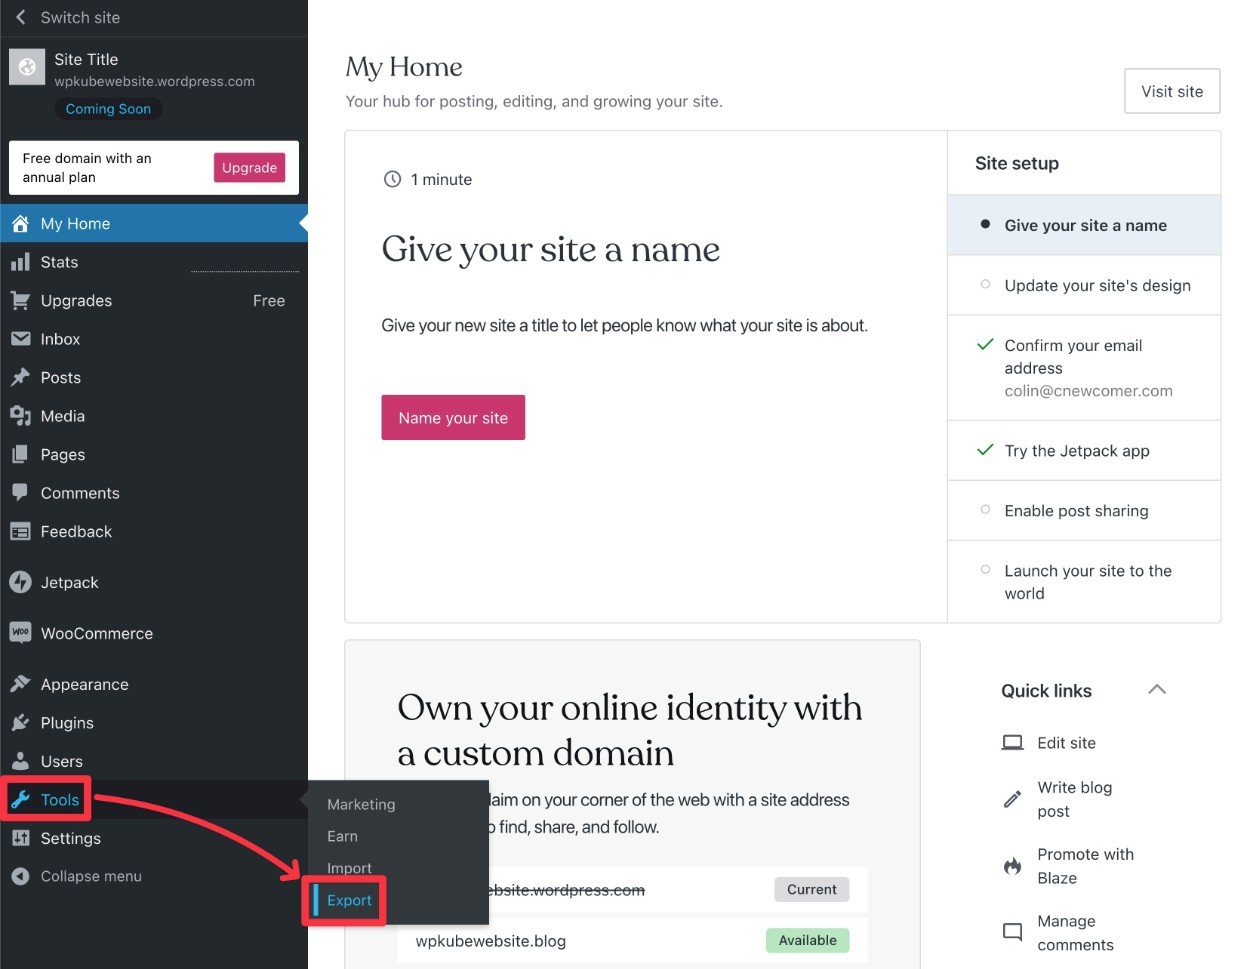
- Log in to your WordPress.com website.
- Select the Tools tab on the left hand side of the dashboard.
- Click on the Export option under the main Tools menu.
On the next screen, click the Export all button next to Export content to do a full export of your site’s content.
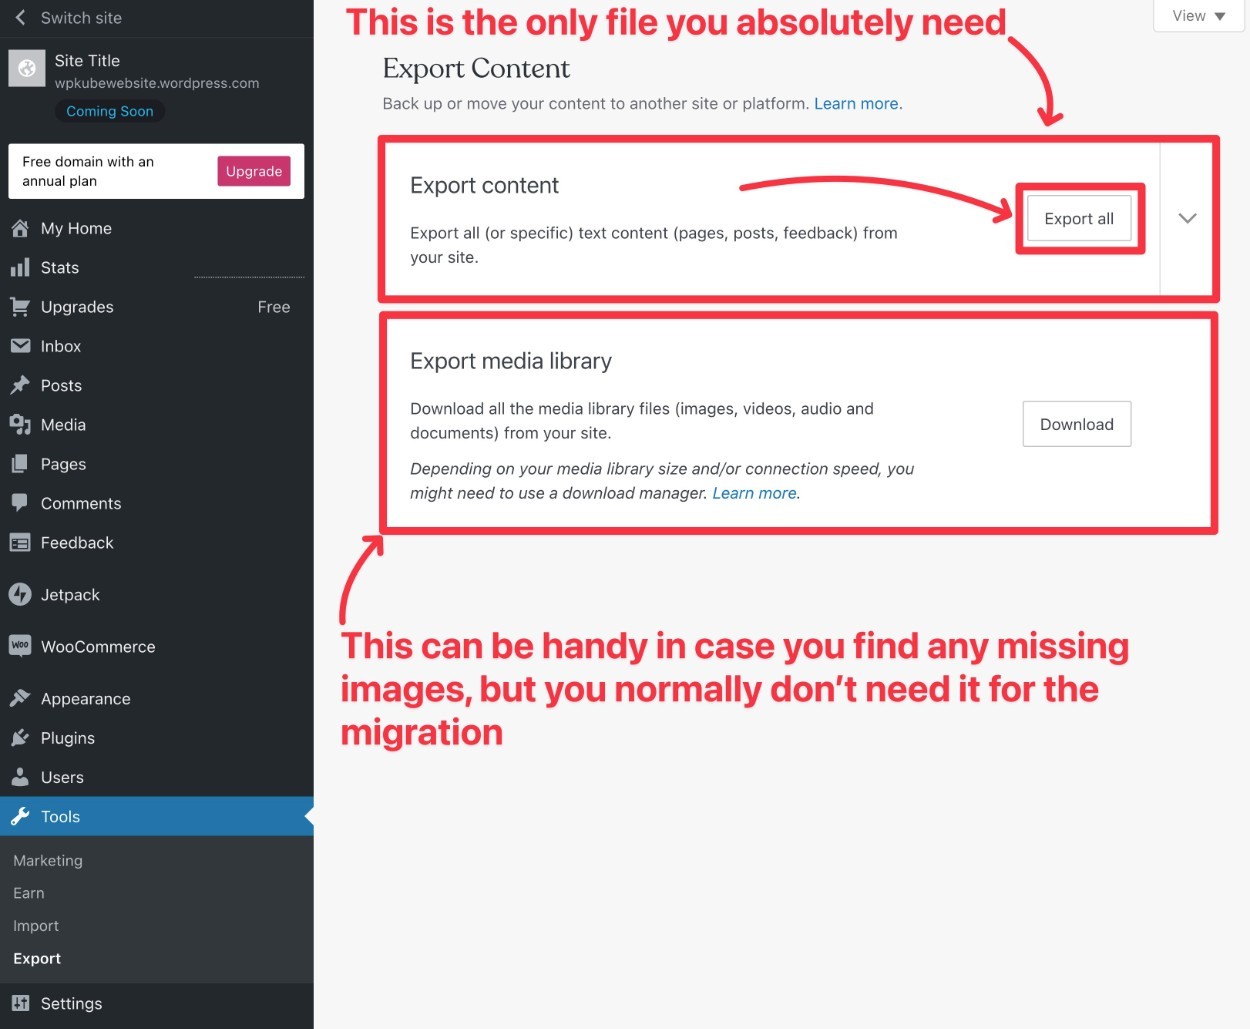
You can also click the Download button next to Export media library to download a copy of all your site’s media. You should not need this for the migration process. However, it can come in handy if any images end up missing for some reason.
So – while you’re here, you might as well download a copy of that just in case.
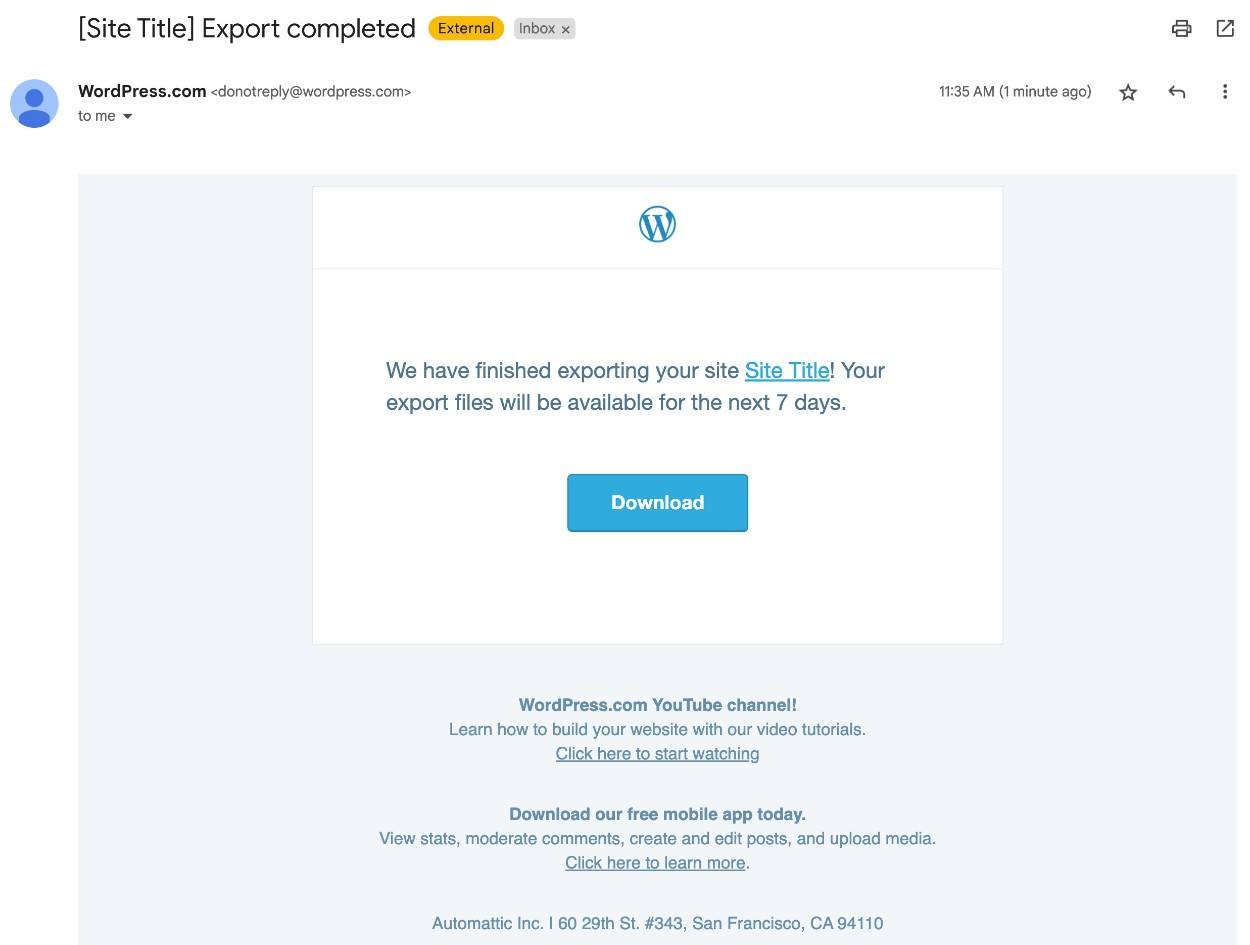
After you click the Export All button, WordPress.com will then send a download link to the email associated with your WordPress.com account.
Go to your email account and click that link to download your site’s export file.
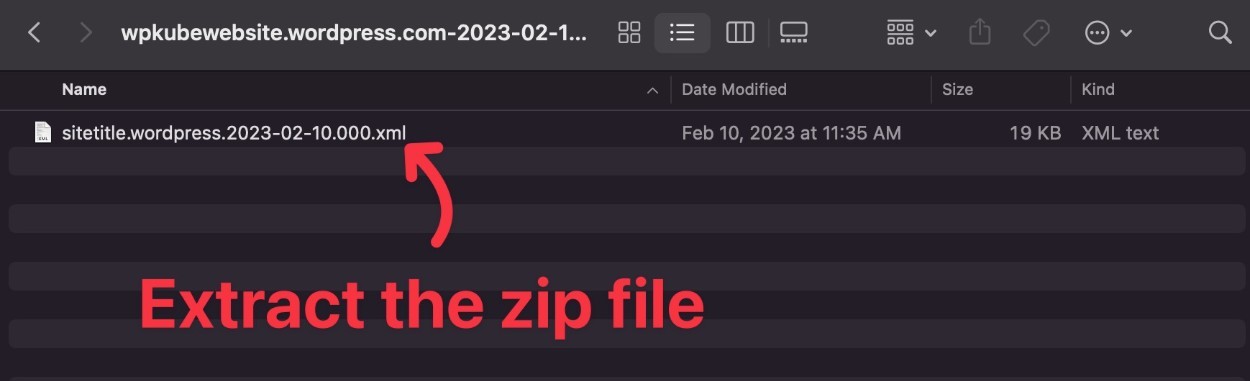
Once you click the link, it should download a zip file to your local computer.
You will now need to extract the .zip file, which you should be able to do with your operating system’s built-in tool:
- On Windows, right-click and choose Extract all.
- On macOS, you can just double-click it to extract the file.
Inside, you should see a single .xml file. Keep this file handy because you’ll need it in a second.
Step 2: Create a New WordPress.org Website (If You Haven’t Done So Already)
If you haven’t already created your WordPress.org site, now is the time to do so because you’ll perform most of the finishing tasks from inside your WordPress.org site’s dashboard.
If you don’t have a site yet, you can choose one of our recommended WordPress hosting providers for the easiest way to get started.
All of the providers on that list make it really easy to install WordPress.
We also have a step-by-step guide on how to make a self-hosted WordPress website that covers the entire process.
If you’re using a free WordPress.com subdomain for your current site, just go ahead and set up your WordPress.org site with your new custom domain name.
If you’re already using a custom domain name at WordPress.com, we recommend pointing that domain to your new WordPress.org site now and temporarily switching your WordPress.com site to a free subdomain.
When you set up your WordPress.org site, there is one other setting to configure to ensure a smooth migration.
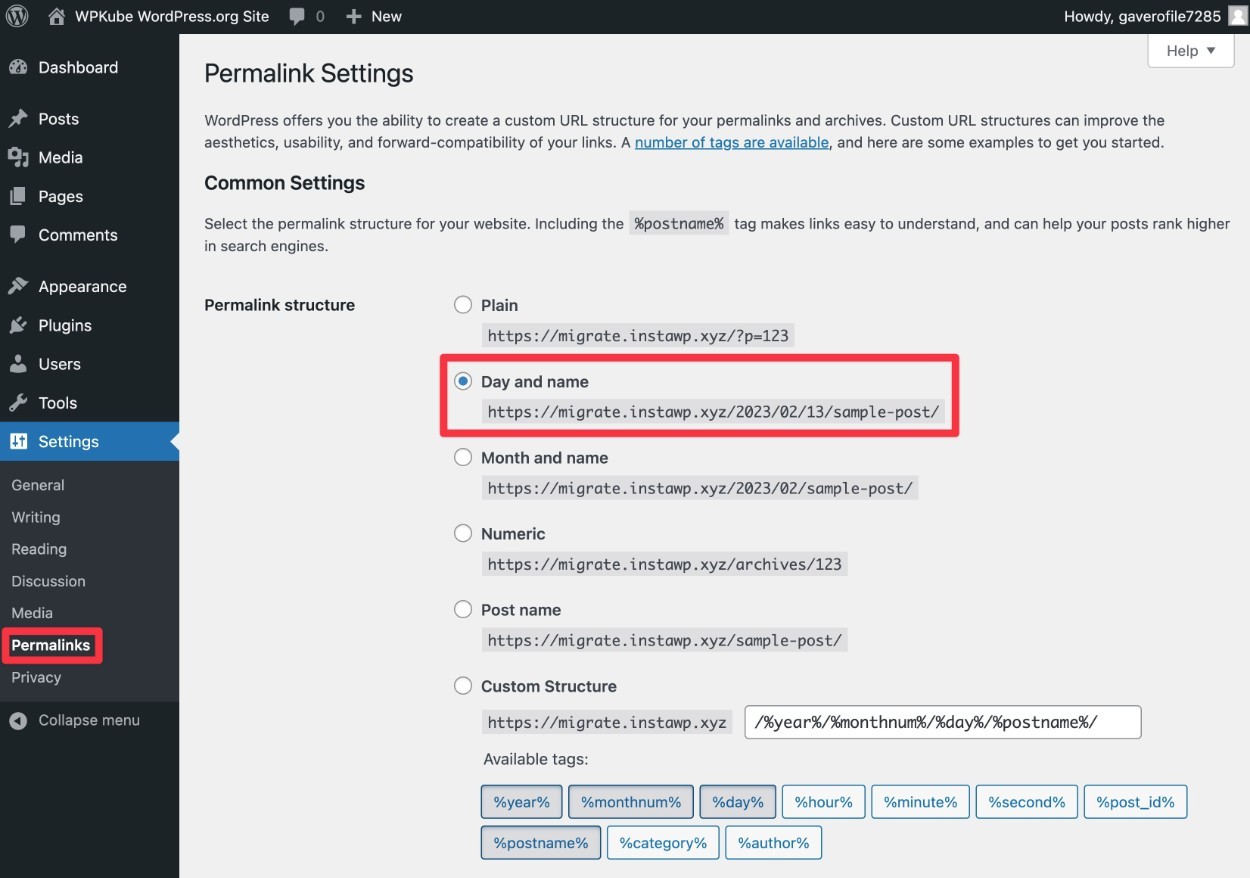
Go to Settings –> Permalinks and set your site’s permalink structure to Day and name. This is the default structure that the free/cheap WordPress.com plans use. So, if you want to match your URLs, you need to use the same structure.
There are ways to change the URL structure by setting up a custom redirect – more on that later.
Step 3: Import Your WordPress.com Data to Your WordPress.org Site
Now that you have a brand new self-hosted WordPress.org website you can start importing data into it.
It’s a lot simpler than you might think – pretty much all you need to do is upload the WordPress.com export file that you downloaded in Step #1.
Here’s how to start:
- Log to the dashboard of your new WordPress.org website.
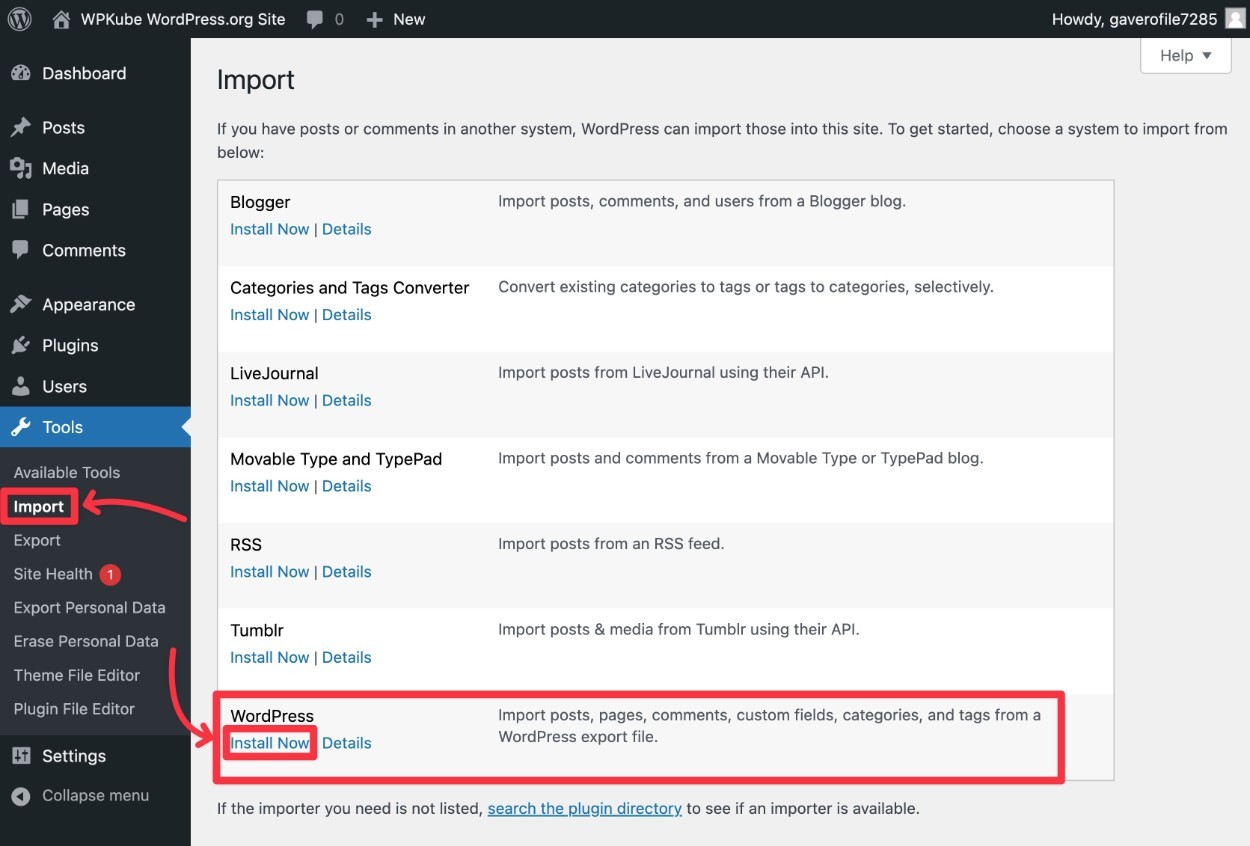
- Click on the Tools tab in your WordPress.org site’s dashboard.
- Select the Import tool underneath the Tools tab.
- Click the Install Now link under the WordPress tool.
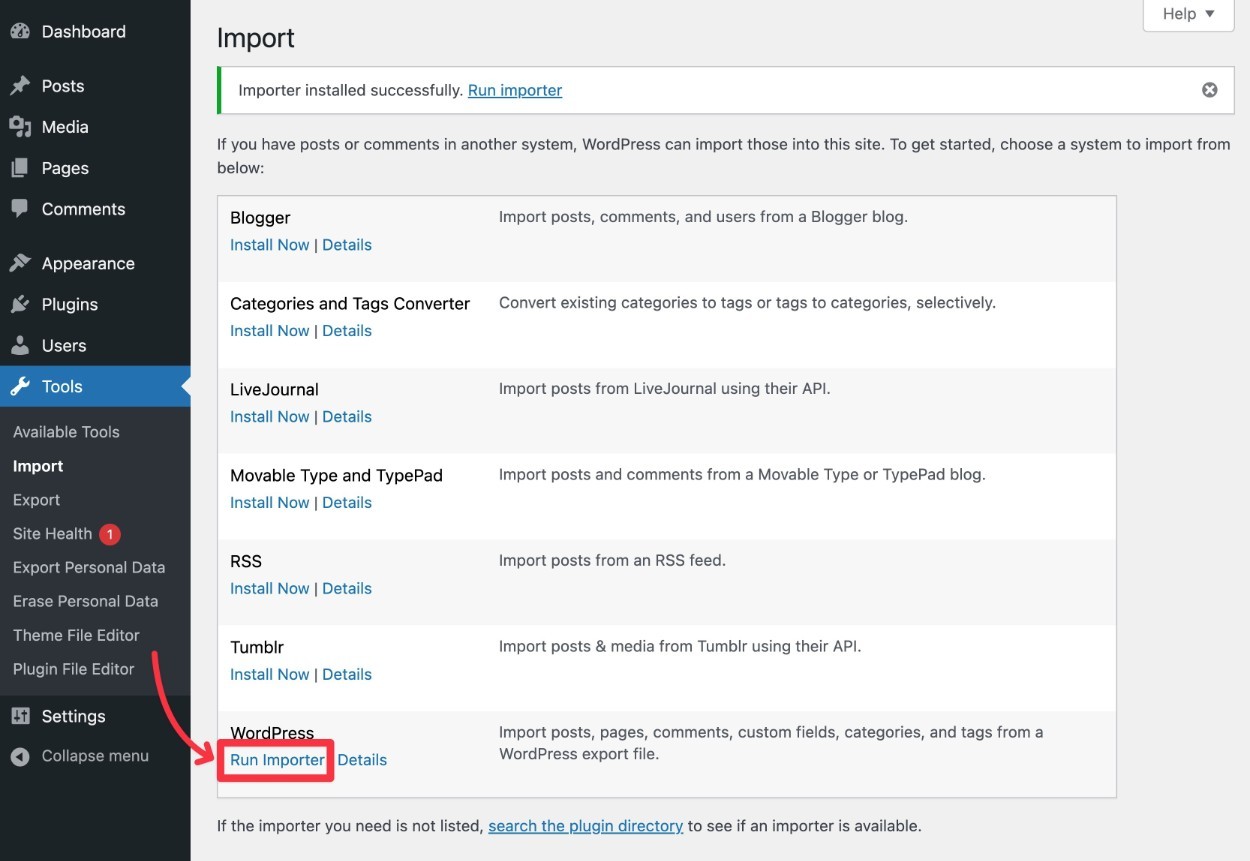
After installing the WordPress importer, the Install Now link should change to Run Importer.
Click the Run Importer link to continue importing your WordPress.com content.
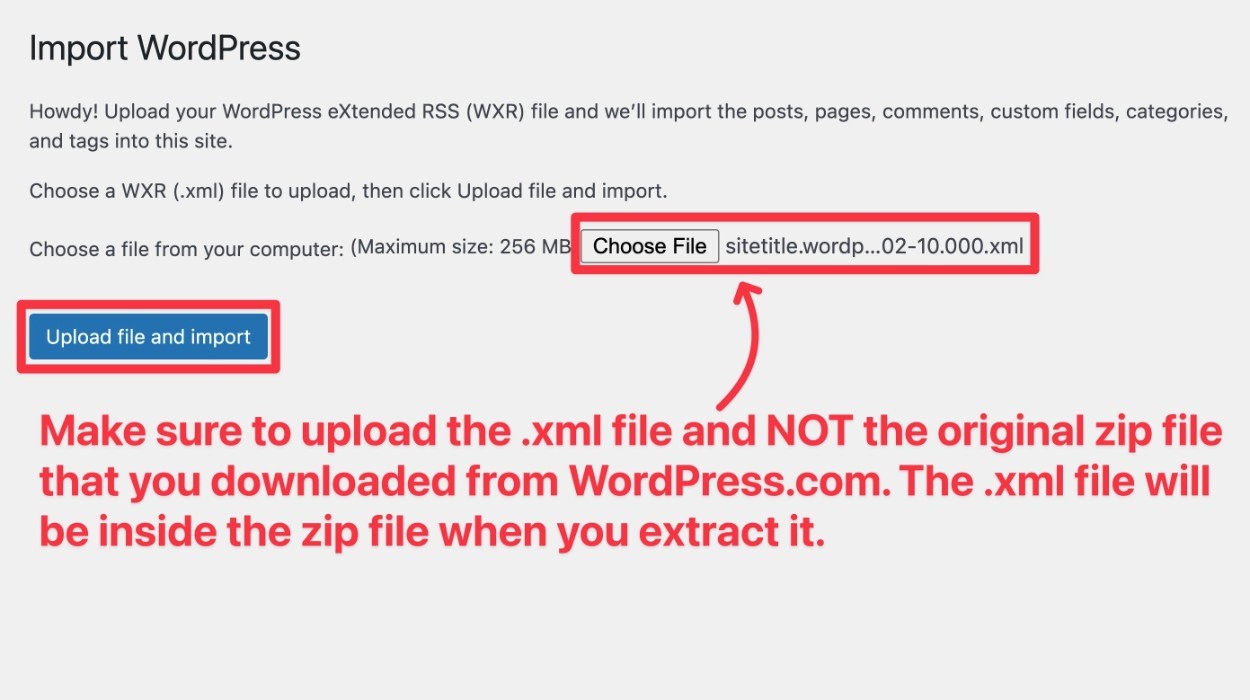
The next page allows you to click on the Choose File button.
Find the export .xml file that you saved on your computer from before, and upload the file onto this WordPress Importer plugin.
Note – do not upload the original zip file. You must extract the zip file and upload the .xml file inside.
Once the file is completely uploaded you can click on the Upload file and import button to proceed.
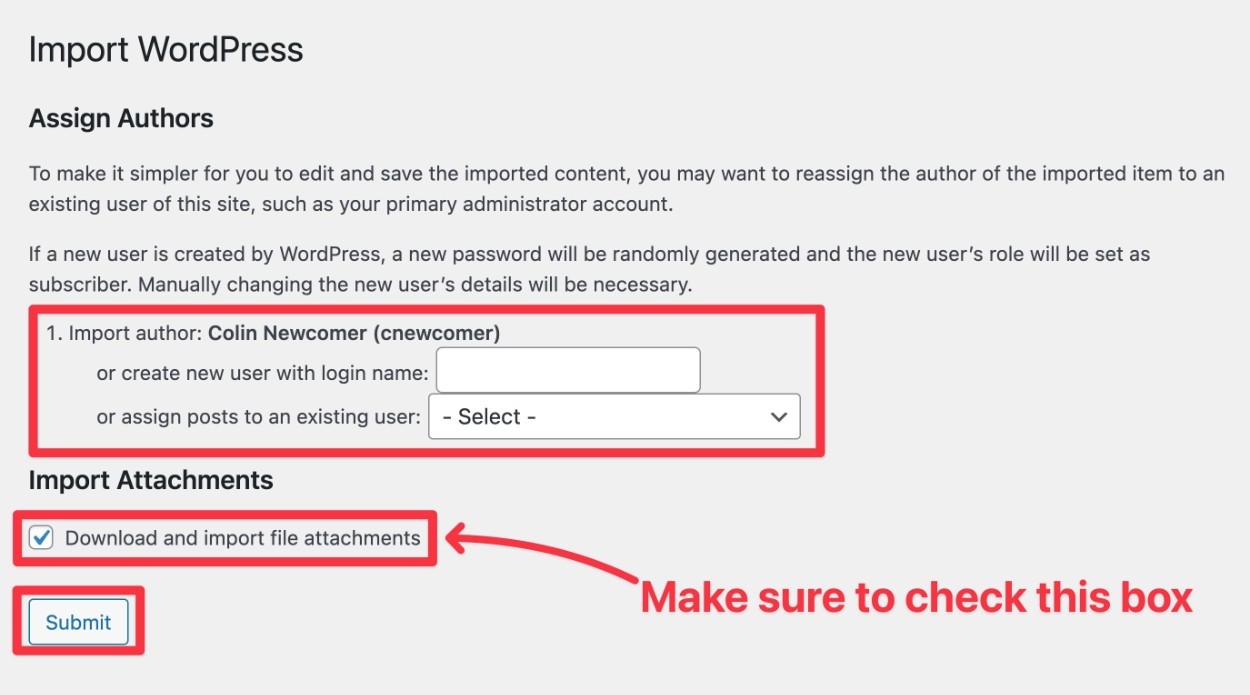
You will then need to decide if you want to assign the content to a new author or select an existing user on your WordPress.org website. It doesn’t really matter which one you choose, as long as you assign the content to a username you actually want to use in the future and that person has admin privileges.
You’ll also want to check the box where it says Download and Import File Attachments. Otherwise, you won’t be able to see any of the images you exported from the previous site.
Click on the Submit button once this is all ready to go.
On the next screen, you should see a success message. That means all of your WordPress.com content should now be on your WordPress.org site.

Congrats! You’re mostly there. But before calling it a day, you’ll need to do a few more things…
Step 4: Set Up Your WordPress Theme
One thing that you can’t always migrate from your WordPress.com site is your theme, which controls the basic design and layout of your site.
In some cases, you still might be able to access the same theme that you used at WordPress.com. This is because many of the themes that you find in WordPress.com are also available to self-hosted WordPress sites.
One easy way to check this is by browsing Automattic’s profile at the WordPress.org theme library. If you see your theme on that list, you can add it to your WordPress.org site as well.
Unfortunately, there’s not an easy way to migrate your theme settings, so you’ll need to recreate any customizations that you’ve made.
Here’s something else that’s important to remember, though:
Because you’re using WordPress.org now, you also have the ability to install your own custom themes, which can give you even more flexibility than you had at WordPress.com.
If you’re interested in trying a new theme, you might want to check out our collection of the best WordPress themes.
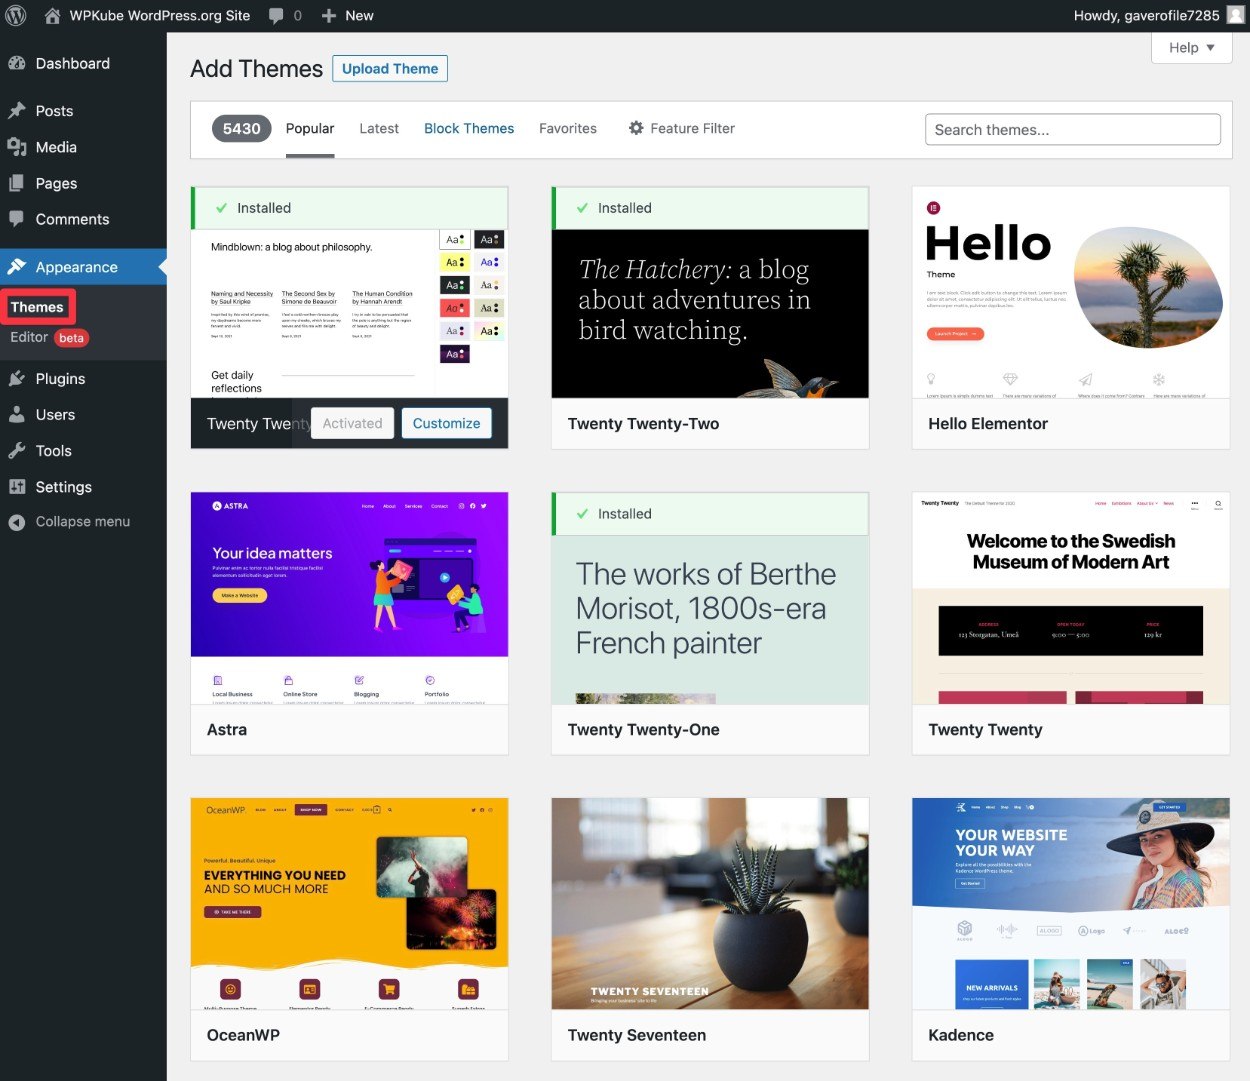
You can set up your theme by going to Appearance → Themes → Add New.
For more details, we have a detailed guide on how to install and set up a WordPress theme.
Step 5: Update Your Site’s URLs
After you migrate your WordPress.com site’s content, it’s normal that some of your site’s links still point to your WordPress.com site.
For example, if you created an internal link between one blog post to another blog post, the link in your blog post content won’t be automatically migrated, which means it will still be pointing to WordPress.com.
Thankfully, there’s a pretty easy and fast way to fix this – running a search and replace on your entire site.
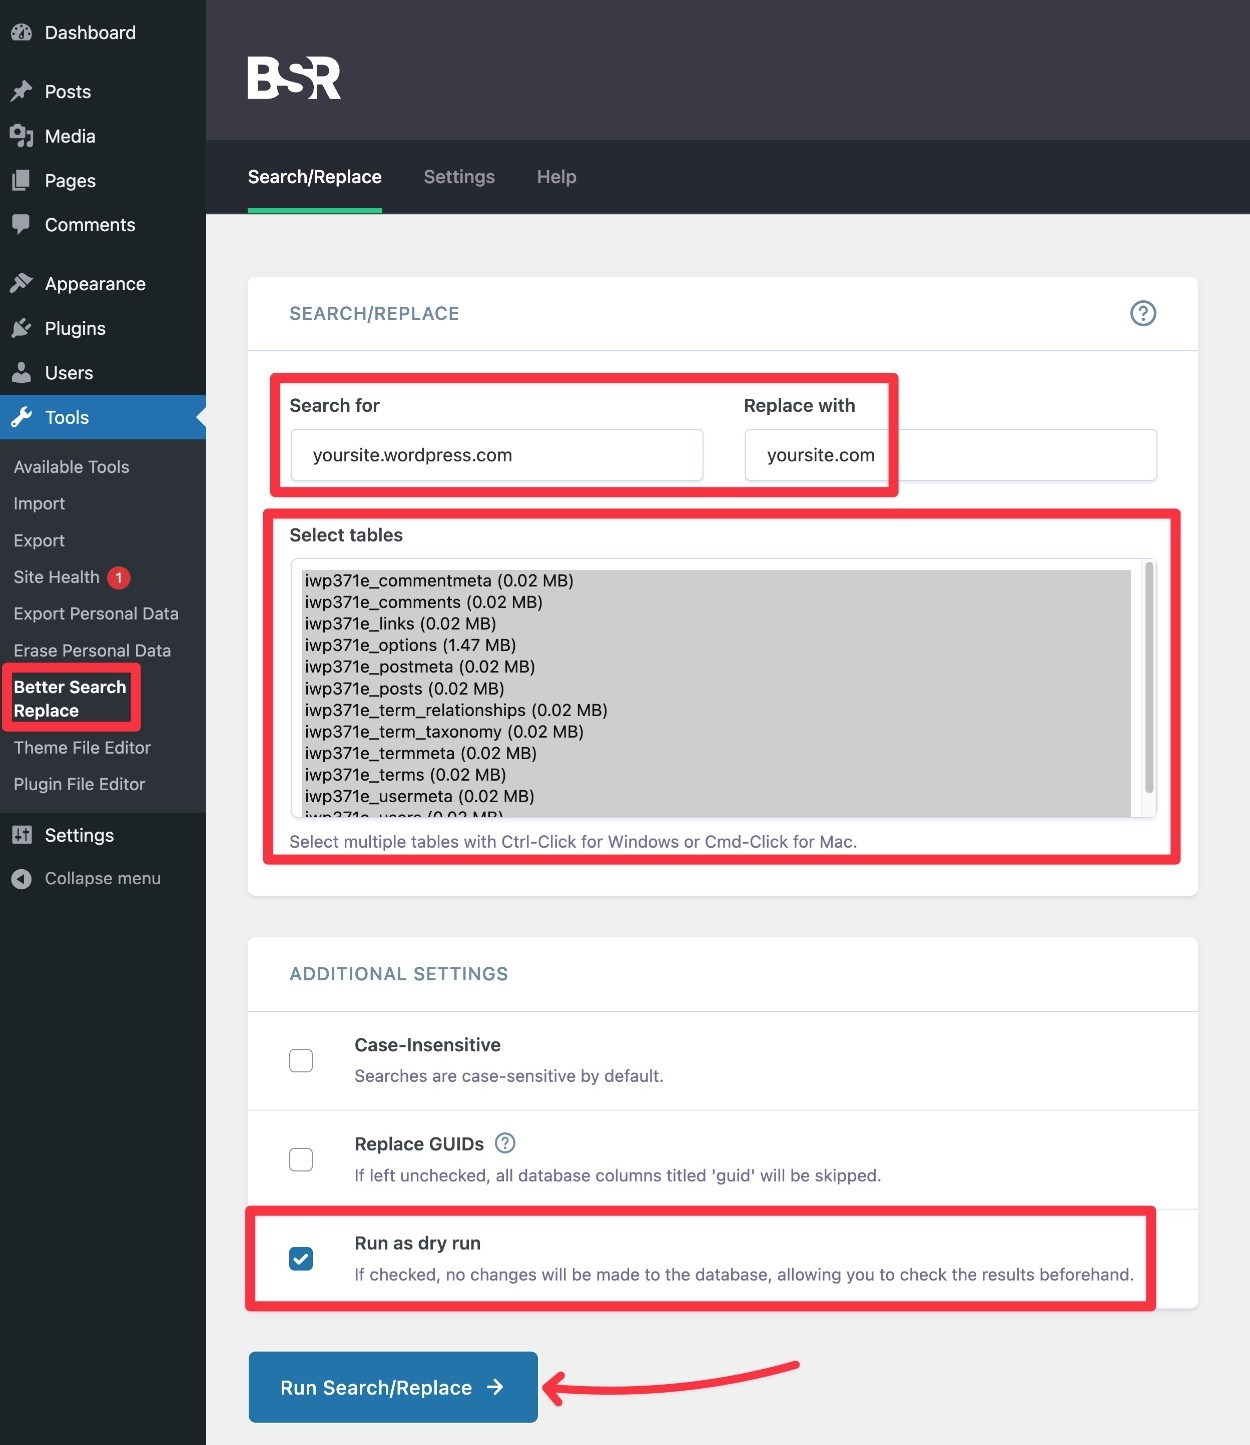
To do this, you can install the free Better Search Replace plugin by going to Plugins → Add New.
Once you activate the plugin, go to Tools → Better Search Replace in the dashboard of your new WordPress.org site.
Enter your WordPress.com domain in the Search for box and then enter your new WordPress.org domain in the Replace with box.
Do not include the https part or anything – just enter the basic URLs. Here’s an example:
- Search for – yoursite.wordpress.com
- Replace with – yoursite.com
Then:
- Select all of the tables in the list.
- Leave the Run as dry run box checked. This will let you run a test run before making any permanent changes.
Then, click Run Search/Replace to run a test run.
Here’s what it might look like:
You then should see the results of your test and it will show you how many potential changes it found. If you don’t see any potential changes, make sure you entered the right URL for your WordPress.com site.
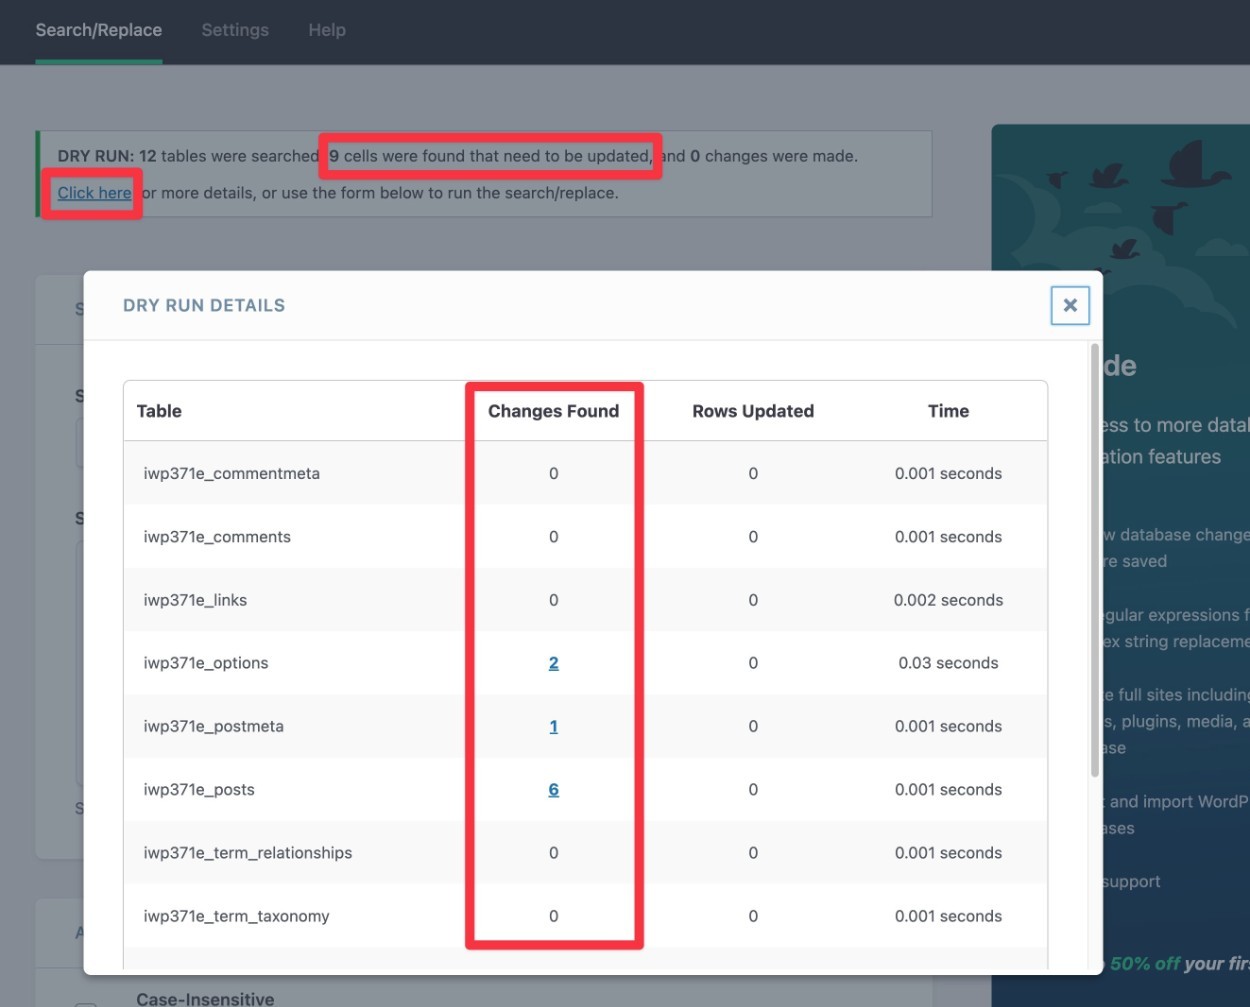
If you do see those changes found, you can uncheck the Run as dry run box and click Run Search/Replace again to make the changes for real.

Step 6: Check Your Site for Any Errors
At this point, your WordPress.org site should be working well. However, you’ll want to thoroughly test your site to make sure there aren’t any issues.
To start, you can just browse around and make sure all your content is there and working.
We also recommend paying attention to these specific areas:
- Images – make sure your site’s images are working and that they’re actually loading from your WordPress.org site’s server (rather than WordPress.com). You can check this by right-clicking on the image and opening the image URL directly.
- Navigation links – make sure all of the navigation links in your menu and sidebar point to the right spots and aren’t still linking to your WordPress.com site.
- In-content links – make sure that links in your posts and pages are also still working.
Note – if you experience 404 errors for some of the internal links to blog posts, make sure that you chose the Day and name permalink structure for your WordPress.org site (Settings → Permalinks).
This is the default structure that WordPress.com sites use. If you want to change to a different permalink structure, you’ll need to manually set up redirects.
If you want to do this, Yoast has a really handy free tool to help you generate the needed redirect code. However, setting up a custom redirect is outside the scope of this tutorial. For more details, check out our guide to adding 301 redirects to WordPress.
At this point, your site is pretty much completely migrated. There are just a few more basic housekeeping steps…
Step 7: Redirect Your WordPress.com Site to WordPress.org (Optional) And/Or Make Site Private
This step is optional…
But if your WordPress.com site uses a different domain name than your WordPress.org site, you’ll need to set up a site redirect to not lose your existing backlinks and SEO efforts.
With a redirect, any traffic to your WordPress.com site (e.g. yoursite.wordpress.com) will be automatically redirected to your WordPress.org site.
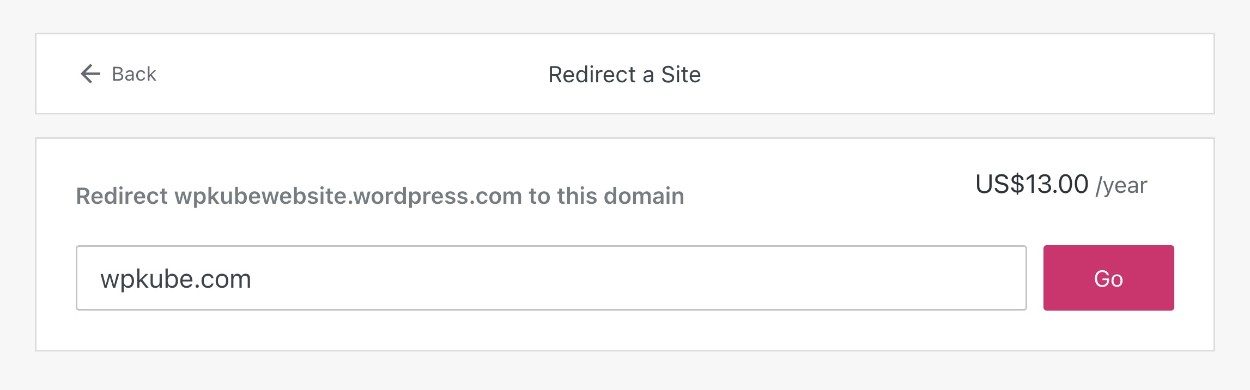
WordPress.com makes this easy to set up…but you’ll need to pay for it – $13 per year, to be exact.
If you have a lot of links and/or traffic going to your WordPress.com domain, paying $13 per year is usually a good investment to redirect those links to your new site.
If your old site doesn’t have many links or traffic, though, you can skip this one if you don’t want to pay the money.
If you do want to set up a site redirect, here’s how to do it…
- Click this link to go to the WordPress.com Site Redirect tool.
- Select the domain that you want to redirect – e.g. yoursite.wordpress.com.
- On the next screen, enter the domain name of your new WordPress.org site.
- Click Go and complete the purchase.
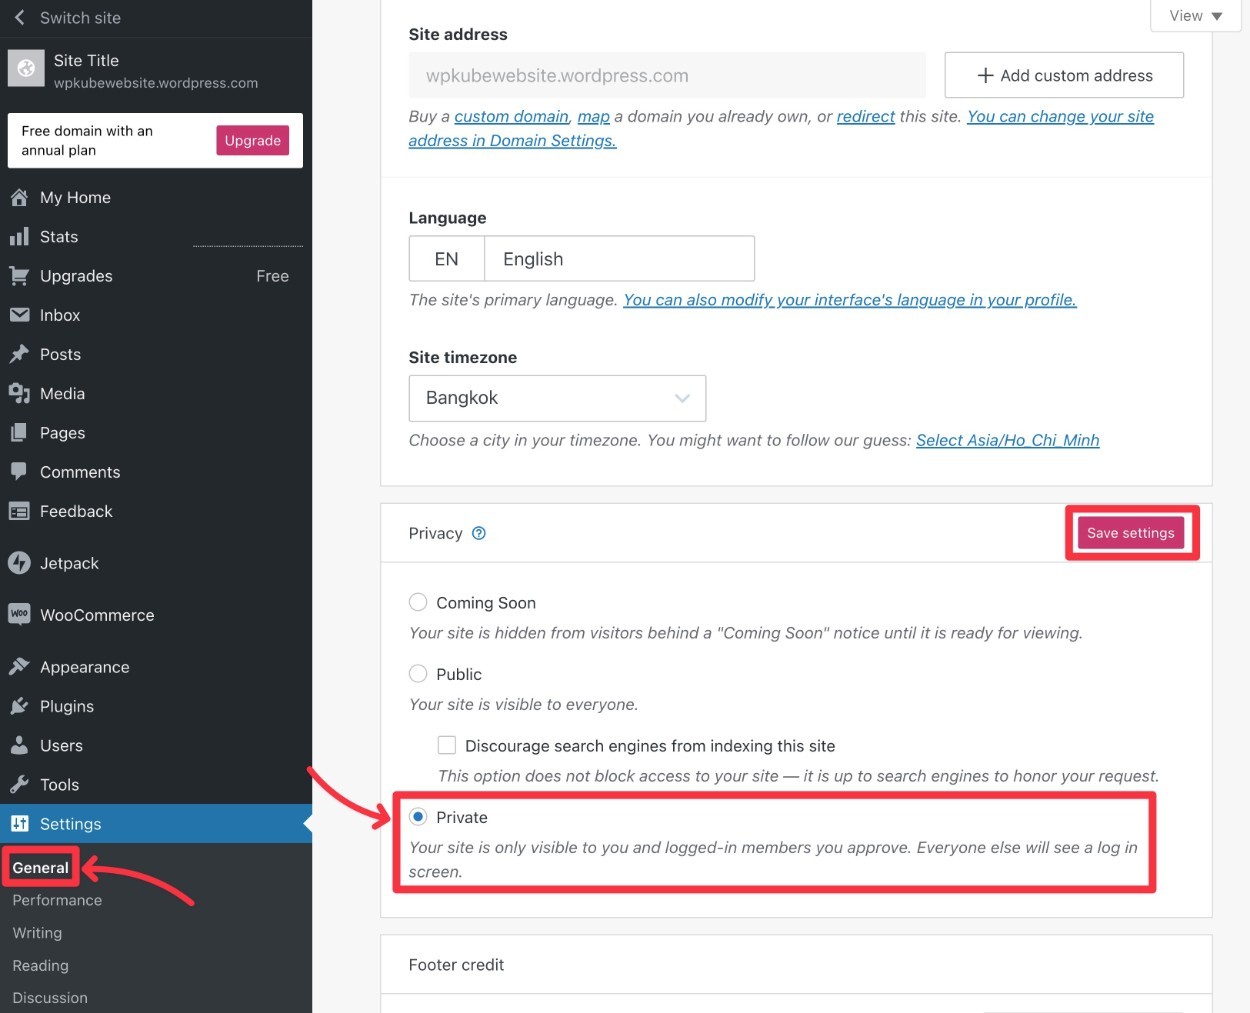
Either way, you’ll also want to make your WordPress.com site private so Google doesn’t think your WordPress.org site is a duplicate copy.
Here’s how to make your WordPress.com site private:
- Open your old site’s dashboard at WordPress.com.
- Go to Settings → General.
- Select the Private option under Privacy.
- Click the Save settings button.
Step 8: Install Plugins to Mimic WordPress.com Functions (Optional)
When you use WordPress.com, WordPress.com builds in a lot of its own customizations to help add a little extra versatility to the WordPress software.
When you migrate WordPress.com to WordPress.org, you can lose some of these enhancements, which might affect the functioning of important areas of your site.
For example, with WordPress.com, you can create a basic contact form using the Form block. But when you move to WordPress.org, there’s no built-in Form block anymore which means your form will stop working.
If you want to quickly get up and running with some of the tools that you were familiar with on WordPress.com, the easiest solution is to install the free Jetpack plugin.
Jetpack comes from Automattic, the same team behind WordPress.com, and it gives self-hosted WordPress.org sites access to a lot of the same features that you had on WordPress.com. For example, Jetpack adds the same Form block that you used on WordPress.com.
Of course, now that you’ve created your site with WordPress.org, you also have the ability to install any other plugin, which opens up even more functionality than you had with WordPress.com.
As such, you might want to skip Jetpack and find new plugins to add those important features to your site.
To help you with that, we have lots of curated lists of the best plugins for certain use cases:
- SEO plugins
- Form plugins
- Page builder plugins (visual, drag-and-drop design)
- Social media plugins
- Online course plugins
- Security plugins
- Email list building plugins
- Membership plugins
For more details, we have a complete guide on how to choose and install WordPress plugins.
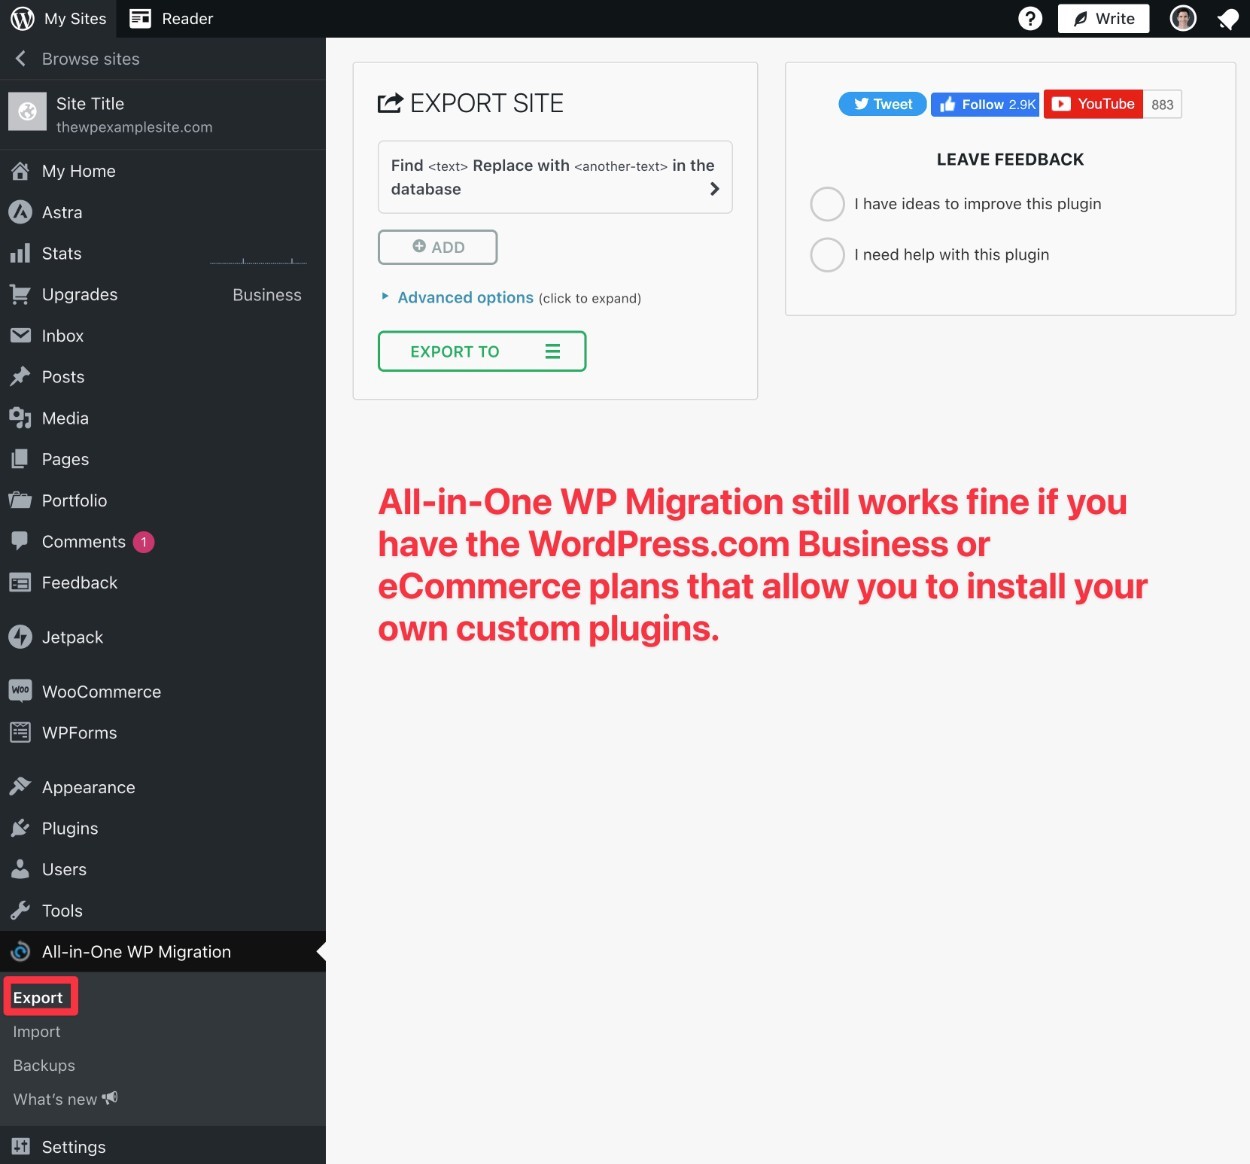
How to Migrate a WordPress.com Business Website
As we mentioned above, you do not need to follow this guide if you’re using one of the more expensive WordPress Business or eCommerce plans.
Those plans let you install your own custom plugins on your WordPress.com site. As such, it’s usually a lot simpler to just use one of the many WordPress migration plugins.
All-In-One WP Migration is a good starting point because we’ve confirmed that this plugin works and the WordPress.com team even recommends it in their documentation.
WordPress.com to WordPress.org Migration FAQs
No, it doesn’t matter. You should be able to transfer over any domain to the new website. For example, if you registered the domain through WordPress.com, you can quickly transfer it over to your new site. The same goes for if you got the domain from somewhere like GoDaddy.
All you have to do is move that domain to the new web host.
As long as you exported all your posts, pages and data from the previous WordPress.com site it should all still be there.
If you use the Site Redirect upgrade we previously talked about you won’t lose any of your search engine rankings. Switching your URLs and redirecting your previous site helps to keep the SEO that you built up from before. It might not be perfect, but it certainly helps.
If you follow all the steps above you will not experience any downtime if you’re moving a free WordPress.com site. Why? Because we are leaving the old site active for the entire process. It isn’t until the new site is up and running where create a redirect from the old site.
If you’re using the same domain on both sites then you’ll need to point your domain name to the WordPress.org site before fully moving everything. As such, there will be a short period of downtime while you switch the content over.
All the images come along as long as you check off the Download and Import File Attachments in Step 3.
Nope. This process is completely free, so it’s worth a shot. The only thing you might have to pay for is the Site Redirect Upgrade if you go with this route.
As stated before, the WordPress subscribers don’t magically move over to the new site, but you can redirect the old site and even send the users an email if you want them to view the new site instead.
Migrate WordPress.com to WordPress.org Today!
That’s it! At this point you should know everything there is to know about moving from WordPress.com to WordPress.org.
Let us know in the comments section if you still have any questions about how to move from WordPress.com to WordPress.org.


Leave a Reply