
Want to add Google Tag Manager to WordPress?
Google Tag Manager has a ton of benefits for WordPress sites. It helps you add and manage all the various scripts you use on your site. For example, instead of needing to manually add code for services like:
- Google Analytics
- Event tracking
- Google Optimize
You can just manage everything through Google Tag Manager!
If you find yourself often adding various scripts to your WordPress site, Google Tag Manager is going to be a lot more convenient for you. And once you get the hang of it, you can even start using it to collect more actionable data to inform your marketing efforts.
In this post, I’ll show you step-by-step how to install Google Tag Manager on your WordPress site, including where to add the code.
Then, I’ll give you a quick guide for how you can publish your first tag and make sure it’s working.
Let’s dive in!
Step 1: Sign Up For A Google Tag Manager Account
If you haven’t already, the first thing you need to do is sign up for a free Google Tag Manager account.
You can do that by heading here.
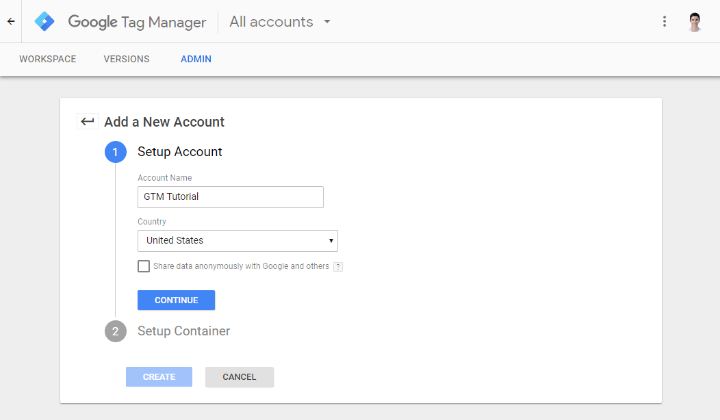
Once you sign up, you should be in the Add a New Account interface. Give your company a name:
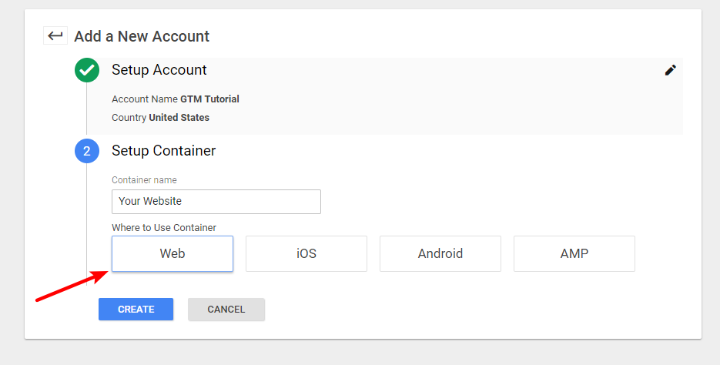
Then, in the Setup Container section, enter your website’s name in the Container name field and choose Web:
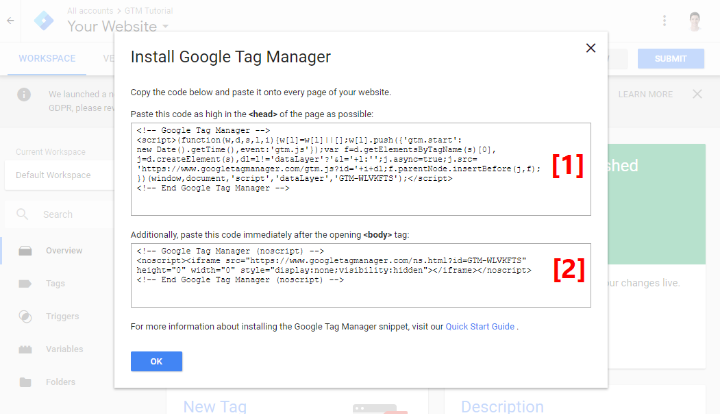
Once you accept Google’s Terms of Service, Google should take you to the Google Tag Manager interface and show you two code snippets. Keep this window open because you’ll need to add both of these code snippets to your WordPress site in the next section:
Step 2: Add Google Tag Manager Code Snippets To Your Site
This is the one part that’s kind of tricky. Previously, you only had to add one code snippet to your theme’s <head> section, but now Google Tag Manager wants you to add two snippets:
- The first one goes in your <head> section
- The second one goes right after the opening <body> tag
Beyond directly editing your child theme, WordPress doesn’t give you an easy way to insert code after the <body> tag, and each theme works a little differently so I can’t give you a tutorial that applies to all themes.
So:
- If you already feel comfortable editing your child theme’s files directly, you can just do that.
- If you don’t feel comfortable working directly with your theme’s files, I’ll show you two different methods that you can use – a beginner-friendly plugin and a simplified code method.
Option 1: Use Head, Footer and Post Injections
If you’re ok with dedicating a plugin to Google Tag Manager, the easiest way to add it is using the free Head, Footer and Post Injections plugin.
To get started, install and activate this free plugin. Then, go to Settings → Header and Footer in your WordPress dashboard to access the plugin’s interface.
Now:
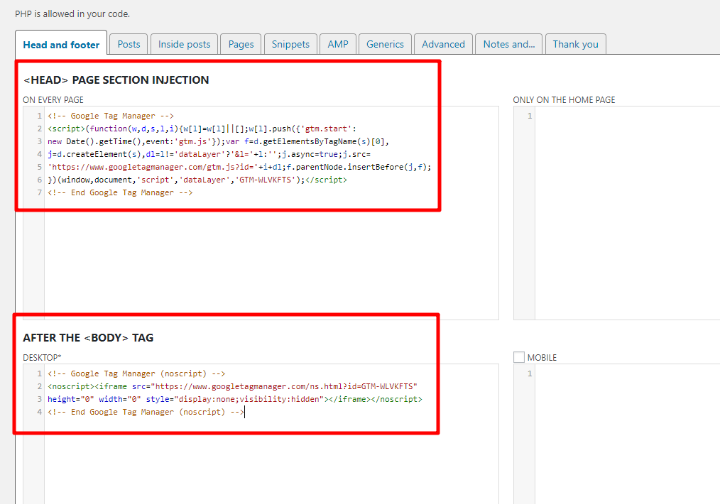
- Paste the first Google Tag Manager code snippet into the ON EVERY PAGE box in the <HEAD> PAGE SECTION INJECTION section
- Paste the second Google Tag Manager code snippet into the DESKTOP* box in the AFTER THE <BODY> TAG section (don’t worry – the code snippet will still load on mobile. Head, Footer, and Post Injections just makes it possible to use separate code snippets if you check the mobile box)
It should look like this:
Make sure to save your changes and you’re all done!
Option 2: Use A Functions.php Code Snippet
Let me lead by saying that this method is technically not 100% optimal. It works fine for most sites, but I’ll explain what I mean after I show you what to do.
To use it, all you need to do is add this code snippet to your child theme’sfunctions.php file:
add_action('wp_head', 'gtm_head_code');

Function gtm_head_code(){

?>

FIRST_SCRIPT_FROM_GTM_INTERFACE

<?php

}

add_action('wp_footer', 'gtm_body_code');

Function gtm_body_code(){

?>

SECOND_SCRIPT_FROM_GTM_INTERFACE

<?php

}
Make sure to replace the placeholders with the actual code snippets.
So why isn’t this method 100% optimal?
Because this method puts the second code snippet in the footer, rather than after the opening <body> tag, your tag might not fire if a visitor doesn’t completely load your page (which is rare, but possible). That’s the reason Google recommends you add it as high up in your site’s code as possible.
But for most sites? This method is totally fine.
Step 3: Test To Make Sure Your Snippets Are Working
To make sure you properly installed Google Tag Manager:
- Go to the free GA Checker tool
- Enter your website’s URL
- Click Check Your Site
Go to the Tag Manager tab of the results and look for the green checkbox in the Tag Manager column:
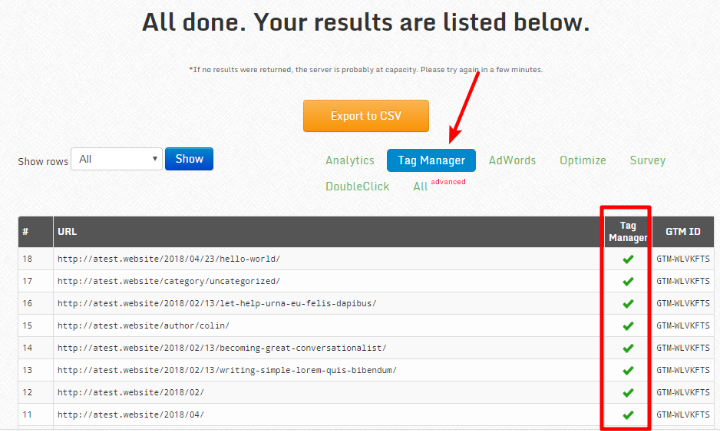
If you see it – congrats! You properly installed the Google Tag Manager scripts on your WordPress site.
Now, I’ll quickly go through how to use Google Tag Manager to create your first tag.
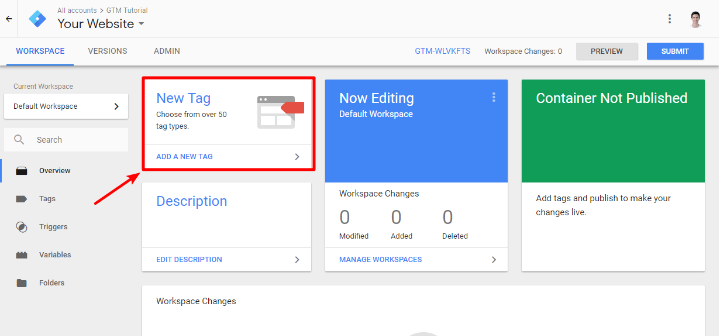
Step 4: Create Your First Tag
Once you’ve added the code snippets to your site, you can go back to the Google Tag Manager interface and create your first tag.
A “tag” is basically a specific script that you want to insert into your site with Google Tag Manager.
To get started, create a New Tag in your Google Tag Manager dashboard:
By clicking on Tag Configuration, you can choose what type of tag to create. Google includes all kinds of pre-built options for stuff like Google Analytics, Google Optimize, and lots of third-party services.
But you can also use the Custom HTML or Custom Image tags to insert any client-side code:
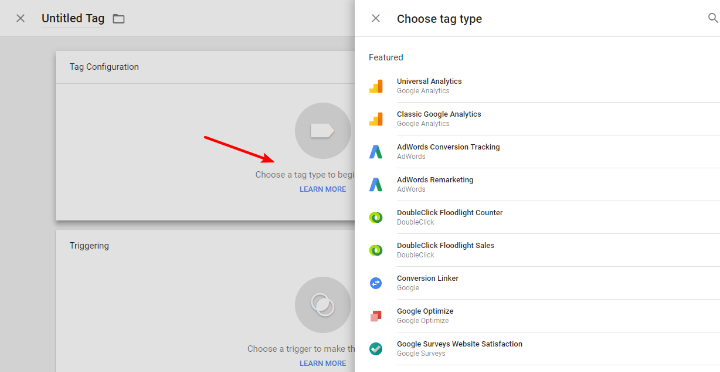
Once you choose your Tag Type, you’ll need to configure it following the settings.
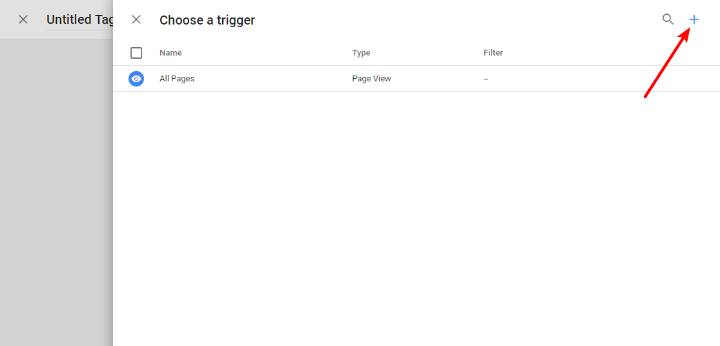
Then, you can click on the Triggering section to choose when to “fire” your tag.
The default is All Pages, but you can also get a lot more targeted if you want by clicking on the + icon:
Once you finish setting things up, click Save.
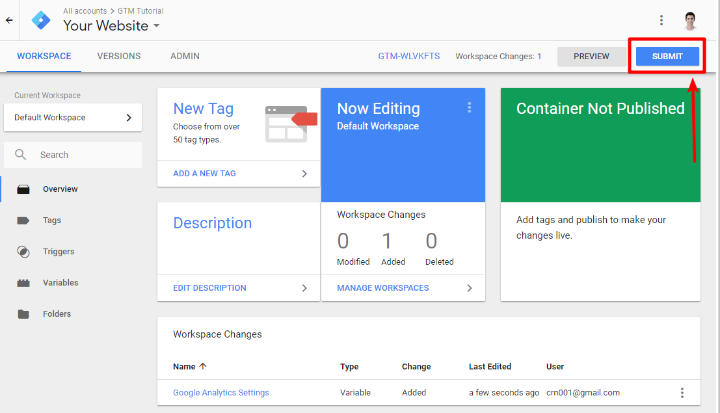
Step 5: Publish Your Container
Now, all you need to do to make your tags live is publish your Container.
To do that, click on the SUBMIT button in your Google Tag Manager interface:
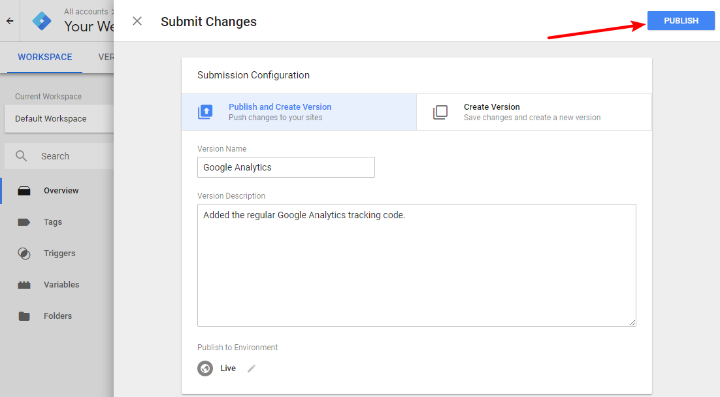
Then, enter a Version Name and Version Description. I recommend that you make these as detailed as possible to help with version control later on. That is, explain exactly which tags you’ve added and what they do.
Then, click PUBLISH:
And that’s it! You just published your first tag.
How To Test If Individual Tags Are Firing
If you want to make sure the individual tags in your container are firing, Google offers a free browser extension for Chrome called Tag Assistant.
Resources To Help You Become A Google Tag Manager Pro
At this point, you’ve successfully added Google Tag Manager to WordPress. But Google Tag Manager is pretty deep in functionality and explaining the huge number of interface options goes beyond the scope of this post.
So – now that you have Google Tag Manager installed, you can learn a whole lot more about the interface in this Moz article.
And for more related reading on some of the tags you can implement in Google Tag Manager, check out our posts on Google Analytics and WooCommerce Google Analytics goals.


After checking so many alternatives – the php option (options 2) seems to be the only one that worked for me. Thanks!
This was great! It helped me a lot, I used the plugin option.
Amazing information that helped me set GA tags on my new website.