
As WordPress has progressed over the years we’ve seen a multitude of features making it easier for content marketers, developers, and bloggers to work online.
One of our favorites came along with the WordPress 3.0 update, unleashing the power of WordPress Multisite. If you’re not familiar with the way this works, we’ll explain all about it below. But overall, we’ve been excited about it ever since the release.
Not only do we know plenty of bloggers who run their own blog networks through WordPress, but it’s extremely common for developers to utilize the system for dozens, or even thousands, of clients.
If you’re trying to figure out how to setup WordPress Multisite, or if you’re attempting to learn more about WordPress as a developer, this guide is for you.
Keep reading as we explain the purpose and benefits of Multsite, along with a tutorial on how to get it all configured.
WordPress Multisite: What is It?
The WordPress Multisite feature cuts out the need to install WordPress multiple times. In short, it means that you can place numerous WordPress sites on an individual WordPress installation.
For example, let’s say I started a blog about WordPress development (like WPKube). After that, I also wanted to launch a portfolio website to bring in additional client work. Instead of installing WordPress a second time and managing two dashboard for these two sites, I would have the option to use the exact same username and password for both.
In addition, I would be able to create the second site from my original dashboard and utilize the same database with separate files.
How is Multisite Different from Regular WordPress?
A Super Admin is assigned for your WordPress Multisite network. That person (most likely you) gains control over the primary dashboard. This dashboard includes additional screens for checking in on your network and installing plugins for that network.
The dashboard looks pretty darn similar to a regular WordPress dashboard. The primary difference is you get to assign admins for all of the websites in your network. Then, all of those admins will also receive their own separate dashboard for managing the individual sites.
Here’s where the Super Admin and regular Admin dashboards differ most: Super Admins can add new sites and install plugins. Admins can choose to install network plugins, but they can’t add their own new plugins to the overall network.
Another thing you should at least have knowledge of is how the files and databases are configured. With WordPress Multisite, you have lots of tables in the database, primarily because these tables need to be kept separate for each WordPress site. All contents and settings are placed in the tables. With a regular WordPress installation you get 11 tables, but nine of those are duplicated for every additional site you add to the network.
Finally, the wp-config.php file stores a few extra lines of code to tell WordPress that Multisite is installed. That’s the only difference with that file. The wp-uploads folder stores an extra subfolder for each site on the network. Therefore, if you wanted to access the files for your tenth site in the network, you would have to go to that particular subfolder, similar to a regular WordPress install, but with subfolders.
Why Might You Consider Installing Multisite?
Some people think that a WordPress Multisite setup seems ideal for their organization. However, that’s not always the case.
Let’s take a look at some of the pros and cons of WordPress Multisite to see if it’s right for you:
Pros of WordPress Multisite
- Updating everything from plugins to WordPress comes easy. A click of the button makes the updates on all of your sites.
- This goes for installations as well. You can install a theme on multiple sites at once. It works for plugins, too.
- WordPress Multisite lets you create a unique dashboard for each site and site admin.
- The Super Admin doesn’t have to open up multiple dashboards. The entire network is housed under one dashboard.
Cons of WordPress Multisite
- You’ll find that some third-party plugins may not work that well on a WordPress Multisite network.
- Security measures must be taken to protect every site on the network. Generally, if one of the sites gets compromised, the entire network feels the repercussions.
- Beginners may have trouble with the network management, especially if there’s a point where your traffic spikes.
- Even if you don’t get hacked, all folders and files are connected throughout the network. So, if you accidentally crash a site because of human error, or if your server isn’t working properly, the entire network may fail.
Who Should Consider WordPress Multisite?
- Educational organizations that would like to offer students the chance to create their own network websites.
- An entrepreneur who owns a large networks of blogs.
- An online magazine or newspaper with multiple teams and sections.
- A website developer with lots of clients who all need their own sites.
- Governments with various departments.
- A national or global business with numerous branches that need their own websites.
Who Should Skip It?
- People with hosting accounts that don’t meet the server requirements.
- Any organization that needs its regular admins to download and install its own plugins to the individual sites.
- Any organization that needs unique IP addresses or databases for all sites.
- Sometimes we find that developers have clients with different hosting accounts. In this case, WordPress Multisite won’t work.
- Anyone who’s only interested in making one website. For example, there’s no reason for a personal blogger (with one site) to install Multisite (unless, of course, you’re just trying to learn more about WordPress).
How to Setup WordPress Multisite
Step 1: Actions to Take Before Setting Up WordPress Multisite
Begin by getting a quality host. Some smaller networks can run on shared hosting, but most of the time we would recommend your own server, managed hosting, or a VPS.
Other than that, you’ll need to understand how to work with an FTP client and how to install a regular WordPress site.
A little further down in this tutorial you’ll see that you must choose a domain structure for your network. Your choices are between subdomains and sub-directories.
You’ve most likely seen these before with large businesses or government websites:
- A subdomain: http://support.mysite.com
- A sub-directory: http://mysite.com/support/
Subdomains require an additional step of configuring wildcard subdomains, while the sub-directories only need you to enable pretty permalinks.
Step 2: Activate the WordPress Multisite Feature
Seeing as how WordPress Multisite is already included with a standard WordPress installation, you don’t have to go out searching for it.
The first step is to have a regular WordPress site already installed. If you’re just getting started with your first site, we recommend checking out our guide on how to install WordPress.
Note: Before proceeding, make a backup of your site.
After your backup, go to your hosting CPanel or choose your favorite FTP client. Either one of those will work. You’ll need to open the wp-config.php file so you can edit it.
Locate the line that says /* That’s all, stop editing! Happy blogging. */
Paste the following line right before that final line:
/* Multisite */
define( ‘WP_ALLOW_MULTISITE’, true );
After that, save the file to the server. Your WordPress site is now completely ready for WordPress Multisite.
Step 3: Configuring Your Network
The Multisite feature is now active, but you obviously want to start adding new sites and making sure there are no hiccups along the way.
Start by deactivated every plugin on your website. You may have problems if you don’t do this.
Now, go to Tools > Network Setup.
A warning tells you that Apache’s mod_rewrite module must be installed to ensure that Multisite works. If you have a credible hosting account, it should already be enabled.
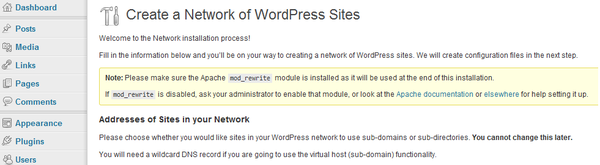
Right below that you’ll have to decide if your network is going to use subdomains or sub-directories. Make the choice depending on your organization, then punch in a title for your entire network. This is also a good time to check if your admin email looks right.
The final step here is to hit the Install button.
The rest of this process is explained by WordPress on your screen. You’ll be prompted to add a few rules to your files, which you can complete with an FTP client.
Step 4: Your Network Settings
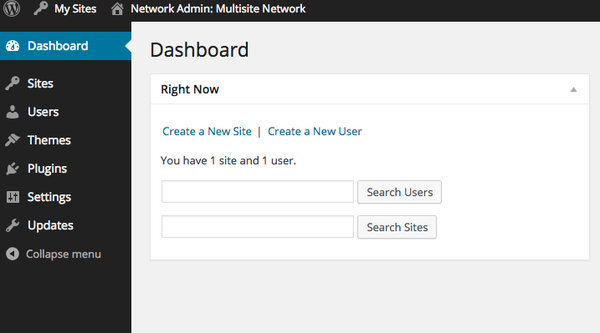
The next step is to go to your network dashboard as the Super Admin. This is where you’ll setup all of your network settings. It’s also the only spot where you can install any plugins or themes to your network.
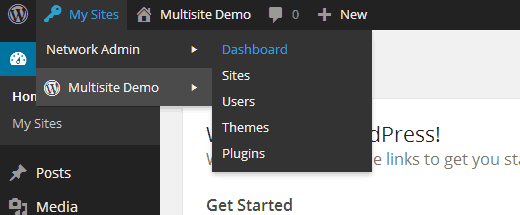
Go to the My Sites tab in the WordPress toolbar. This will reveal more options in the menu, where you can go to Network Admin > Dashboard.
You’re now looking at the Network Admin dashboard, where you’ll discover several new modules for managing your network. There is also a spot for making brand new sites and adding users to those sites in the network.

In the sidebar you’ll see a Settings tab that you should click on. Go through this page to fill out all the necessary details, including the network title and your email address.
Step 5: Registration on Your WordPress Multisite Network
Since so many WordPress Multisite admins are trying to open up the network to multiple people, it’s essential to configure your site to accept registrations. This means that you want to allow users to make their own accounts. For example, users might be able to make an account for their own personal blog. In other situations you would need the network site admins to have their own accounts as well.
By default these registrations are disabled on WordPress Multisite, most likely to keep unwanted users out initially.
To get the ball rolling, choose whether or not you’d like to get an email notification when a new user or site is made.
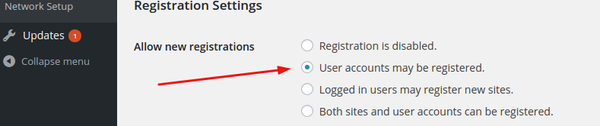
The Add New Users checkbox indicates that you’d like to allow site admins to add their own users.
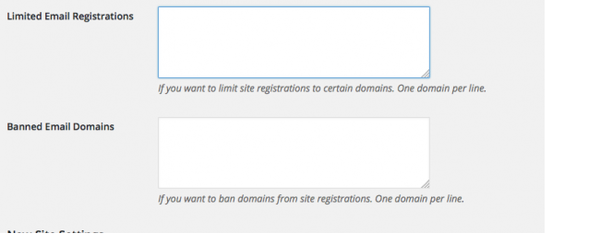
You’ll also be able to adjust the Limited Email Registration settings, preventing some people from registering. For example, an in-house network might only want to have employees making user accounts on your sites. You also might find that some of the sites on your network should prevent any user registrations, while others are completely fine for that.
Step 6: The New Site Settings Section
Go to the New Site Settings section for a wide range of settings to play around with. For instance, one organization might want to send out customized emails to any new users that signup for the network. This allows you to customize those emails.
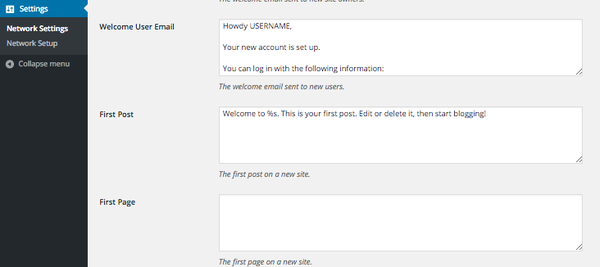
On the other hand, a school might want a default blog post to show up on every new student blog. If that’s the case, you can configure the blog contents here.
Step 7: Uploading Your Settings
Server resources can be compromised with such large networks, so it’s key to constantly check-in on how the server resources are holding up. Go to the Upload Settings section in your multisite dashboard and configure the amount of space each site can utilize for its uploads.
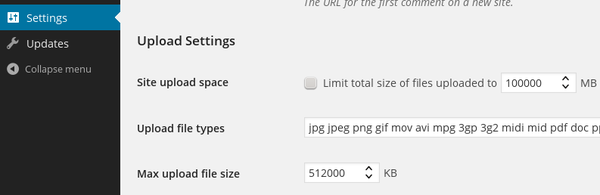
Let’s say you don’t want users uploading insanely large videos and photos. If that’s the case, you can limit file upload sizes. This page is only nice for limiting the total storage space, like if you only wanted about 100 MB of storage space per blog or website.
Step 8: Managing Your Menus
Go to the menu settings on your dashboard. As we discussed before, site admins are most likely going to want access to whatever plugins you have allowed on your network.
For example, you may have a social media sharing plugin on the network. It would be nice if every site admin could take advantage of this plugin on their own sites.
This is where you’ll activate that. All you have to look for is the area that asks you to enable the administrative menu.
The good news is that if a site admin no longer wants that plugin, they have the power to remove it from their own site.
Do You Have Any Questions?
If you have any questions on how to setup WordPress Multisite, feel free to let us know in the comments section below. The majority of the work that comes along with multisite is in the Settings area, seeing as how you must manage your resources and ensure your network is healthy. Most beginners can handle the installation, but it takes a little practice and experience to successfully maintain a network.
That said, we wish you good luck with your WordPress Multisite experience!


I always found Multisite confusing but after reading this; a lot of my questions are answered. Thanks!