Have you ever been to a website and later you start seeing their ads on Facebook? If so then you’ve probably wondered how this happens and what the advantage of it is. The website is using an easy to use tool built into Facebook Ads Manager called Facebook Pixel to perform a type of marketing known as retargeting.
Retargeting, also known as remarketing, allows you to show your ads to people that you know are already interesting in your website. Using Facebook Pixel you can retarget your ads to your website’s previous visitors.
In order to use Facebook Pixel you’ll need to install some code on your website. This code tells Facebook that someone visited this page, allowing Facebook to track your traffic which in turn allows you to target your website’s audience on Facebook.
In this article we’ll take a look at how to install this code on your WordPress website.
Step 1. Getting the Facebook Pixel Code
![]()
Facebook Pixel is part of Facebook’s advertising platform. Everyone with a Facebook account had access to this platform. To get it login to Facebook and select the Ads Manager. This will either be on the right under Favorites or in the down arrow drop-down menu under Manage Ads. In the Facebook Ads Manager select Tools and then Pixels. Next, click on the button that says Create a Pixel. This will give you the code you need to place into the header of your website.
It will ask you to choose a name for your Pixel. You can only have one Pixel per ad account. Facebook recommends that you choose a name to match your business. Name your Pixel, agree to the terms, and click Create Pixel. Your Pixel is now ready to install. You have the option to use the code yourself or email it to someone such as a developer to implement it for you. Select Install Pixel Now.
![]()
Copy the JavaScript code to place it on your website. I recommend pasting it into a text editor and saving it so you’ll have it handy. You can also use this code with plugins on individual pages and posts with plugins such as Facebook Conversion Pixel. Next click Set Up Events and then click Done.
Step 2. Installing the Code Manually
You can install the code manually or you can add it to a plugin that controls your headers. To install the code manually go to your WordPress Dashboard and select Appearance and then Editor. On the right side on the screen select Theme Header.
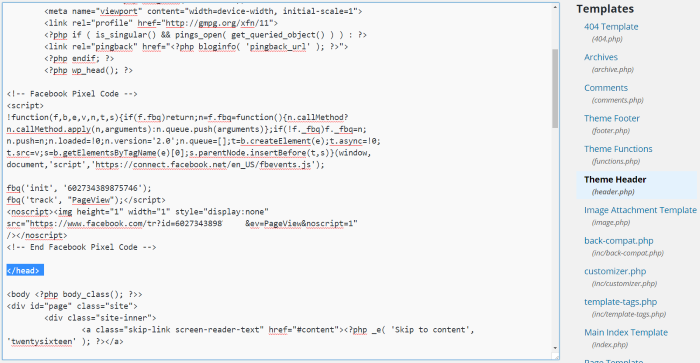
Look for the tag </head> and paste the code just before it. You might need to add a few lines to make room. Once you’ve pasted your code click Update File and that’s it. Your code will now run on your website.
Note – if you change themes you’ll have to add the code to the new theme. An alternate method would be to use a plugin to handle your headers such as Header and Footer. Simply place the code into your header scripts and the code will be placed into your header for you. Now if you change themes you won’t have to worry about adding the code to your new header file.
In order to improve tracking you might prefer to use the code on specific posts or pages rather than your entire website. Facebook has code snippets that you can use to track individual pages and events but they’re not WordPress friendly. A better option would be to place the code on pages and posts using a plugin.
Step 3. Facebook Conversion Pixel Plugin
![]()
If you only want to place the code on specific pages, posts, and custom post types you can use a plugin such as Facebook Conversion Pixel. With this plugin you can enable the plugin to work with various posts, pages, and post types including WooCommerce and others. For example you can enable the Product post type and place the code on your checkout page for easy tracking.
![]()
Once you’ve installed it and enabled the post types you want to use it with go to the page or post with that post type. A box will now appear where you can place the code. Click the button to allow the code to work and then paste the code into the box. When you publish or update the page the code will run.
The advantage of placing the code on specific posts is you know the visitors have seen your offer already.
Step 4. Using Facebook Pixel with Multiple Websites
You’re only given one Pixel per ad account. That’s not a problem if you only use Pixel for one website, but what if you want to use it for multiple websites? You can do one of two things:
- Have more than one ad account. This might work, but you’ll have to deal with multiple logins, multiple stats tracking, and payments can be bothersome. This is ideal if you have a team and you’ve assigned a different team member to each account.
- Use the same Pixel on all of your domains and set rules to distinguish between them. This is done by creating Custom Audiences.
Custom Audiences
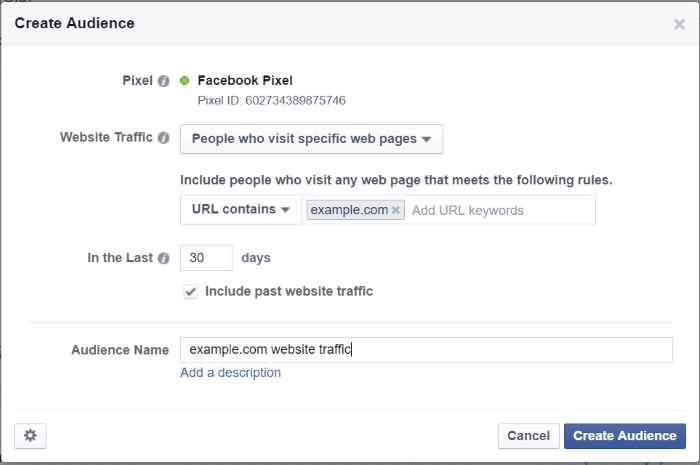
To create a custom audience go to Facebook Pixel in the Ads Manager and select Create Audience. In the Website Traffic dropdown box choose People who visit specific web pages. This will show you another box where you can add URL keywords. Place your domain name here. In the box for Audience Name type a name for that specific audience.
This is a good idea even if you’re only using the code on one website. You can track for specific offers from your website and then show a different ad based on the offer they saw on your website.
Conversion Tracking
Although Facebook Pixel tracks website visits rather than conversions, there is a way to track conversions across multiple domains. To do this you’ll need to create a Custom Conversion for each domain. Keep in mind though, you’re only allowed 20 custom conversions.
![]()
In the Facebook Pixel Manager select Create Conversion. In the next window select Track Custom Conversions.
![]()
Type in the URL and select the category you want and hit Next.
![]()
Give it a name and set the conversion value if you want and then hit Create. Once you’ve collected enough data you can target your ads based on the conversions.
Step 5. Analyzing your Stats
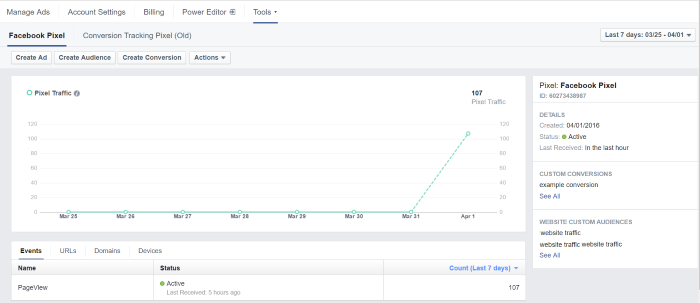
The Pixel allows you to view website traffic, track conversion and optimization, and remarket. You can see traffic by events, URL’s, domains, and devices. You can the information to create ads, audiences, conversions, and actions.
Final Thoughts
Facebook is an excellent platform for building your brand and targeting your audience. You can boost your Facebook posts using ads, but rather than targeting a wide audience you can use retargeting to narrow the audience for better results at less money.
Not only is Facebook Pixels a great tool for getting the most out of your Facebook ads, it’s also free and easy to use. Even if you don’t use Facebook ads now, you can use the stats and tracking to help you use it later.
We’d like to hear from you! Do you use Facebook Pixel with WordPress? Do you have anything to add? Let us know in the comments below.


This is really an awesome and very informative article. This is really and amazing way for marketing. This is something I was aware of, but I was not sure how to do this. But with this detailed article I now know how to do this. I will definitely try this for my blog and e-commerce site.
Thank you for sharing such in-depth article with us. This is really so helpful.
Glad you found the article informative. Thanks for stopping by.
Love this.
We built a plugin that we used on the custom WordPress sites we build. It was so useful for our customers that we released it a year or so ago. Tracking Scripts Manager (https://wordpress.org/plugins/tracking-script-manager/) can be used for this and much more. It lets you add any tracking script including the Facebook Remarketing/Retargeting pixel to the header, footer, pages and posts.
James