
Almost everything in the world has a maximum capacity. Computers use a finite amount of memory to store routines, code, scripts, and much more. In some cases, you’ll want to boost this limit to stay away from errors. As for how to increase the memory limit within WordPress, you won’t be able to use the familiar dashboard screens.
The main way you’ll increase the WordPress memory limit is to access your server’s files, make a change, save it, then test your site. How you do this will differ based on your type of administrative access, your preferred method, and skill level.
For this tutorial, we’ll show you how to increase the memory limit in WordPress regardless of your skill level or type of server access. First though, let’s talk about what memory limits are, and why you’ll need to increase it.
Why You’d Need to Increase the WordPress Memory Limit
Your WordPress website runs on lots of different files and scripts using a language called PHP (among others.) In order to keep your resource usage to a reasonable level, your server will have a PHP memory limit. This will throw an error or even a White Screen of Death (WSoD) if a script looks to take more memory than the limit allows for.
However, the default setting doesn’t take into account your unique setup and needs. As such, you could max out your memory limit, but have enough ‘gas in the tank’ server-wise. While a memory limit is useful and necessary in order to keep your site working, there may be times where you need to up this allocation.
We’ll show you how to do this later using a few different methods. First though, you’ll want to know how to check your memory limit.
How to Check Your Current WordPress Memory Limit
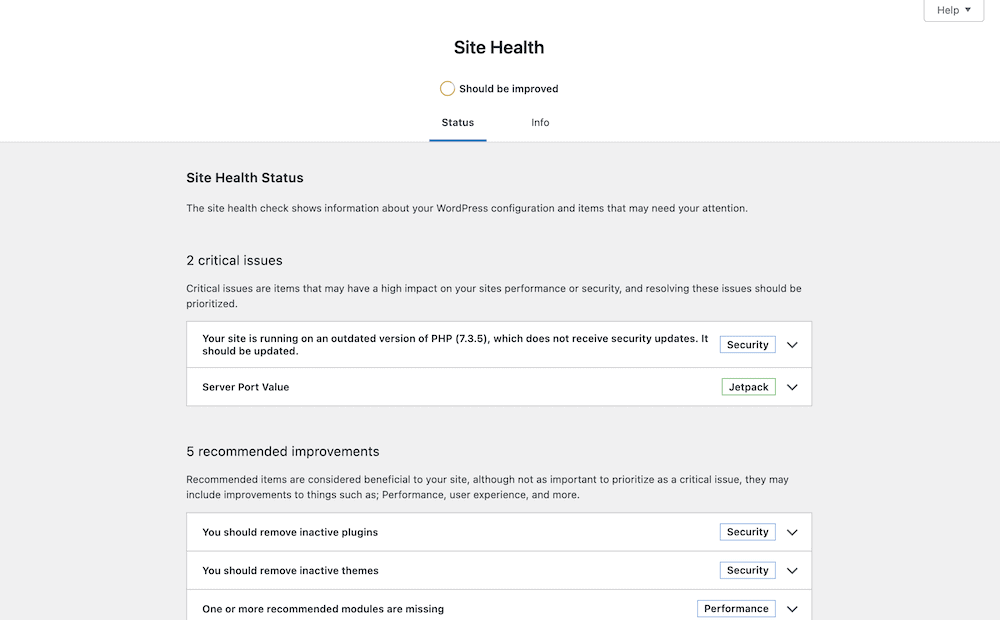
Modern versions of WordPress – those from 5.2 onwards – have a fantastic Site Health feature. This can help you resolve and troubleshoot many aspects of your site. However, you can also check your current WordPress memory limit here.
To do so, log into your WordPress dashboard, and head to the Tools > Site Health screen:
The Info tab will list a number of different metrics, including that of your current memory limit within the Server ‘concertina menu’ option:
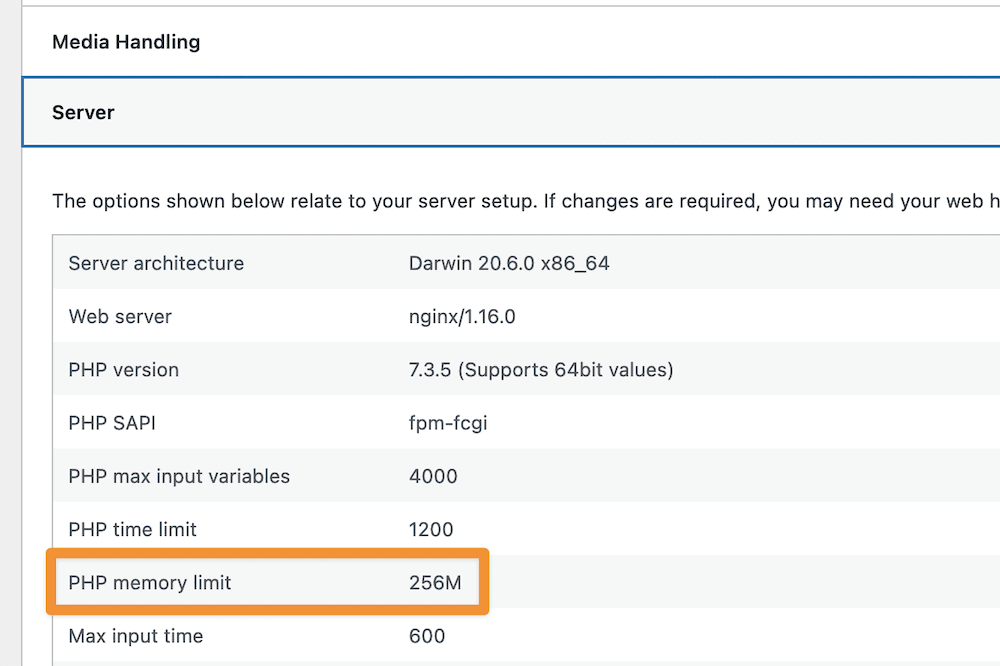
If this number is between 128–256 MB, you’ll want to contact your hosting provider’s support. A memory limit this high should be more than enough for almost every eventuality.
However, if the figure is lower, you can look to raise it. We’d start with 128 MB, then test your site. This should resolve almost all issues in the majority of cases. We’ll show you how to change this figure next.
The Tools You’ll Need to Change Your Memory Limit in WordPress
In order to increase the memory limit of your WordPress website, you’ll need some tools, privileges, and skills. Here’s a quick checklist:
- The skills to use Secure File Transfer Protocol (SFTP.) If you choose to adjust the setting within your
wp-config.phpor.htaccessfile (more of which later) you’ll have to access it through your server using SFTP. - An SFTP client. To ‘remote into’ your server, you’ll need a dedicated SFTP client. FileZilla is near-ideal, as is Cyberduck. However, there are lots of others, such as Panic’s Transmit 5.
- A working knowledge of WordPress files. While this isn’t super important (because we’ll walk you through it,) it’s helpful to understand how WordPress’ file structure works, so you won’t encounter any surprises.
- Administrative access to your hosting provider’s account. One of our methods will need you to log into your hosting back end and adjust the
php.inifile. To do this, you’ll want to have administrator access.
Once you have these tools and skills in place, you can begin to increase the memory limit in WordPress.
How to Increase the Memory Limit in WordPress (3 Methods)
There are three methods we’ll cover on how to increase the memory limit within WordPress. The first two require the use of SFTP to access your server, and the last will need you to log into your hosting control panel:
- You can change memory limit settings within your
wp-config.phpfile. - You’re also able to edit the
.htaccessfile if you have one. For Nginx servers though, you won’t have such as easy time (and we’ll explain what to do.) - You can access your
php.inifile (along with the others) from your hosting provider, and in some cases you’ll need to. We’ll show you how to do this using cPanel, but it will transfer to other admin screens too.
Let’s start with the most common and straightforward way to increase the memory limit within WordPress.
1. Alter the wp-config.php File
When most site owners want to increase the memory limit in WordPress, the wp-config.php file is the first port of call. This is because it’s one of the more simple ways to achieve the task.
Remember, you’ll need administrative access to your server, and SFTP credentials to log in. You’ll often find these in an email from your host, or somewhere within your hosting control panel.
Once you log into your server using SFTP, you’ll see a list of files and directories. The wp-config.php file should be in the ‘top level’ and visible:
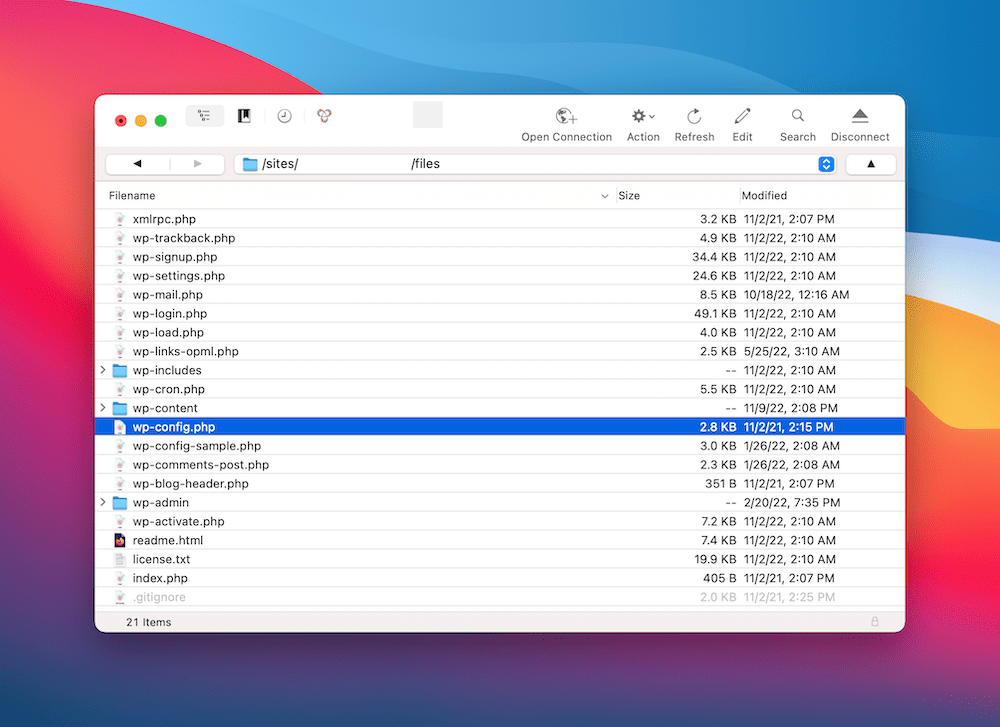
The way you open this file will differ slightly based on your chosen SFTP client. For example, FileZilla gives you the Edit option within its right-click context menu that’s clear to spot. However, a tool such as Cyberduck calls it the Edit With option:

Regardless, once the file opens, scroll until you come to the define( ‘WP_MEMORY_LIMIT’, ‘64M’ ); line. Note that the value might look different in your file, and you may even need to add the line in if you can’t find it:
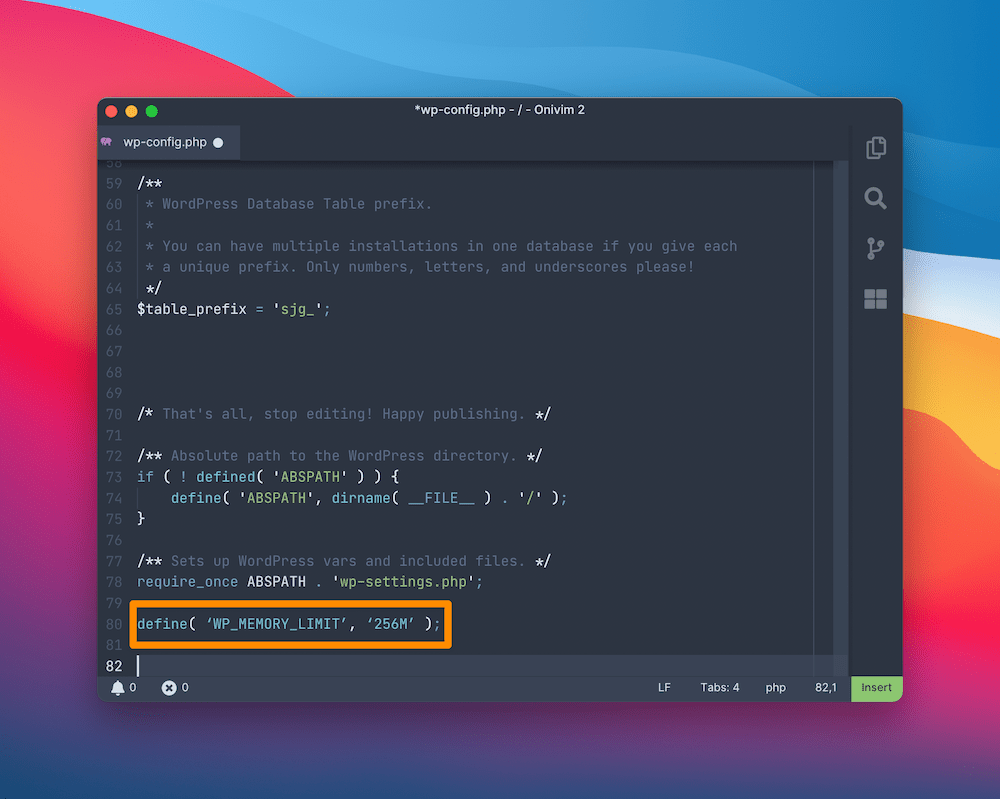
Here, change the value (in our case, 64M) to “128M” then save your changes. Remember to preserve the single-quote encasing. Once you do this, you might want to clear any server caches. The final step is to test your site and see if the memory increase has an effect.
2. Change Your Server Configuration Settings
You can alter the memory limit within your server’s configuration settings too. However, this will only be possible for Apache servers. While it’s technically possible with Nginx servers, the technical skills and access you’ll need won’t always be available.
If you need to change the memory limit for an Nginx server, we’d suggest another method on this list, or to contact your host for support. However, Apache server users can open the .htaccess file and make a change to the memory limit.
The good news is that the approach to change the memory limit here is similar to wp-config.php. You’ll still access your server using SFTP, but this time, look for the .htaccess file within the top level. Again, you can open this within a text editor.
Within, you’ll want to add the following after # End WordPress:
php_value memory_limit 128M
Once you save your changes, you’ll want to clear your server cache before you test whether this works to your liking.
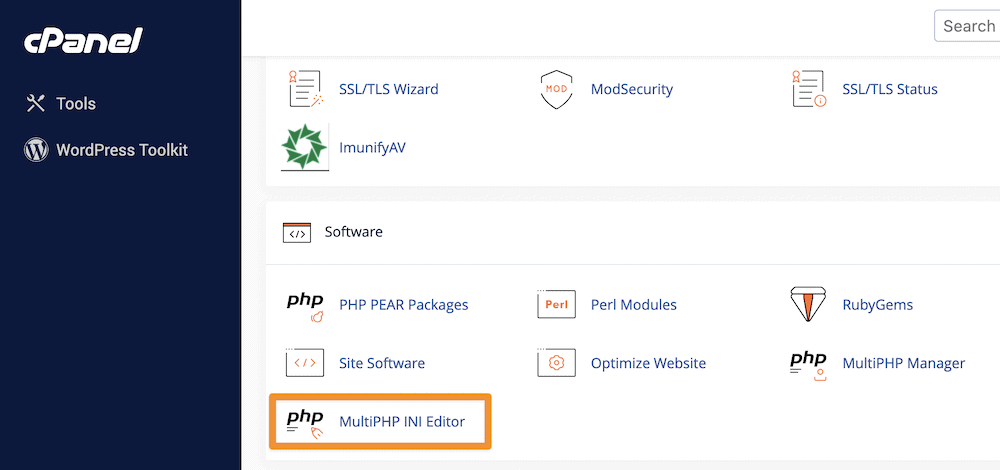
3. Tweak Your php.ini File from Your Hosting Provider’s Admin Panel
While it’s possible to edit your php.ini using SFTP, most hosting providers offer a dedicated file manager for this task. To find it, log into cPanel (or your chosen hosting admin screen) and look for the Software > MultiPHP INI Editor option:
From this screen, you can either choose the Basic or Editor mode. Regardless, select your site from the drop-down menu to load the relevant php.ini file:
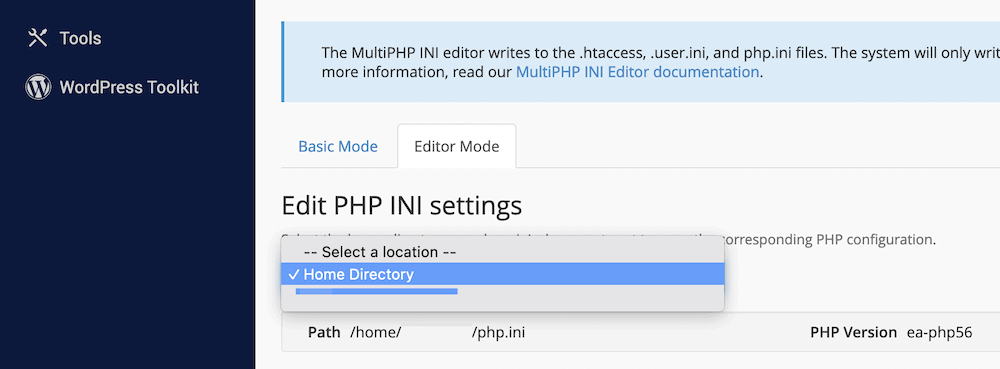
After this, look at the settings on offer. You’ll want to find the memory_limit option and change the value to whatever you think is best. Once you make these changes, save them, clear your cache, and test out your site.
You May Need to Upgrade Your Hosting Plan or Provider
If you run an Nginx server and you want to change your WordPress memory limit, it’s a good idea to contact your host to do so for the reasons we discuss. Regardless, if you check out your memory limit and it’s high enough based on our recommendations, you’ll have a decision to make.
It could be that your needs are too much for your current hosting plan, so you’ll want to consider an upgrade. We’d talk to your host about this, as they can give you some back end insights to help you make that decision.
However, if you know your memory limit is high and you don’t have intensive resources chewing it up, you might need to switch hosting providers. This will be common if your site grows while you’re on a so-called ‘beginner’ or cheap hosting provider. E-commerce stores can be a good example, because the influx of new customers can leave you with the need to scale your resources fast.
As such, check out our roundup of best WordPress hosting options to see if there’s a better fit for your needs. It could be that you need the experts in managed hosting to see better results than what you currently get.
Wrapping Up
Your WordPress memory dictates how much resource is available to your server. If it maxes out, you’ll see errors such as the WSoD. However, in most cases, this figure is conservative and unsuited to your needs. As such, you’ll want to increase this maximum limit to give your plugins and bandwidth more wiggle room.
This post has looked at how to increase the memory limit in WordPress using three different methods. Here they are:
- Access your site using SFTP and change the
wp-config.phpfile. - Edit the
.htaccessfile for Apache servers, again using SFTP. - Log into your hosting control panel, and use the file manager there to edit files. The
php.inifile often has a dedicated setting here.
Do you have any questions about how to increase the memory limit within WordPress? Ask away in the comments section below!


Leave a Reply