
CSS is hard!
Sound like something you might say? You wouldn’t be alone. CSS (or Cascading Style Sheet) is a coding language that can be a tough little baby to wrangle.
However, to say CSS is hard is a bit harsh. Like any language, CSS can be a bit tricky to understand at first, but once you understand the basics, things start to fall into place.
The best way to learn CSS is to understand what it is and how it works. Then, you can learn some basic code snippets to help you grasp that initial understanding a little more and you’ll be off designing in no time!
Our post is going to do just that.
What Is CSS?
Sure, CSS means Cascading Style Sheet but everyone will tell you that. However, that doesn’t really help, does it?
There is any easier way to understand what it is.
Think of HTML as the frame of a house, and CSS as the paint job to the outside. When you paint the trim of the house, or stain the front deck, does that change the frame of the house itself?
No, it doesn’t. Instead, it merely changes the appearance of things. The foundation and the frame of the house stay the same.
This is what CSS is.
It alters the appearance of your site, but it doesn’t disrupt the foundation or core of it.
Every house has paint on it. Every WordPress theme uses CSS.
They work together to create a website and you can use some rather simple CSS code snippets to change that so-call “paint” of your theme.
In fact, you just might be surprised how easy it is.
Simple CSS Edit One: Editing Font Type And A Quick Lesson On Writing Code
When using a theme like the Genesis Framework, changing something as simple at the font used on your site needs some CSS. But don’t worry. It’s really not that hard to do.
To make any CSS changes to your theme, you’ll first need a custom CSS area to make these adjustments. Don’t alter the Stylesheet that comes built into your theme.
Instead, use a plugin like the Custom CSS option that comes load in Jetpack. Any of your CSS alterations you make in there will override the predetermined CSS of your theme.
Before you can edit the font, you need to figure out which area you want to edit.
There are 7 main areas that you can edit your font:
- All 6 Heading Font Types
- The Body Font
The tag markup for these is simple. For example, if you want to edit the Heading 1 font that shows up on your site you would use the tag, h1. If you wanted to change the Heading 2 font, the tag would be, h2 and so on.
Here is an example of how to write CSS code to change your Heading 1 font:
h1 { font-family: 'Georgia'; }
Now it’s true, you could try copying and pasting that, but I want you guys to get a better understanding of how this really works.
The first part written (h1) is the subject you wish to change. This symbol ({ ) opens your line of code and this one ( } ) closes it.
Okay, okay.
This probably still sounds confusing, but when I was learning CSS I taught myself a handy trick for remembering how to write CSS correctly. Like this:
h1 { opens the door to his closet
In search of something to change into: ‘He finds what he wants’;
And then he closes the door}
Back on topic; here is another example of how you can make changes to your font.
 body {
  font-family: 'Arial';
  }
By changing the element from h1 to body, I’ve now told the Stylesheet that I want to change the body font that shows up in posts and pages to the Arial font.
That’s pretty simple right?
If your theme is Google Font enabled, you can even use the fonts from there on your site as well.
Simple CSS Edit Two: Edit Font Color
This little CSS trick is a nice way to change up the color of your menu font or the color of the body font. Like the code snippets written above, all it takes is a couple short lines of code to really change things.
Say that I wants to change the color of my Heading 2 font to something different. I can do that by following a similar outline that we did before (remember the story?) but with the main lines of code changed a bit. Like this:
h2 { color: #4f4f4f; }
Notice that the subject is defined as h2 and we still have the opening and closing tags ({}), however, the way the code is written is a little different from the one above when we wrote the code for a font change.
Unlike the font that needed to be closed off by parentheses, (‘ ‘) the hex color element doesn’t need that.
Now, you don’t need to write code for the same subject over and over again to change certain aspects of it. You can combine the code for that same subject to make things easier to find and change in the future. For example, you can combine Font and Font Color into the same line of code.
body { font-family: 'Roboto'; color: #4f4f4f; }
See how I did that?
I have two lines of code inside of the that one subject line. When you need to make multiple changes to a single subject, write the code out like this will save you time. Just be sure that you close those individual lines of code with a semi-colon (;) before you move on to the next line.
note: to help remember to do this, think of the semi-colon as a period at the end of your sentence. You never end a sentence without a period. Never end a line of code is CSS without a semi-colon.
Simple CSS Edit Three: Background Color, and A Browser Tool You Didn’t Even Know Your Had
Editing the color of certain things on your site is another super easy CSS trick. All you need to know is element or subject that you’d like to change.
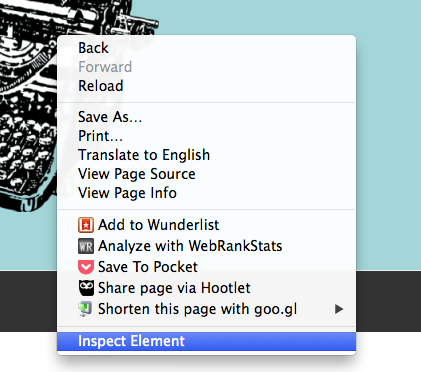
A handy tool that many designers use – myself included– is the Inspect Element tool in our Google Browser. This is an awesome too for trying to find the right subject to change and define.
To find that, simply double click your mouse to pull up the options as you can see below. Select Inspect Element, and you can now search your websites editable elements.
See this picture here?

I have one menu item highlighted in a different color from the rest of my menu to stand. In order to do that, I used my Inspect Element Tool to figure out the correct name for me to edit.
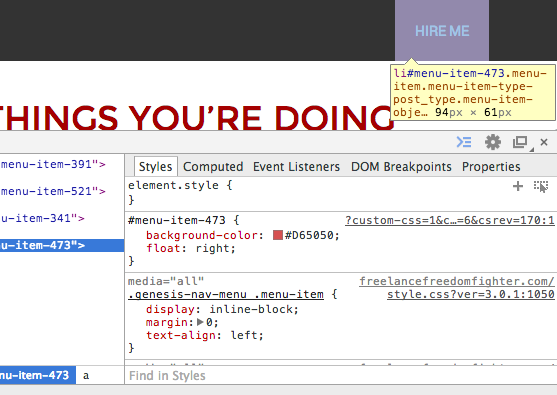
Now as I scroll over the menu items, the actual code name that it is given will show up in my highlights. The one that I changes had the name of: #menu-item-473 (You can see that that is the name of it in the yellow box. It’s name is highlighted in blue.)
That is the name of the subject that I wanted to change. To change the background color of that menu item, I start the line with it’s name and declare that I want to change the background, like so:
#menu-item-473 { background-color: #D65050; }
Again, I start by telling the Stylesheet the subject I want to change (#menu-item-473) and then I tell it what to change (background-color) and what to change it to (#D65050).
Whatever you decide to change the background of will have a different name than this, but thankfully, the Inspect Element option in your browser will make finding it so much easier.
Another awesome thing about Google Inspect Element Tool is that you can edit things in real time to get things just right, and then you can copy and paste all your editing work from there, into your CSS Custom Style Sheet. Talk about time saver!
Simple CSS Edit Four: Float
Sometimes, it’s nice to be able to do something a little different with your primary menu or predefined widgets on your site. Maybe you’d like to take, one menu item and place it further to the right than on the other items sort of like I did with the menu pictured above. (Also pictured below in full width.)

To do this, you can use the Float code snippet to do just that. Like the steps above, you should use the Inspect Element Tool to find the name of the subject you wish to change. The one pictured here is the same as the one mentioned above. (#menu-item-473)
In order to get this item to move over, but to still look nice on a mobile screen, this is the code I wrote:
#menu-item-473 { background-color: #D65050; float: right; }
It was seriously that easy. Now I have a menu item that stands out, which what I needed it to do. You can also apply this to things other than your menu items.
For example, if you have a widget that you’d like to reposition, you can could use the float: right; or float: left; code snippet to change where the your widget is display.
It takes some time and tweaking, but CSS becomes easier to use the longer you mess around with it.
Simple CSS Edit Five: Text Align
Aligning your text is something you can do in a post, sure. But what about your widget titles, or something of the like?
You can use this CSS code to easily align your widget text title.
I use the Genesis Framework for my websites, and this is the code it took to align the titles of my widgets:
.footer-widgets .widget-title { text-align: center; }
The element or subject name in your theme may differ slightly from this, but you get the idea.
This small code will keep my text in my footer widget titles centered, and since I proclaim the .footer-widgets together with the .widget-title, only the footer titles with center.
So that’s it! 5 super simple ways that you can edit your theme using CSS! CSS is like any other language. It’s hard at first, but once you get over that initial hump of understand, it’s a breeze.


What a great tutorial and some great code to easily put int.
I don’t use wordpress, but these are great tips & codes for someone who does!
I haven’t used CSS codes for my site as I’m not familiar with CSS language. I make it up by trying to look for plugins. These simple codes really helps me in managing CSS codes.
I use blogger so this didn’t really apply to my blogging. I’m sure WordPress users will appreciate it.
Thank you so much for these. I used to be very good with CSS and HTML codes. I am still pretty good but I have to go back in my log to rehash them.
Can you give me the code to make my wpform size small and compact please?
Really useful! I like how simple these instructions are, I’ve always had trouble with CSS code.
Great tips and tutorial.
You have the best tutorials! I am excited to use what I just learned, thanks!
Thanks Mary Ann! I’m glad you like it
Thanks for the great tutorial. This is great information for any one who uses wordpress.
I don’t use WordPress, but I have a few friends who would love to bookmark this. Thanks for sharing!
Finally someone explained it in a way that made sense to me. I am so thankful for this post!
I’m so glad it helped :). I really tried to break it down as best as I could, so I’m happy that you found it useful.
as a front end developer, css is my jive! having this knowledge has only made me more OC about my layout because i always want things to be properly aligned, and colored! haha >XD
It seems this post is well loved! You were nice to make and share it. 🙂
These are some pretty simple basic css codes..
Great article! Love your tips! They are so helpful!
I have not played around to much with the css on my Wrdpress site, I use to play around with the code when I had blogger, lots of great tools for switching it up.
Float is extremely tricky to use so be careful about it! One wrong float can severely confuse you and the solution while often simple, is complex to figure out when you have a lot of divider elements.
Interesting! Thanks for sharing. Although I’ve been blogging for quite sometime now but seldom I changed themes (fonts, colors etc) i still have to read this again to absorb the tutorial. well explained, nice post. 🙂
Great post and information on customizing wordpress sites. This should help many. Thanks for sharing.
These are great! I have a question — how do I make my body font larger? Would I go body { 14pt } ??
These are great tips and an easy to understand tutorial. I will use some of these ideas on my blog and I appreciate your way of explaining each step.
That was a great tutorial i have a much better understanding of CSS now. Thanks for sharing a great post.
What a great post. I took a CSS class, and I still feel clueless, but this was certainly helpful. Thanks for the tutorial!
great tips! I’ve used all of these and more (self taught!) and when you breakt it down css really can be easy 🙂
I’m definitely bookmarking this page. What great information, especially for someone like me who has been too afraid to mess with CSS.
Thanks for the great tips for wordpress.
I am gonna have to bookmark this. I need help with font colors.
until now I am still trying to understand the language program this website, thanks for leavened
Awesome 🙂 Tutorial has made playing with CSS easy.
It is going to help me a lot.
best tutorial on basic css that I have found, Thanks