WordPress is without doubt the best Content Management System on the web bar none, this is coming from someone who has used all of the popular content management systems around.
Installing WordPress on your own server is a piece of cake with the simple one-click install, this is something that even non technical and senior citizens are able to do with a breeze. In most cases you would launch a site live on the web and customize the site to your taste.
But, there are times that you would like to have the privilege of using WordPress offline, on your computer and this is probably on a windows machine. Since the Windows market accounts for 90% of the operating system market share.
This could be for various reasons; you might want to customize your site locally offline, learn how to use WordPress, or maybe you want to test certain custom features and plugins before going live on the web. Whatever the reason, you will need a solution to install WordPress locally on your computer.
To install WordPress you will need to have a server environment on your computer and you can achieve this using two popular, free and open source server environment applications in WAMP and XAMPP.
Both applications are excellent, and they will both mimic the server environment that WordPress needs to run on your computer. I’m going show you how to install WordPress using both solutions step-by-step, but it’s up to you which one you choose. Let’s start with WAMP.
WAMP which stands for Windows Apache MySql and PHP, is a free application that provides the environment of a web server on your local computer. The WAMP application is a combination of the Apache web server, PHP and MySQL, which are all needed for WordPress to work online or offline.
WAMP is a free and open source application which means anyone can download it without paying to use the software. You can get the software from: wampserver.com/en. On the menu in the homepage click on Download and you will be taken to the download section. Depending on what kind of operating system your computer is running, you are given two versions of WAMP that you can download. A 64 and 32 bit version.
This current version of WAMP will not work with Windows XP, but you can download older versions from the link provided. You can refer to this Microsoft resource if you’re not sure which version of operating system you’re running, which automatically detects your operating system version.
Once you click on the version that corresponds to your operating system, a message will pop up with various pieces of details. Just click on the download directly link. You will then be directed to the sourceforge website where your download will begin. If you are running chrome WAMP will be downloaded into the Downloads folder. This is similar for other browsers.
To begin installation, just double click on the executable WAMP pink icon:
Once you double click on the file, Windows will give you a security warning asking you to confirm that you want to run the software. Click Run:
You might be prompted further by the Windows User Account Control to confirm that you want to allow WAMP to make changes. Click Yes to continue. The WAMP installation wizard will then launch:
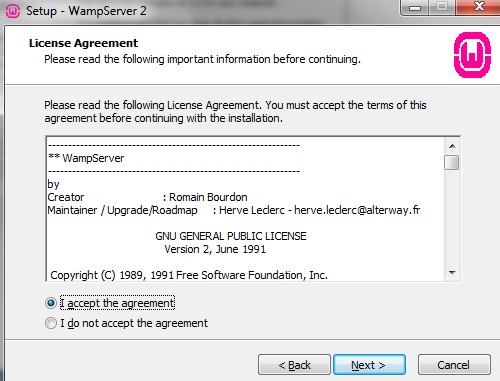
Click next to continue onto the License agreement box:
Again to continue, select I accept the agreement and then click on Next, then specify where you want WAMP to be installed.
Usually this is in the root of the C drive, and this is the default path selected by the installation Wizard. But if you want to install it somewhere specific then you can choose that location here by clicking on Browse.
I’m going to install mine in the root of my C drive:
Once you have chosen where you want WAMP to install, then just click Next. You will then be presented with another dialog to choose if you want to create an icon for WAMP in Quick launch or a shortcut icon on your desktop. I’m going to select Create a Desktop icon, so that I can launch WAMP directly from my desktop:
Click Next to go to the Ready to Install dialog box and install WAMP:
To complete the installation, click Install. WAMP will then install on your computer, this could take several minutes:
If you have Firefox installed, WAMP will ask you if you want to use Firefox as the default browser with WAMP:
I want to use Chrome, so I’m going to click on No. It will then give you another screen to choose which browser you want to use WAMP with:
You can choose another browser by going to the programs folder and then selecting the executable application file or if you use Internet Explorer just click Open. If you are using Chrome the path should be: Local disk –> Program Files–>Google–>Chrome and then select the chrome icon application. Here’s the path visually:
Once you’ve located your preferred browser just click the Open button to complete the installation. You will be asked to choose PHP mail parameters, you can add your email here or you can just leave it as the default:
Click Next to finalize the installation. You will then be taken to the final screen in the installation wizard where you are also given the option to launch WAMP Server 2:
Click Finish to complete the installation. The Windows User Account Control might prompt you to confirm if you want to allow the program to make changes. Click Yes. You might also be prompted by the Windows firewall:
Make sure you click on Allow Access. You know have WAMP installed.
Side note: There have been some instances where some users see an error message such as: “wamp can’t start because msvcr110.dll is missing”. You can resolve this issue by downloading visual C++ redistributable…2014 from this link. Make sure to select your version of Windows operating system either 32 or 64 bit. If you find that you are still struggling then scroll to the XAMPP installation section, as I will show you how to install WordPress with XAMPP.
Now that you have the server environment on your computer, we need to create the database that will be used by WordPress. To create the database you need to open phpMyAdmin, which is a graphical user interface that lets you create, modify and manage users on the MySQL database. You can access the WAMPSERVER and phpMyAdmin right from the taskbar on Windows. To launch phpMyAdmin, click on the small Show hidden icons arrow on the taskbar and then click on the WAMPSERVER icon with one left click of your mouse:
The WAMPSERVER menu will then open:
From here you can manage the WAMPSERVER, you have separate options for managing each application; i.e. Apache, PHP and MySQL. To create the database just click on phpMyAdmin, and it will then open in the browser that you chose in installation:
To create the database just click on the Databases tab where you will be taken to the Databases window:
All you need to do here is type the name of the database, I’m calling mine wordPress, and click on the Create button, you don’t need to set anything else. The default database username is root and the password is blank. We’ll need this later when we’re installing WordPress. We’re nearly there! Now we need to download a copy of WordPress that we can install.
You can download the latest copy of WordPress from, you guessed it! WordPress.org. click on the blue Download WordPress button. The current version as of this writing is 4.0
If you’re using Chrome the file will download into your Downloads folder, locate the folder, extract the wonderful goodies and copy the extracted folder to your clipboard.
The moment of truth has arrived! We are now going to install WordPress. In the installation of WAMP I installed WAMP in the root of my C drive, and we need to put the WordPress folder inside the www folder in WAMP. So, in my case the path for the WAMP folder is C Drive–>wamp–>www. There are two levels in the WordPress folder the first folder called WordPress followed by the version number, and when you open this folder there will be another folder also called WordPress. I’m going to remove the version number from the root folder and rename the second WordPress folder to wpkube you can rename it to whatever you like:
To begin the installation open your browser and type in http://localhost/wordPress followed by whatever you renamed the folder to. In my case it’s http://localhost/wordpress/wpkube. You will then be taken to first page of the WordPress installation:
WordPress will tell you that it can’t find the wp-config file that it needs to start the installation. Just click on the Create a Configuration File button to create the file. You will then be taken to the setup page with details of what you will need for WordPress to run. Just click on the Create a Configuration File button to proceed. On the next screen you will need to enter the database name, username, and password. Enter the name of the database that you created, and then enter root as the username and leave the password field blank. Leave the database host as localhost and you can set the table prefix for the database, but since you’re working offline it’s best to leave it at wp. So in my case this is how it looks like when I’ve entered everything:
When you’ve entered everything just click the Submit button. You should get a message that says WordPress has successfully connected to the computer:
Click on the Run Install button to continue with the installation. On the next screen you will need to give your WordPress site a name, choose an admin username & password, and provide an admin email address. You’re given the option to allow indexing for the site, since you’re working offline this won’t be possible, just Uncheck this option. Once you’ve filled out all of the details required just click on the Install WordPress button. Here’s how mine looks like:
Once you click on the install button WordPress will install and you should get a message to confirm this along with a link to login:
That’s it! You’ve installed WordPress locally on your Windows computer. Go ahead and login to the backend and view your site:
If you have Skype installed there could be a conflict of port access. This means that WAMP might not work properly, because skype will be using the port it needs. To prevent this from happening you can simply configure Skype to not use port 80. Open skype and click on Tools–>Connection Options:
In the Skype options window Uncheck the option Use port 80 and 443 for additional incoming connections and set Use port to any number between 1024 and 65535:
Then simply just click Save to for changes to take effect.
The second way that you can install WordPress locally is using a similar application to WAMP called XAMPP. The names rhyme don’t they?! XAMPP is also a free and open source application that you can use to install WordPress. XAMPP stands for cross platform, Apache, MySQL, PHP and Perl. We won’t be using the Perl bit, because WordPress is written in the PHP programming language not Perl. Just like WAMP, XAMPP is a combination of Apache, MySQL and PHP. The main difference between WAMP and XAMPP is that XAMPP can be installed on multiple platforms such as Windows, Linux and Mac.
XAMPP also has its own dedicated website where you can grab your free copy of the software, just point your browser to: apachefriends.org/index.html and you will be taken to the XAMPP homepage where you can download the application. Unlike WAMP, there is only one version for Windows. Just click on the download for the Windows platform and you will be redirected to the sourceforge website and download should start immediately thereafter.
Just as in WAMP the User Account Control will prompt you to confirm that you want to allow XAMPP to make changes to the computer. Click Yes to continue. If you have an ant-virus program, which you should- XAMPP will give a warning that the program might interfere with XAMPP and provides a link where you can find out more:
In most cases the anti-virus application will not affect XAMPP, just click on Yes to continue with the installation. XAMPP might then give you another warning about the User Account Control restrictions, again this shouldn’t be a problem. The XAMPP installation wizard will start and similar to the WAMP installation there will be several screens before XAMPP is installed:
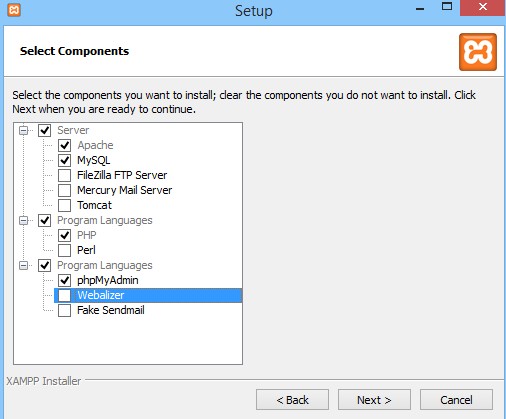
Click next to continue the installation. XAMPP will then ask you to confirm which components you want to install:
Since we’re working with WordPress we’ll only need 4 components; Apache, MySQL, PHP and phpMyAdmin. Select these 4 components and click Next, you need to specify where you want to install XAMPP:
It’s best to install XAMPP in the root of the C folder, click Next to continue. Then on the next screen you are given some details about the creators of XAMPP. Uncheck the checkbox next to Learn more about Bitnami for XAMPP and click Next. You will then see the ready to install screen, click Next to continue the installation:
XAMPP will then begin the installation, this may take several minutes to complete. Now would be a good time to go and grab yourself something to drink while XAMPP installs!
Once installation is complete, you will see a final dialog box to finish the install and you have an option to start XAMPP right away. Click on the Finish button:
The XAMPP control panel will then launch. You have successfully installed XAMPP:
Now the first thing that you will need to do is to start the Apache and MySQL services, you can do this by clicking on the Start button next to each Module and both services should start. Please note that XAMPP will not work properly of you also have WAMP installed because they will both be competing for the same ports. Once all services are running it should look like this:
To check that everything is working and that the server is running, just type in http://localhost into your browser and you should be taken to the XAMPP homepage:
That means all systems are go and the XAMPP installation is completed. Next you will need to create a database for WordPress. Talk about De Ja Vu!
Just like you did with WAMP, you will need to create a database for WordPress to use and the process is very similar. The only difference here is how to launch phpMyAdmin to create the database, and to do that all you need to do is press the Admin button next to MySQL in the XAMPP control panel:
This will take you directly to the phpMyAdmin user interface panel:
In the same way you created a database in WAMP, you need to click on the Databases tab and then enter a name for your database and click on the Create button:
A database with the name that you specified will be created, again I’m calling mine WordPress. Also, if you remember that username by default is root and the password is blank. That means we now have a database that WordPress can use, next it’s time to get and install WordPress.
Get the latest copy of WordPress from http://Wordpress.org and save it to your computer. Once you download a copy of WordPress make sure to unzip the folder and copy the unzipped folder to your clipboard. You need to place the unzipped WordPress folder inside the htdocs folder in XAMPP, so in my case I installed XAMPP in the root of the C Drive, so my path will be C drive–>XAMPP–>htdocs here’s the path visually:
Remember that there are two levels in the WordPress folder, for simplicity I’m going to remove the version number from the folder name and just have it as WordPress, and inside this folder is another folder called WordPress. You can rename this folder if you like or you can just simply copy the contents of this folder and paste it into the root of the htdocs folder so that you only have to type localhost/wordpress to access the website:
We can now install WordPress on XAMPP, to do so you need to point your browser to http://localhost/wordpress – note I don’t have a main folder inside another, if you just pasted the original folder and renamed it you will need to go to http://localhost/wordpress/wordpress – or whatever you renamed the second folder to. You will be taken to the installation page for WordPress:
Click on the Create a Configuration File button to create the wp-config file. Note: you can bypass this screen altogether if you rename the wp-conifg-sample.php file to wp-config.php and enter the database name, username and password and save the file.
You will then be taken to an information screen that outlines what you will need for WordPress to install click Let’s go to proceed, you will then be taken to the database configuration page:
Here you will need to enter the database name, I called mine wordPress, the username which is root and the password which is blank. Leave the database host and table prefix as the defaults. When ready click on Submit. If all the details were correct and there were no errors you should receive a message confirming that WordPress can communicate with the database. Click on the Run the Install button to proceed.
The next screen is where you enter the site information, enter an admin password and email:
Again, it’s worth leaving the Allow search engines to index this site unchecked as the site is offline. When you’re ready click Install WordPress to complete the WordPress Installation:
Viola! WordPress is now installed, and you can login to the admin panel and view the site front-end by typing in http://localhost/wordpress.
I hope this step-by-step tutorial will help you to install WordPress locally on your Windows computer. Both of these open source applications are a great way to install WordPress locally on your Windows machine, and you can install as many copies of WordPress as you wish.
In terms of the question: ‘which one is better?’ This usually comes down to preference, there really isn’t much too choose between the two applications. XAMPP is bit more portable, since you can install it on multiple platforms, personally I prefer XAMPP, because I just think that it runs a bit faster and is easier to use than WAMP. But, take nothing away from WAMP, it is a popular option with thousands of users.
Which one do you prefer and use? Let me know in the comments below.
On the fence about using Divi AI to improve your workflows when building websites with…
Kinsta is a recognizable brand in the WordPress hosting space. The main thing that sets…
Searching for the best WordPress maintenance service to get a little helping hand with your…
Do you really need managed WordPress hosting? Let's face it: Running a WordPress blog or…
WP Engine is one of the very first companies to start offering tailor-made hosting for…
Cloudways is a very original type of a web hosting company when compared to other…
View Comments
I used to do most of theses, but nowadays I just use InstantWP (see http://www.instantwp.com/ ). One click and I am all done. Saves so much time
Thanks for your help. Great tutorial.
Great tutorial. I already have WordPress in stalled on my computer. I'm using GoDaddy to host my blog, do you know if that will have an effect on where I install Wamp?
Hey John,
No, it doesn't matter where you install WAMP. Your blog / site on Godaddy should be fine.
I got to myphp and it is asking for a username and password. I don't remember establishing those. What may I do?
I have window 7 ultimate 32 bit in my pc due to this localbyflwheels is showing 502 bad gateway error. Can I run 64bit wordpress development environment in it or any things within my pc? Kindly help me to operate it.
Thanks in advance.